|
Since the Master Bathroom was the last room to be renovated, I suppose it is time for the final house tour. It is crazy to look back at how much the house changed and how much we learned in the process. It definitely makes me sad knowing that we sold such an awesome home, but we'll always be looking for our next flip (the bug is still in us)! Exterior - Before & After 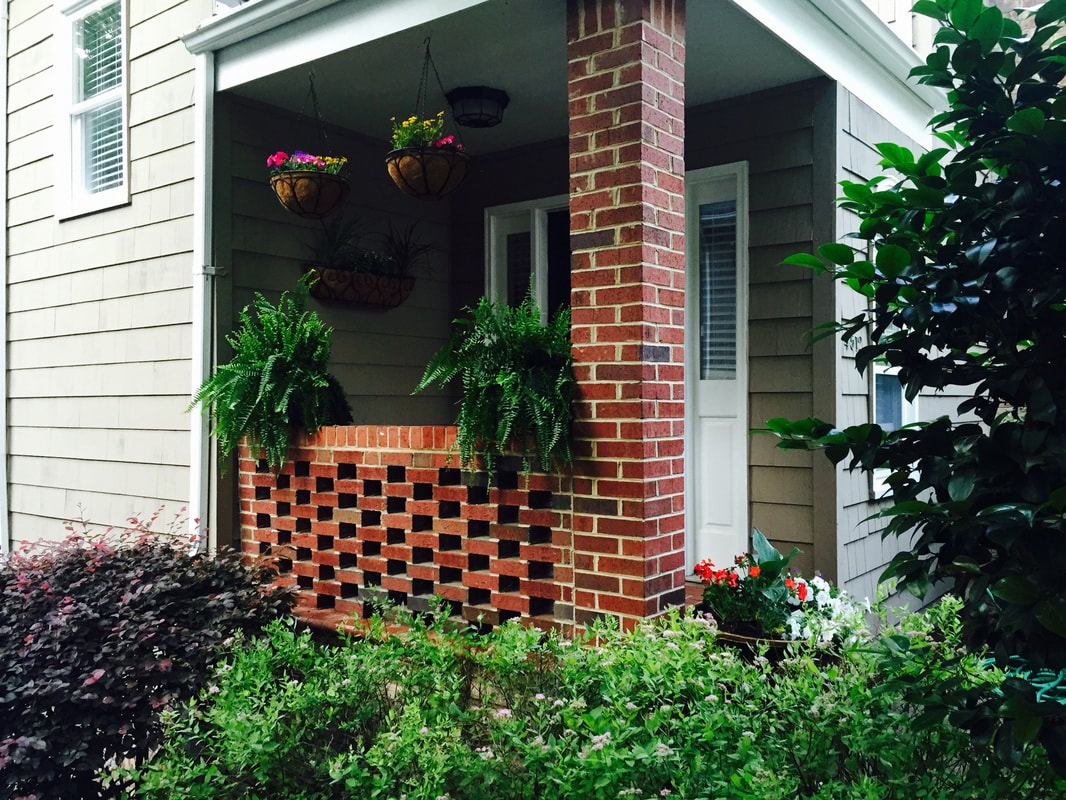 Foyer - Before and After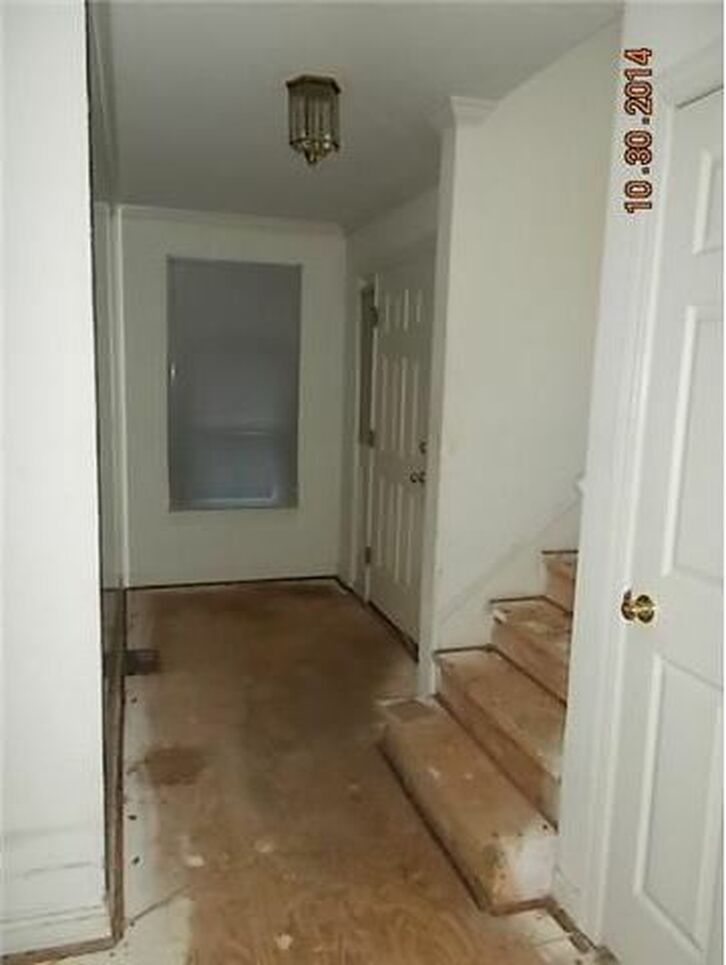 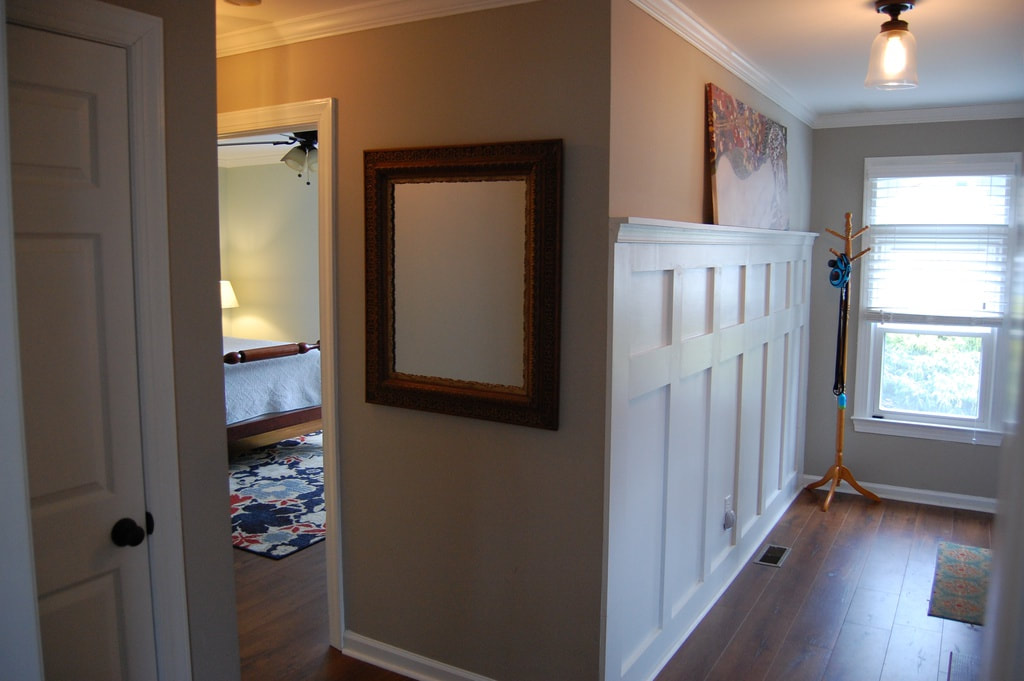 First Floor Bedroom - Before & After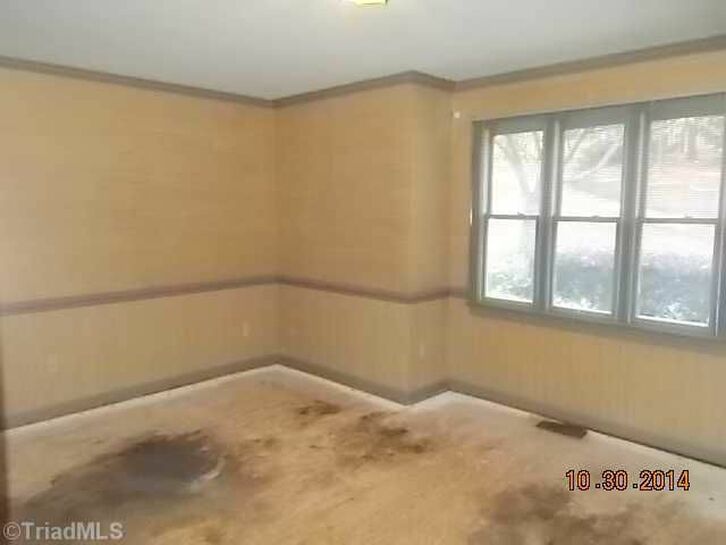 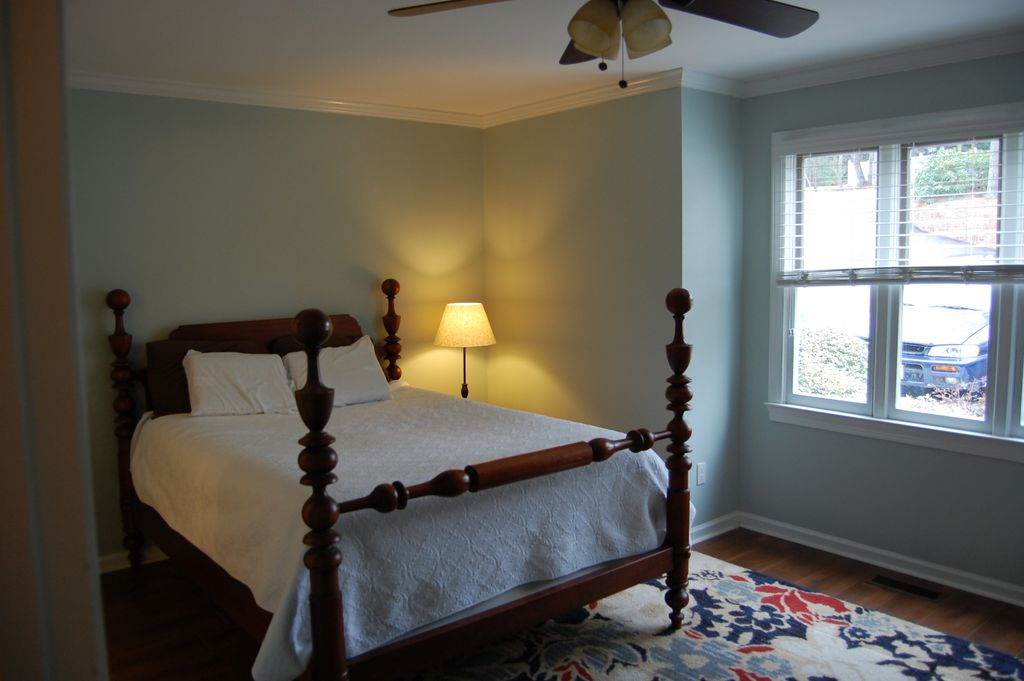 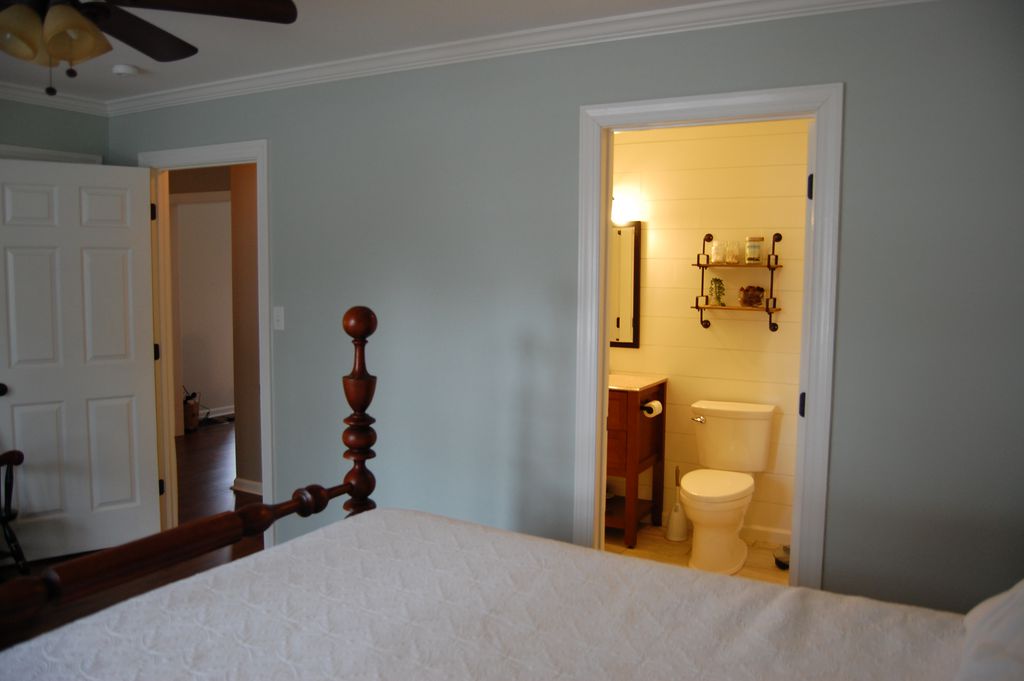 First Floor Bathroom - Before & After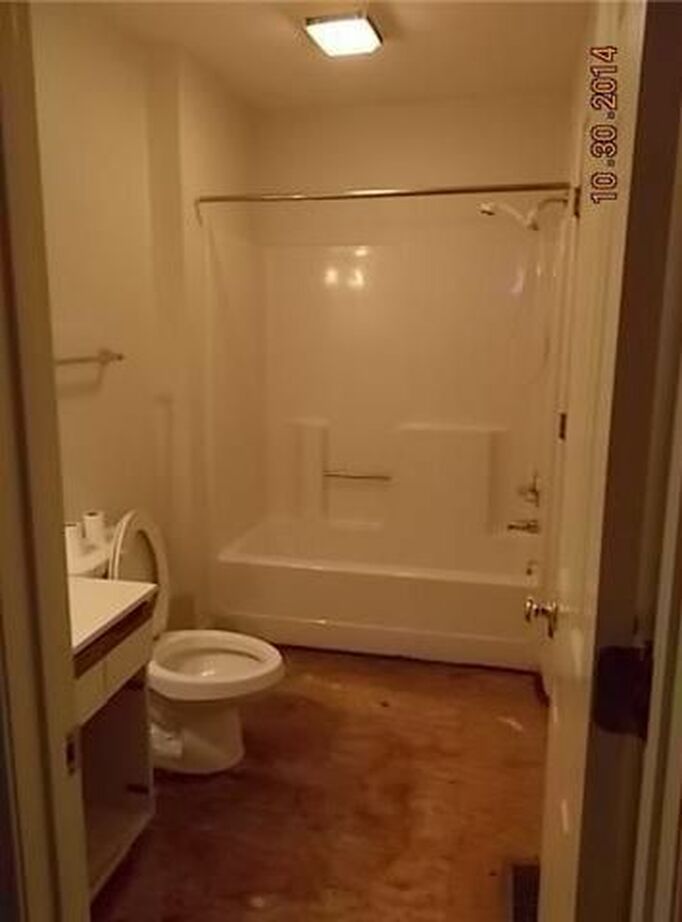  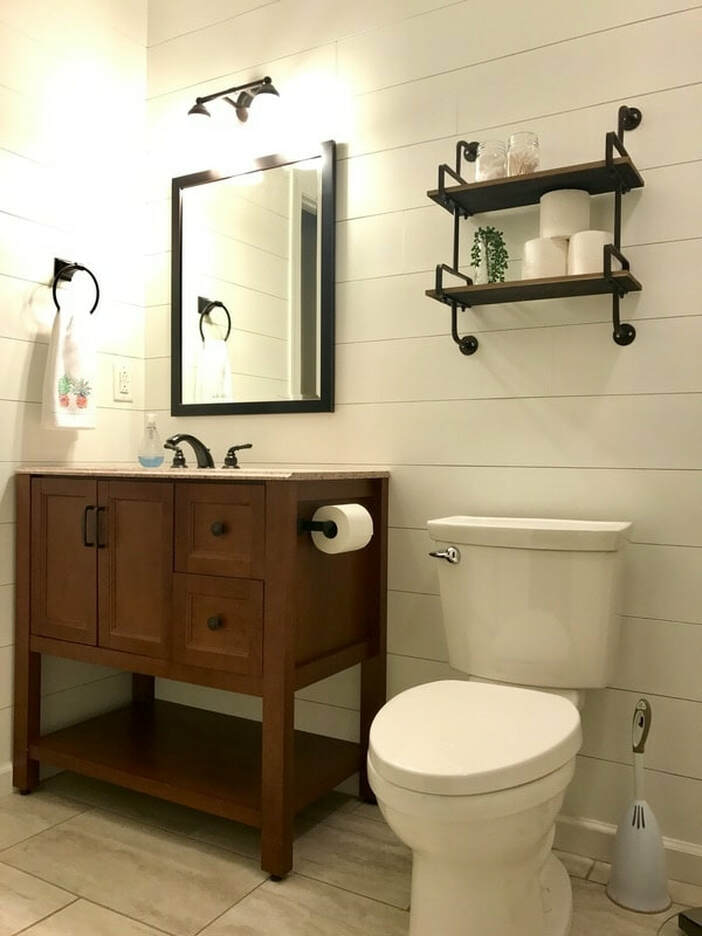 Dining Room - Before & After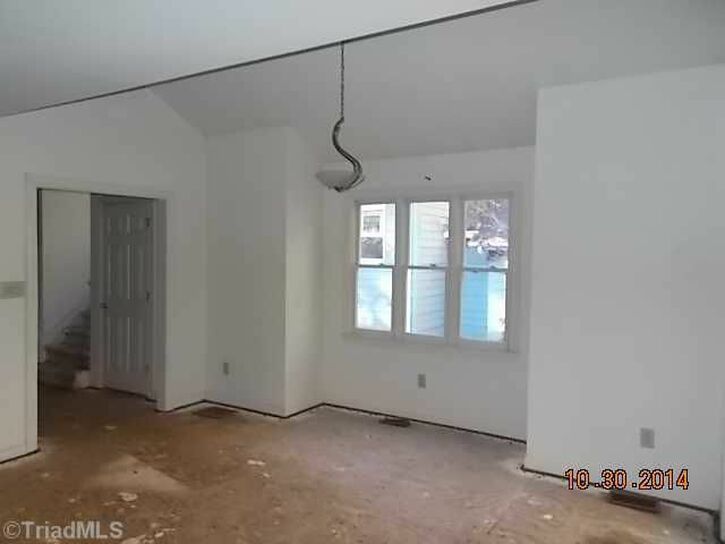   Kitchen - Before & After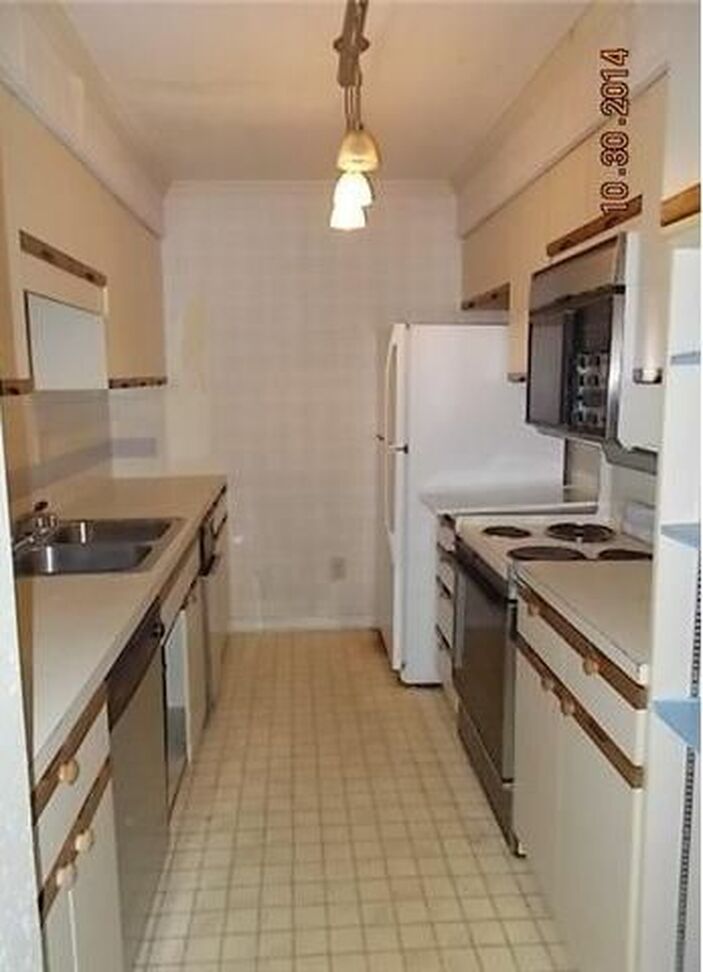 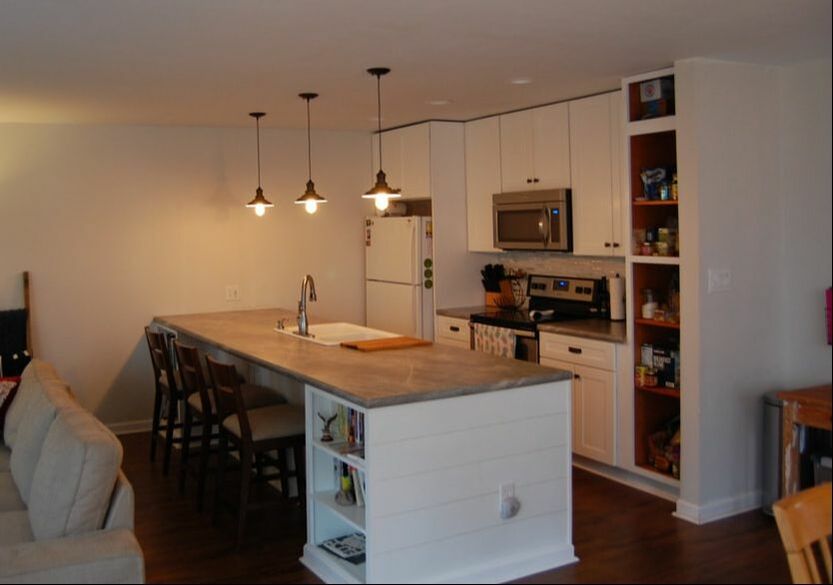 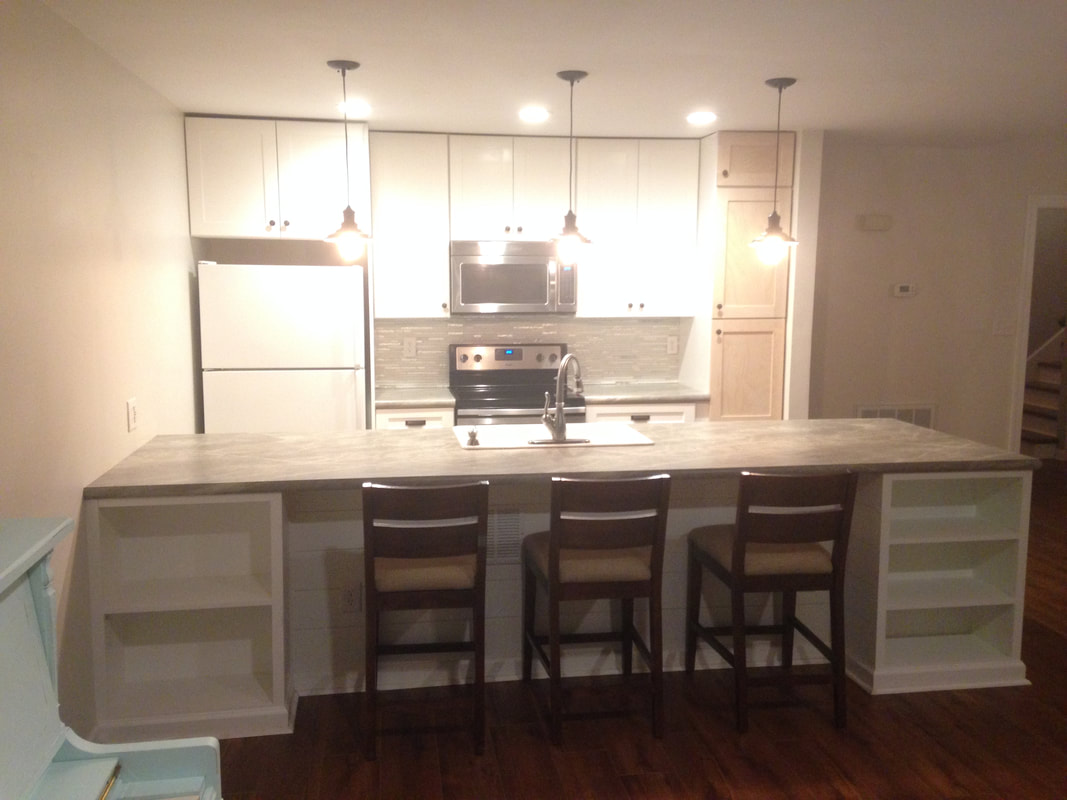 One of the final projects we never got to finish was painting the pantry doors. They were custom built about a week before we closed on the house. A small project for the new homeowner! Living Room - Before & After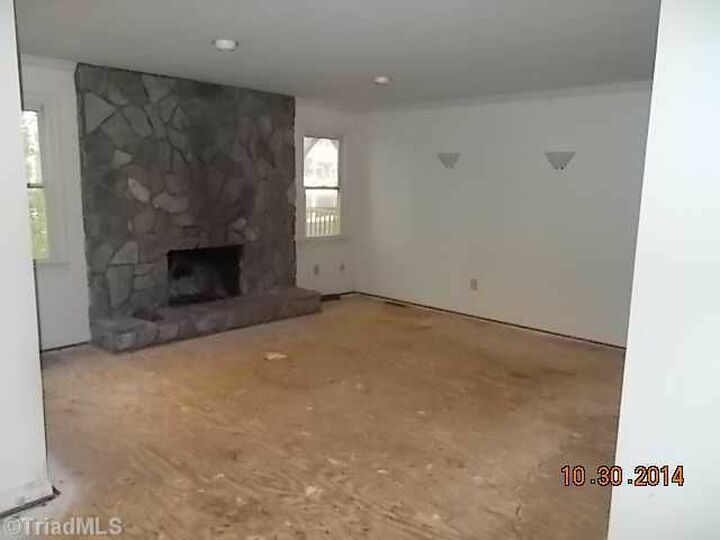 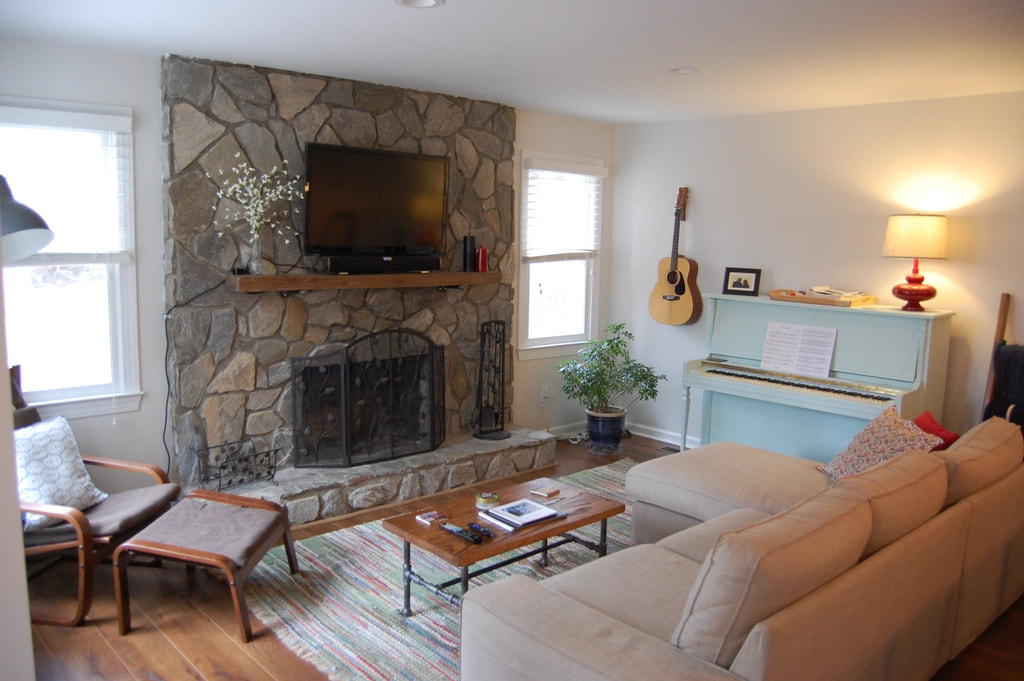 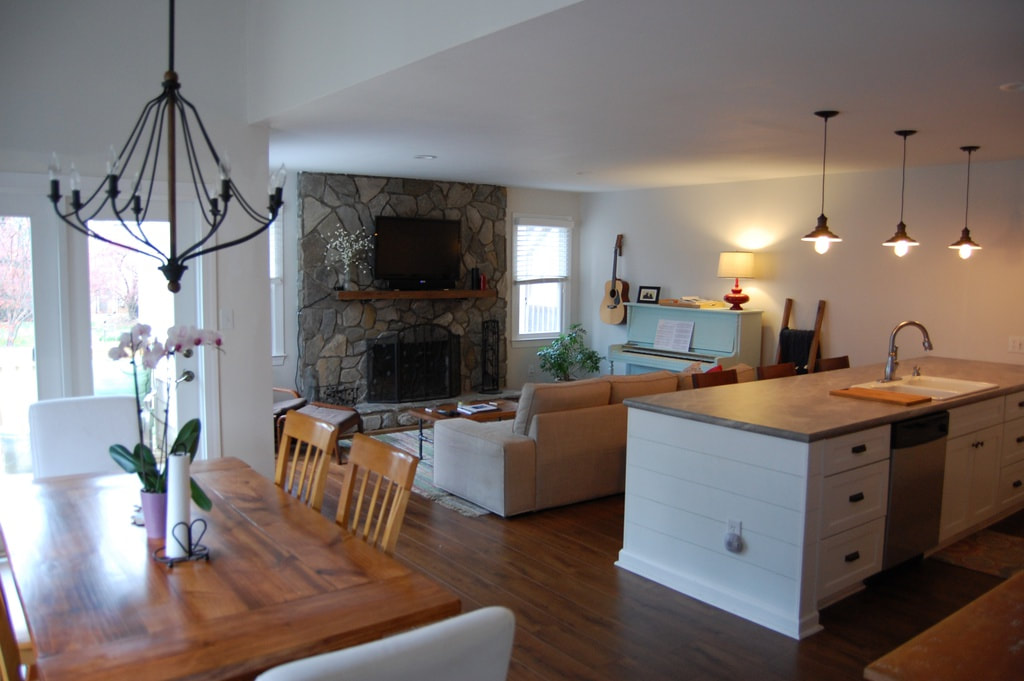 Stairs - Before & After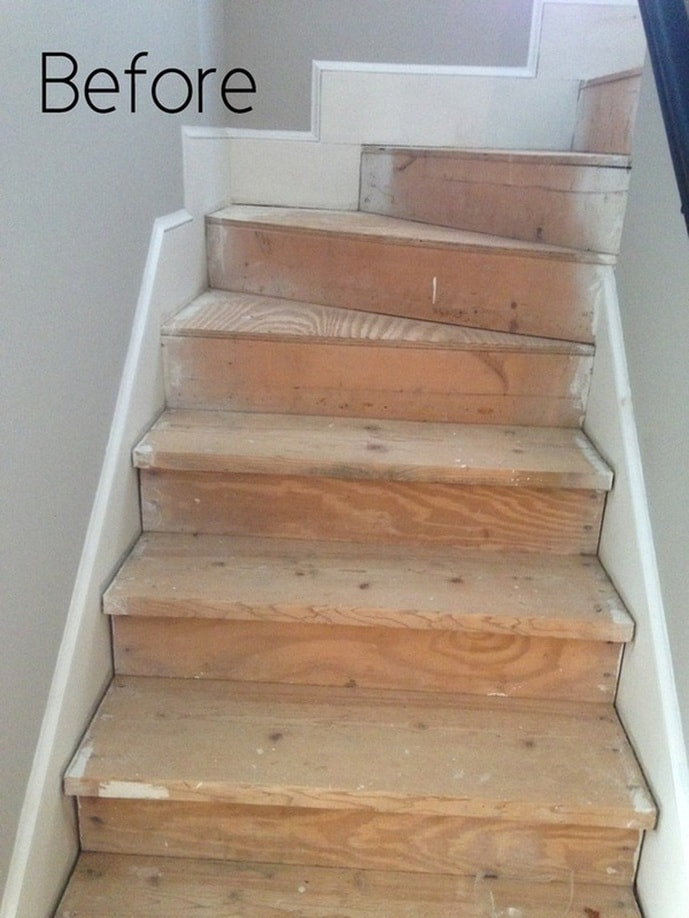 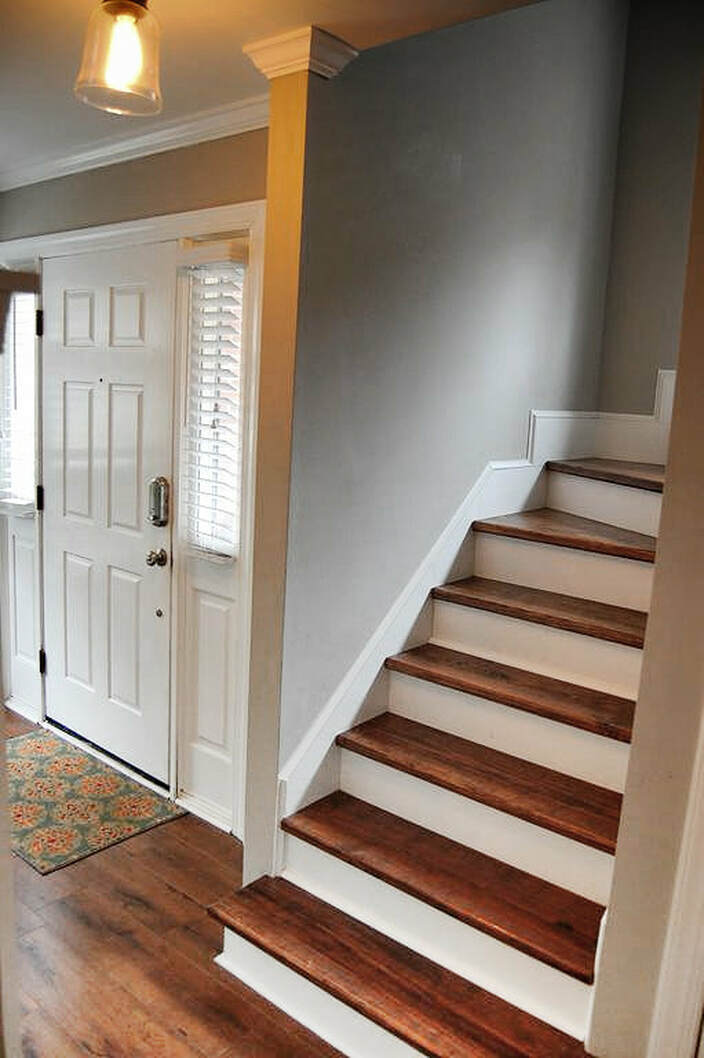 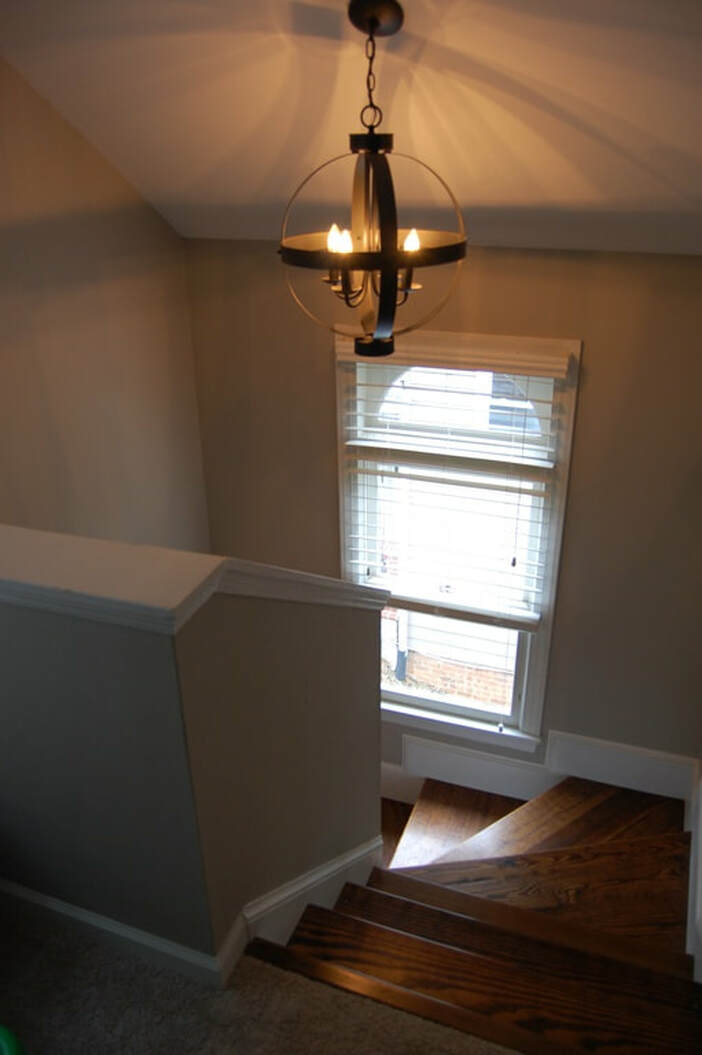 Upstairs Guest Bedroom - Before & After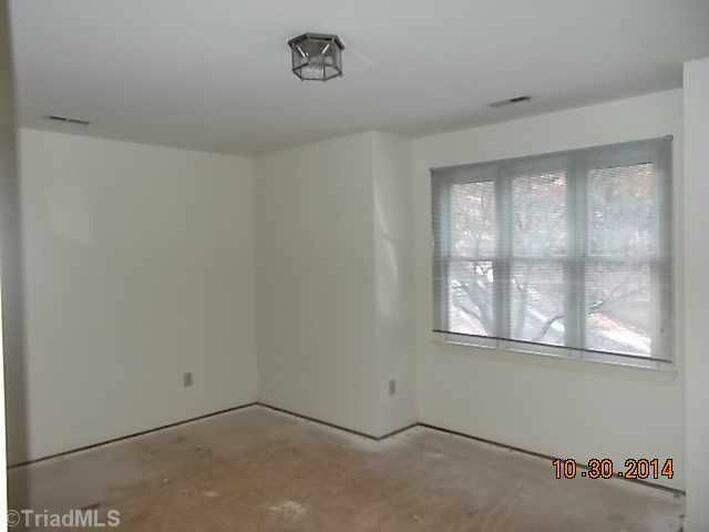  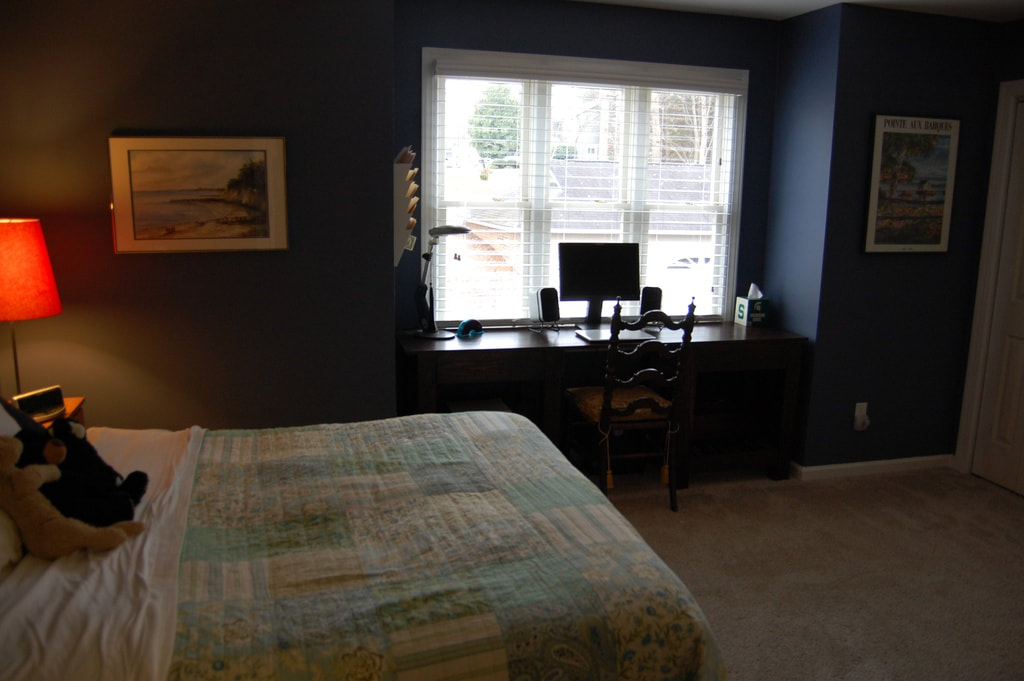 Upstairs Guest Bathroom - Before & After 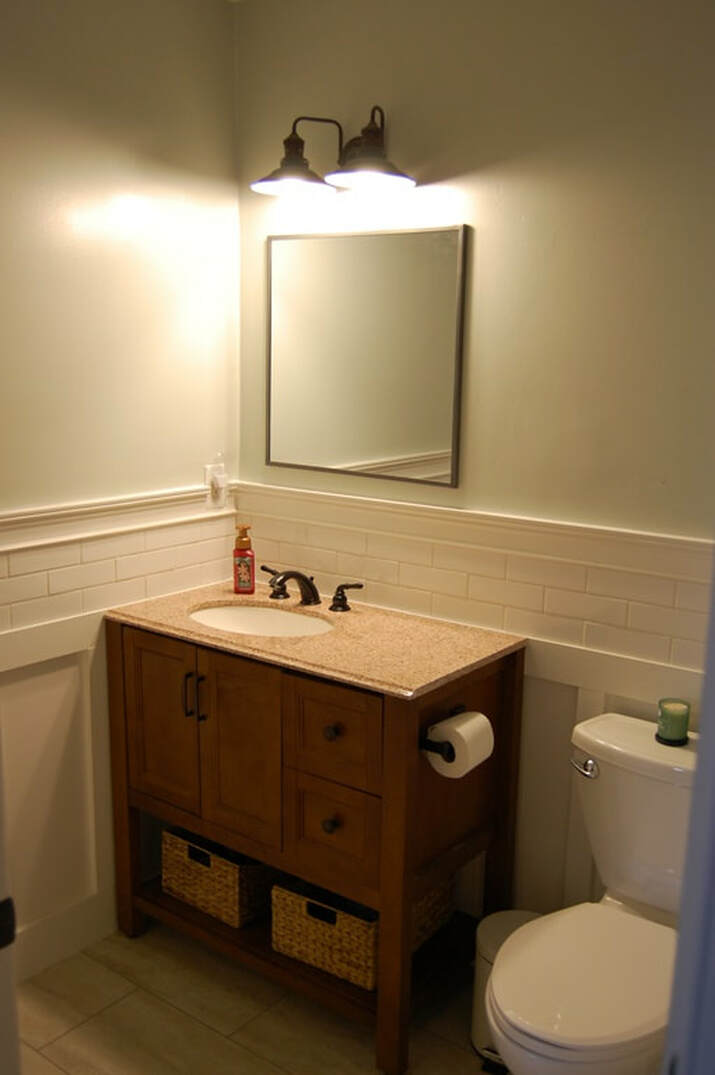 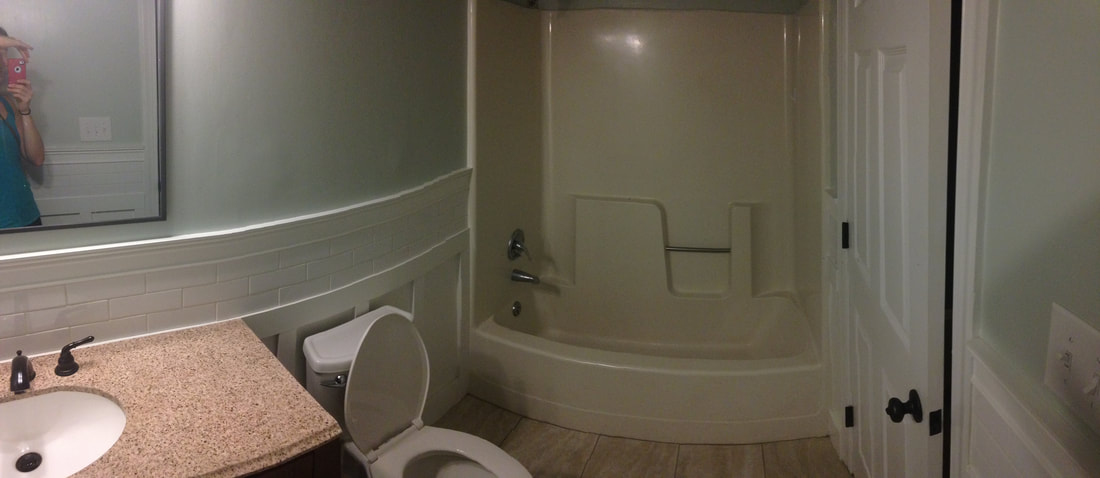 Master Bedroom - Before & After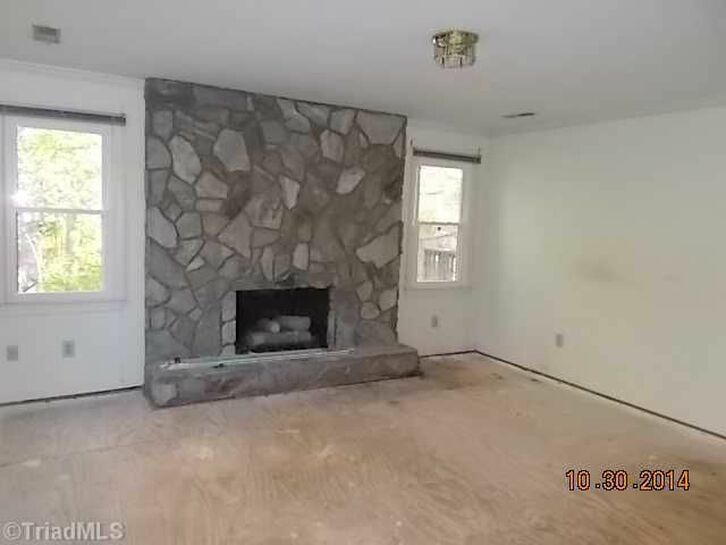 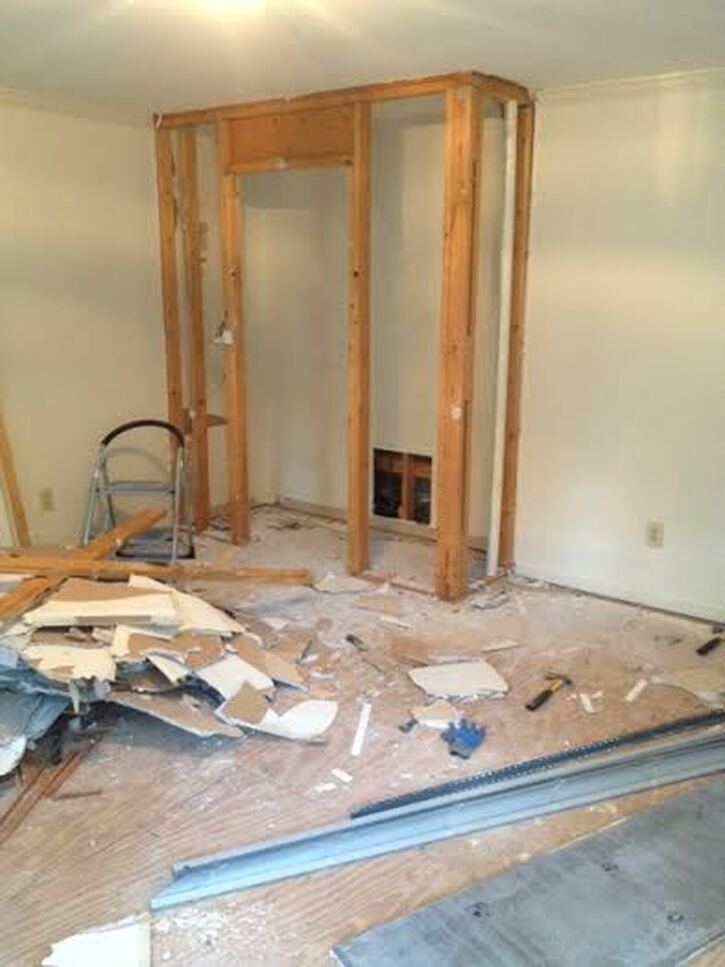 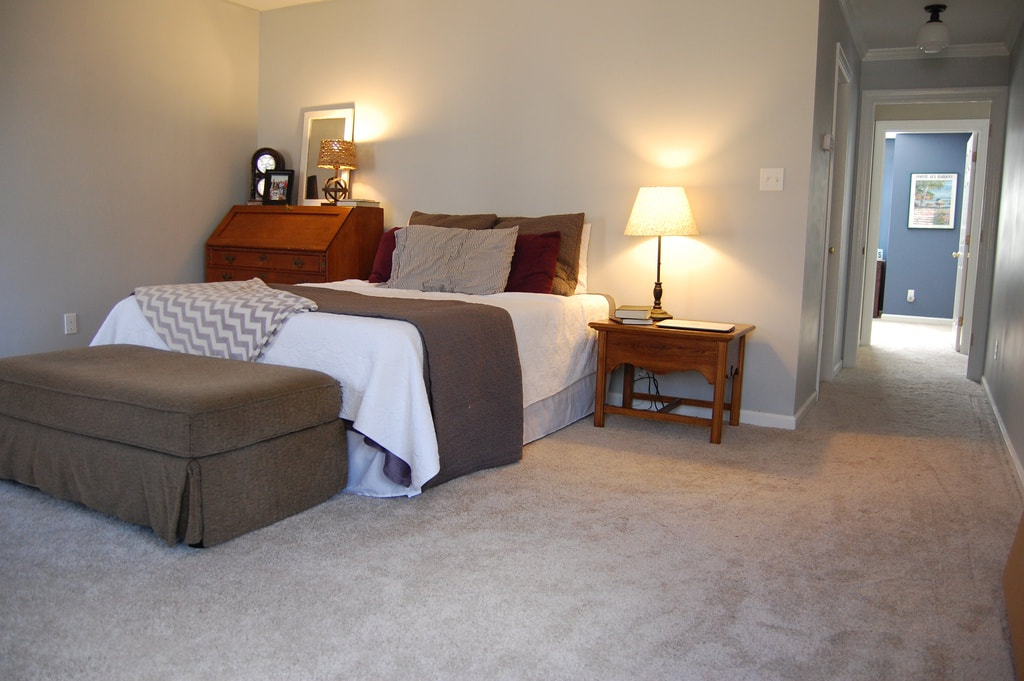 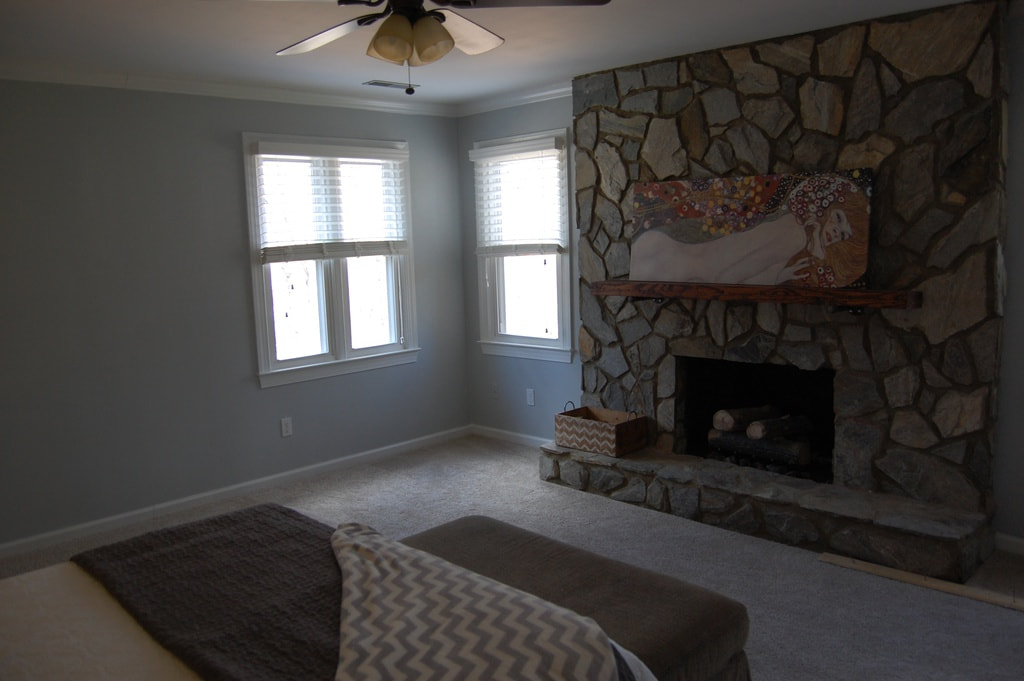 Master Bathroom - Before & After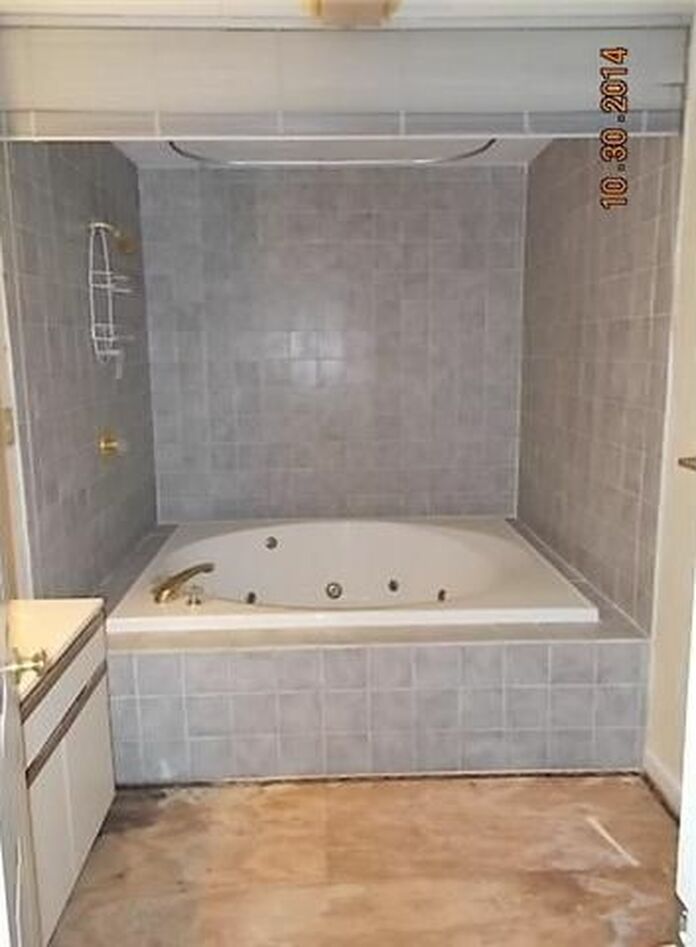   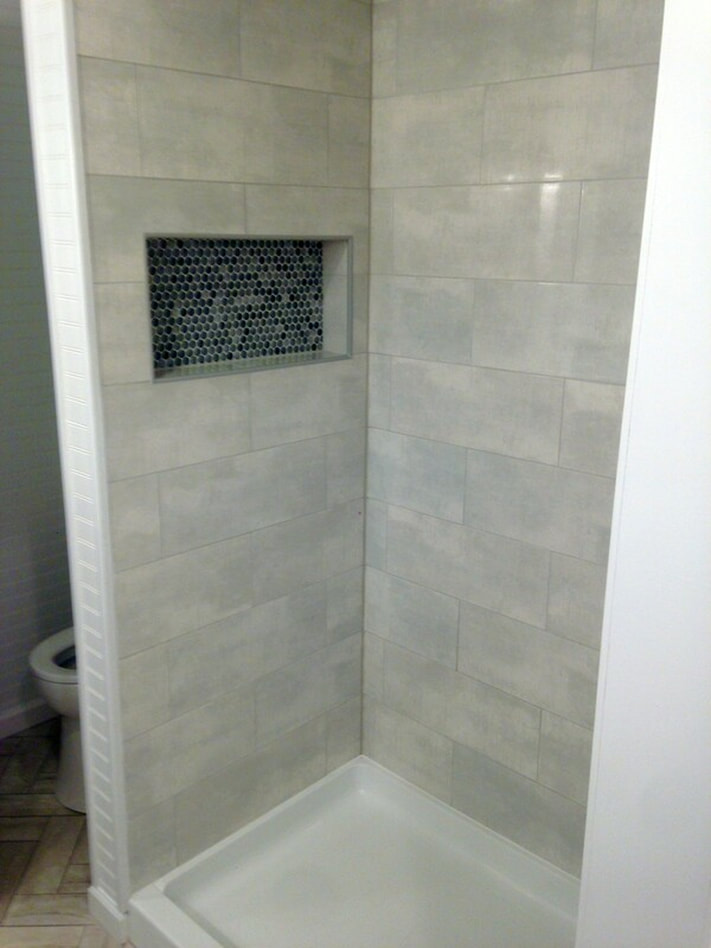 Basement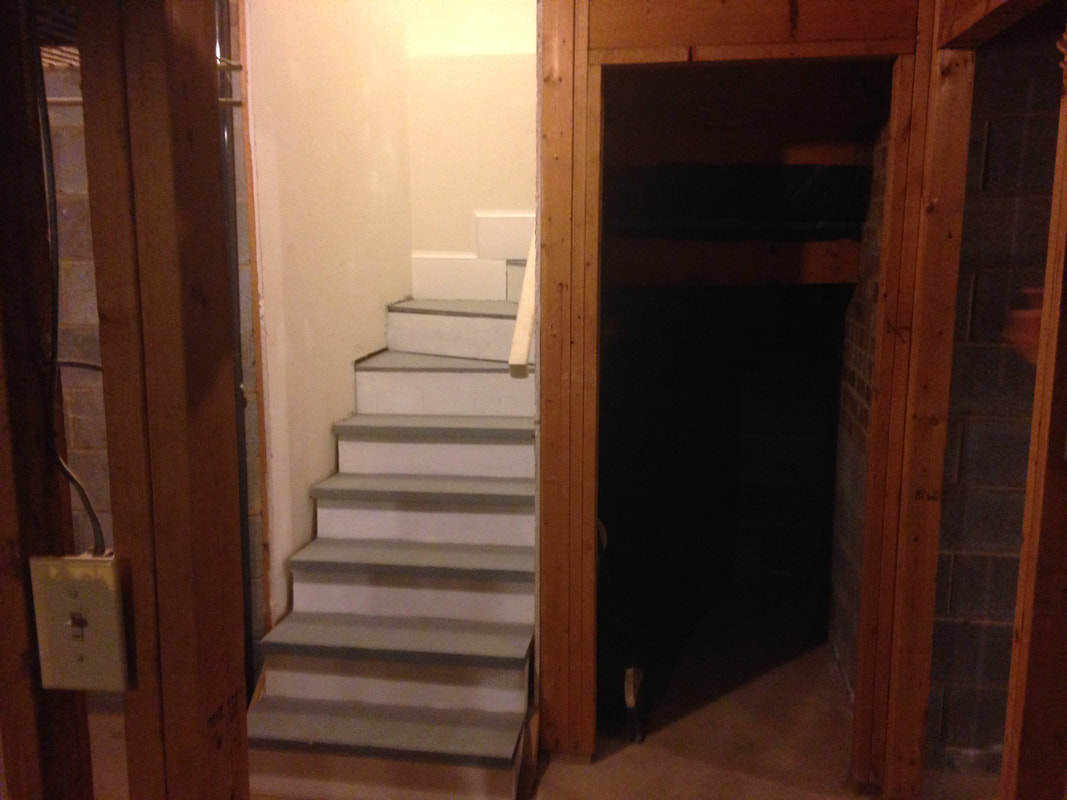 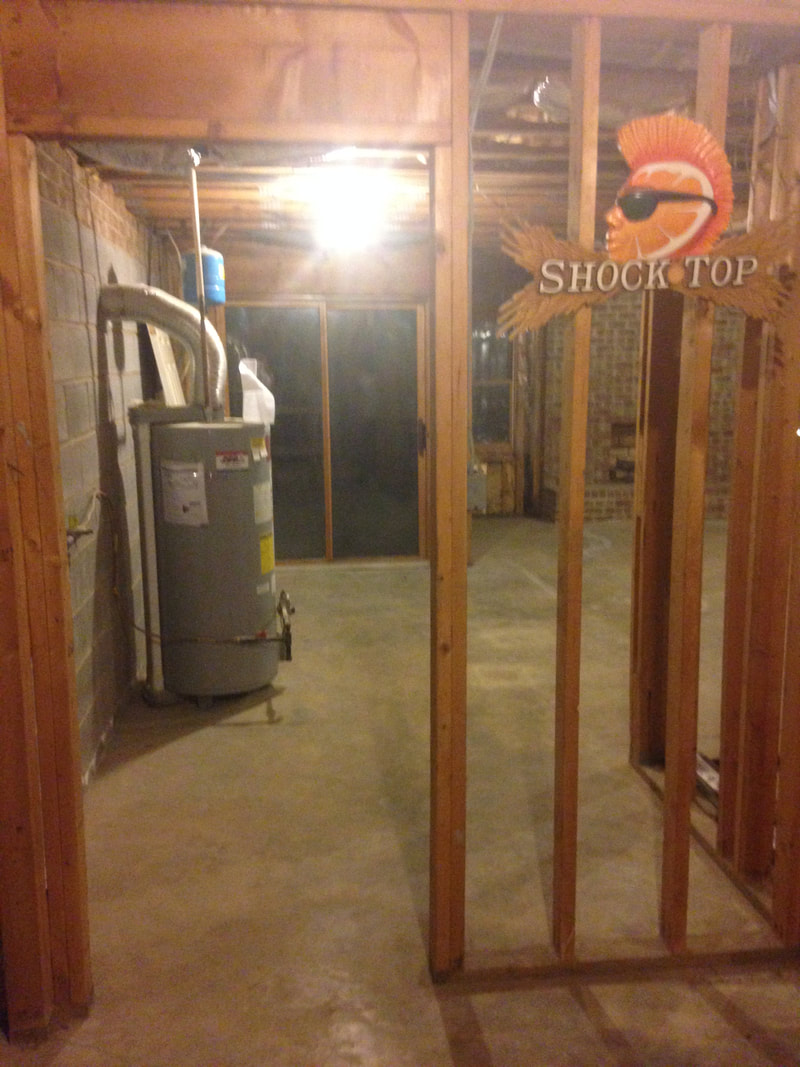 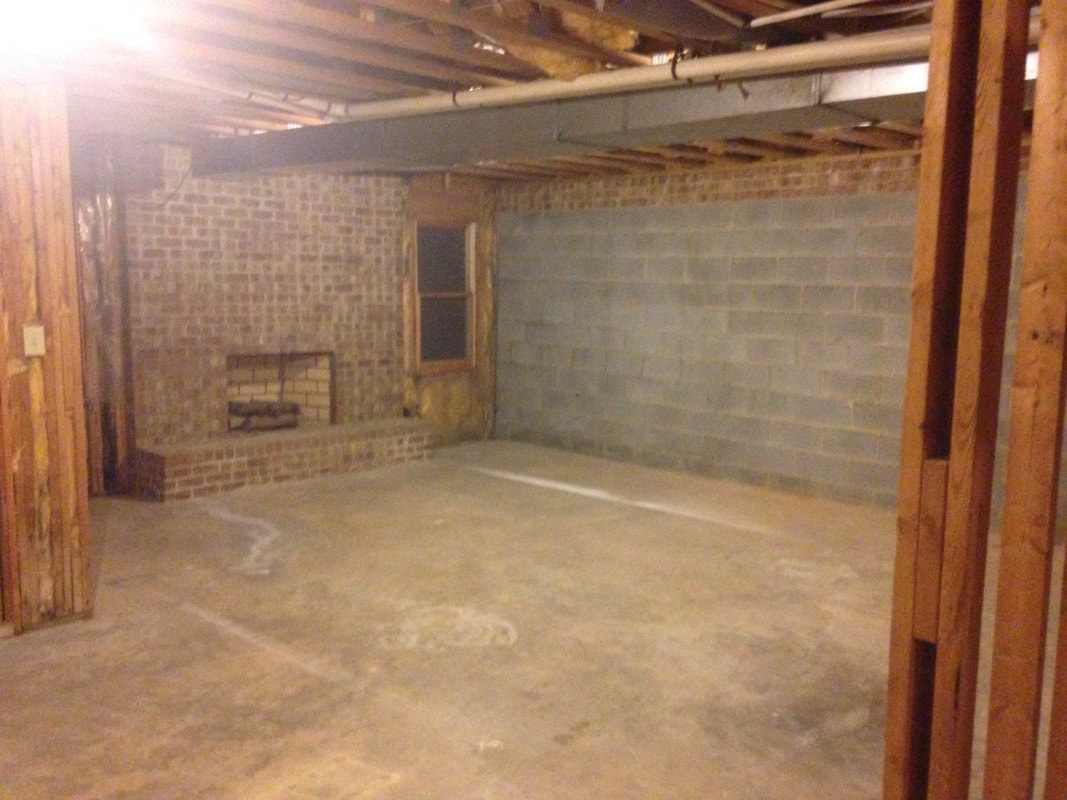 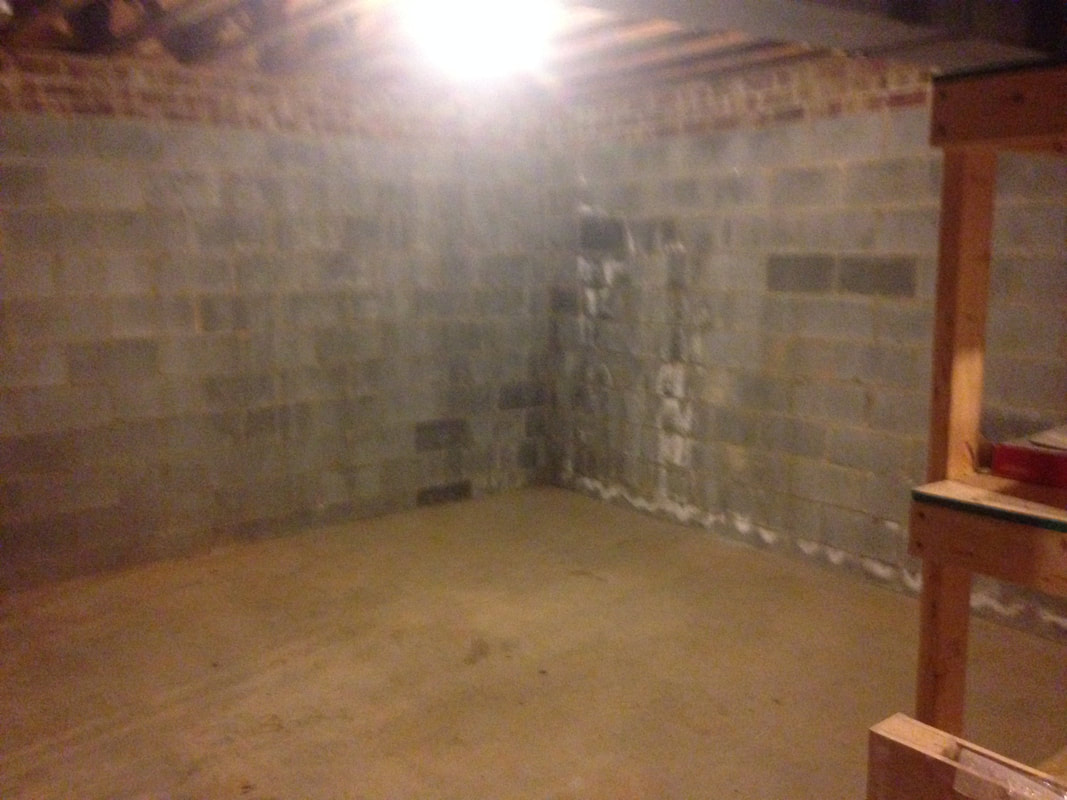 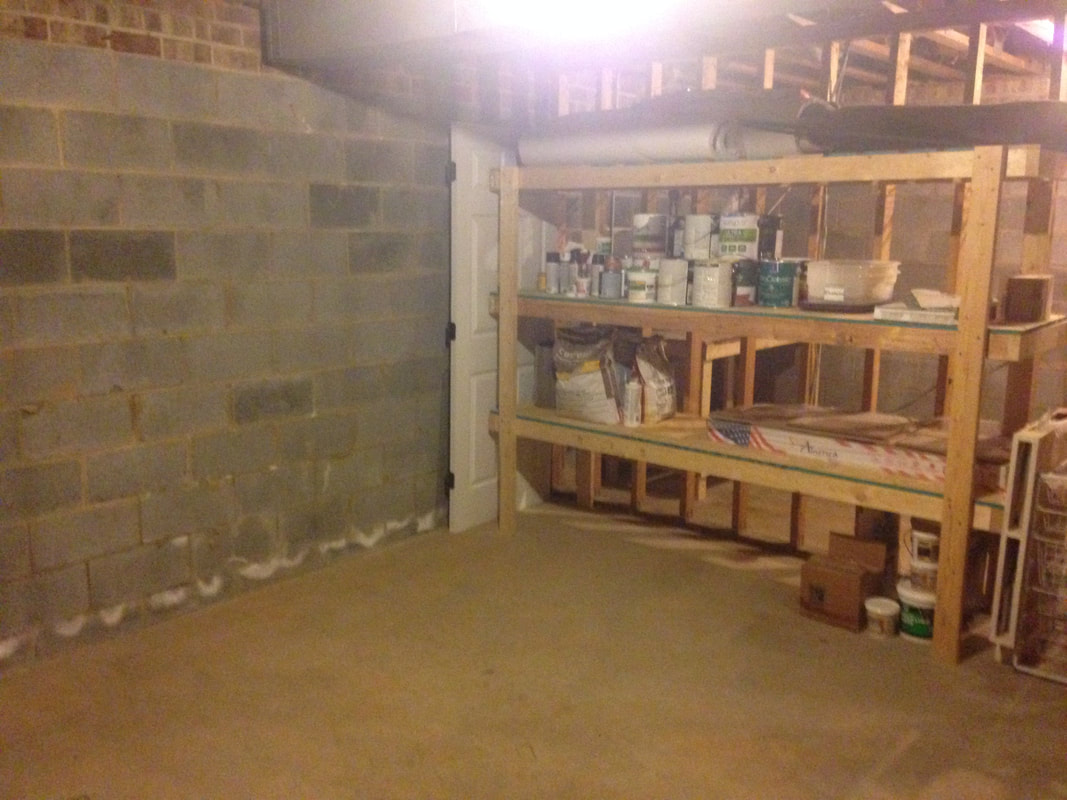 What a journey! Cheers!
0 Comments
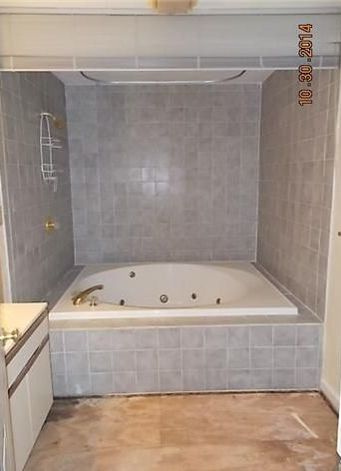
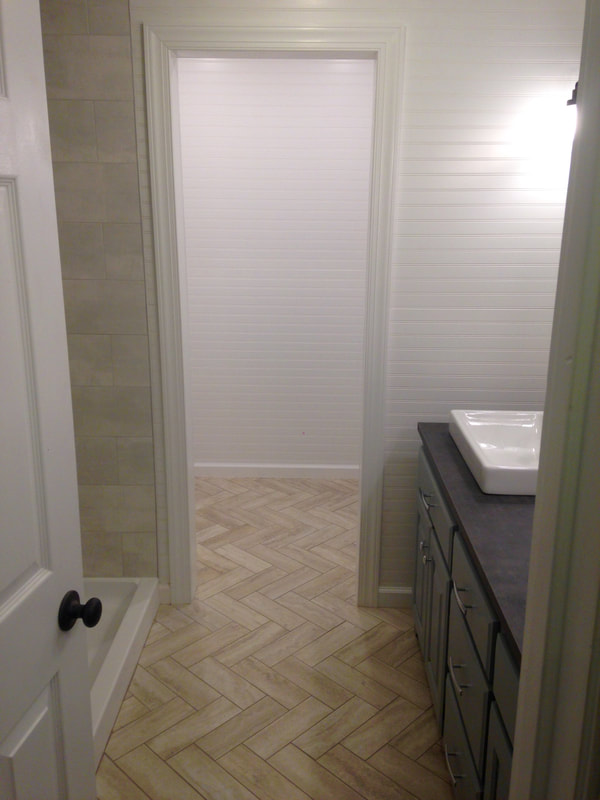
After almost three years, the Master Bathroom is finally finished! We literally put the last touch on AFTER we closed on the house (I forgot to caulk around the shower handle). With about $3000 invested and lots of blood, sweat, and tears, it was a total transformation. 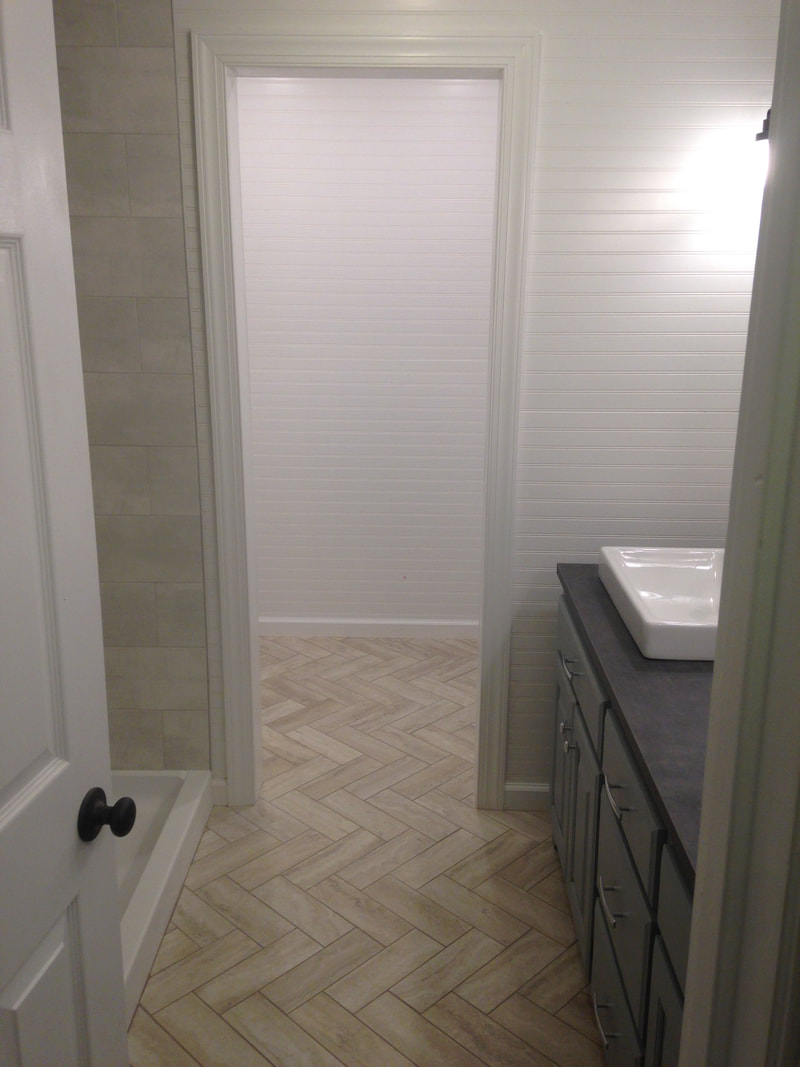 A view of the empty closet area. If we hadn't sold the house, we would have built custom storage for the closet, including two or three built-in dressers, space for shoes and accessories, and poles to hang shirts/dresses. However, the new owner will be able to layout storage in the closet as they see fit. 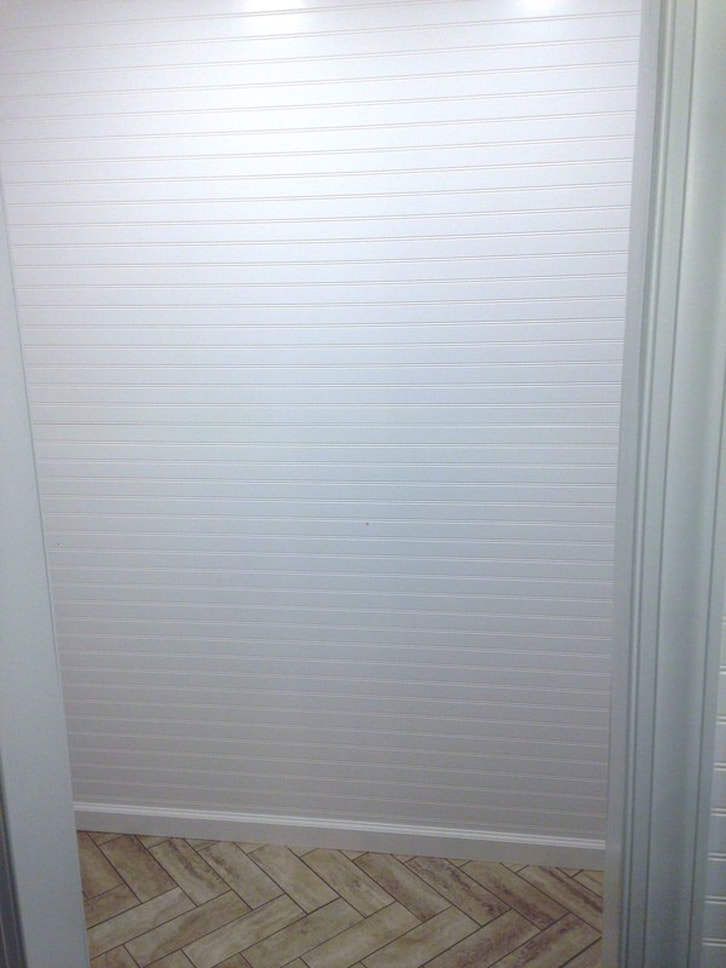 The soffit in the closet hides a giant pipe coming from the other bathroom. I think it turned out pretty well! 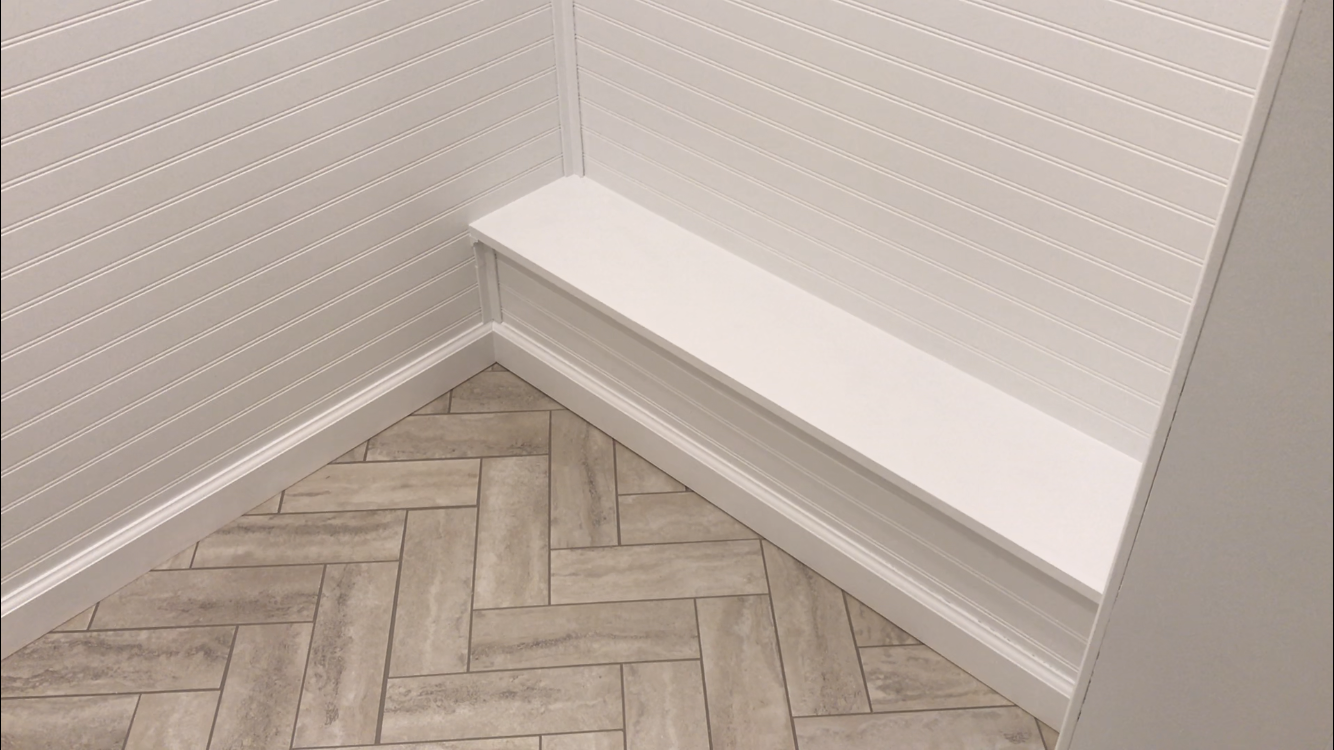 Apparently it was difficult for me to get the entire shower in one shot... 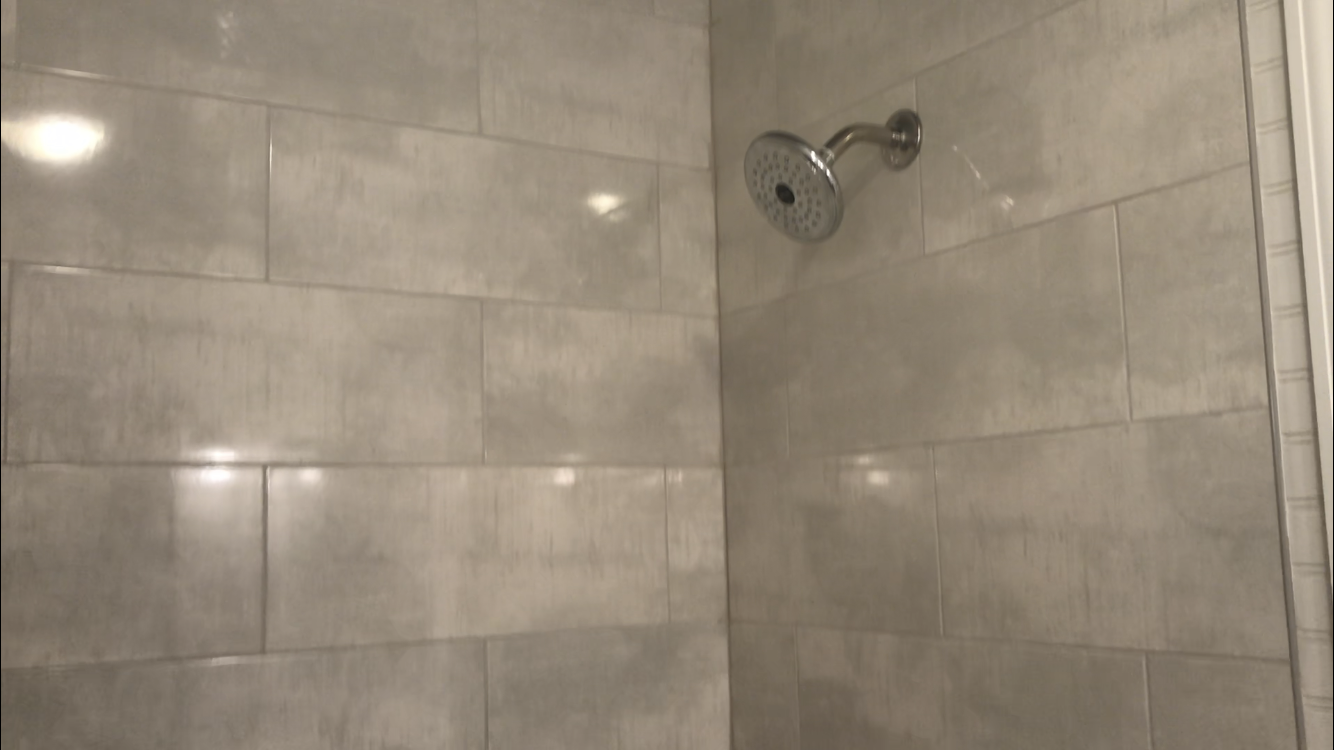 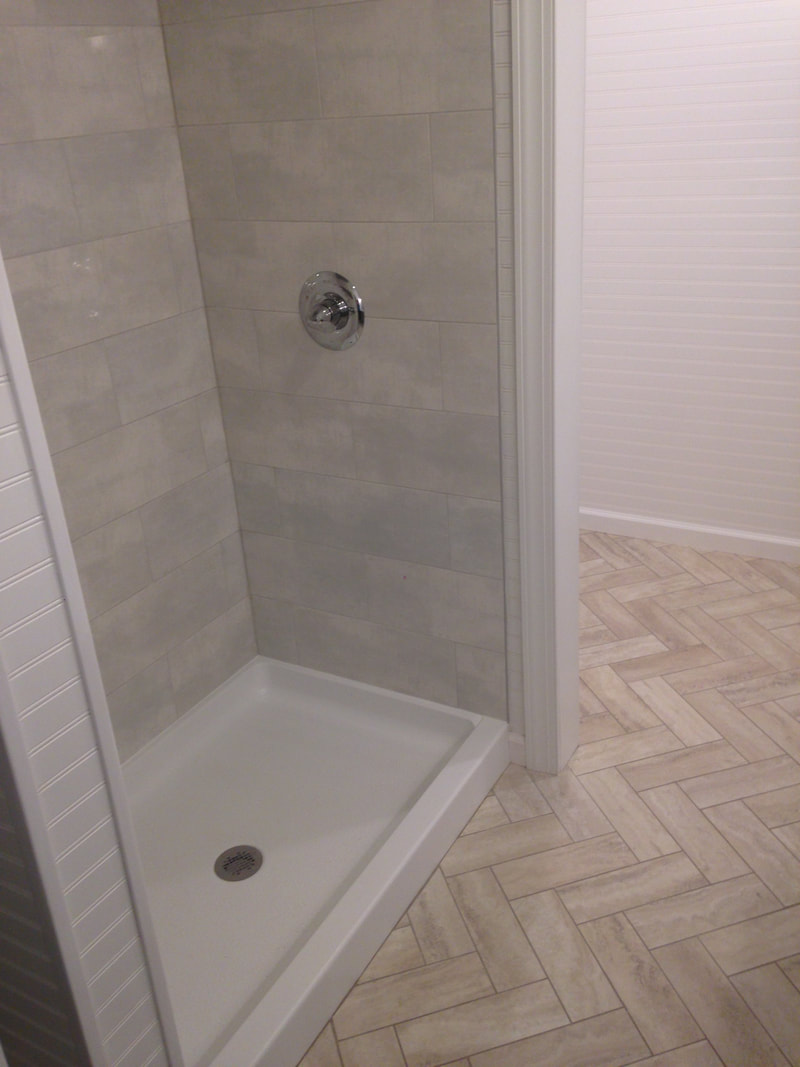 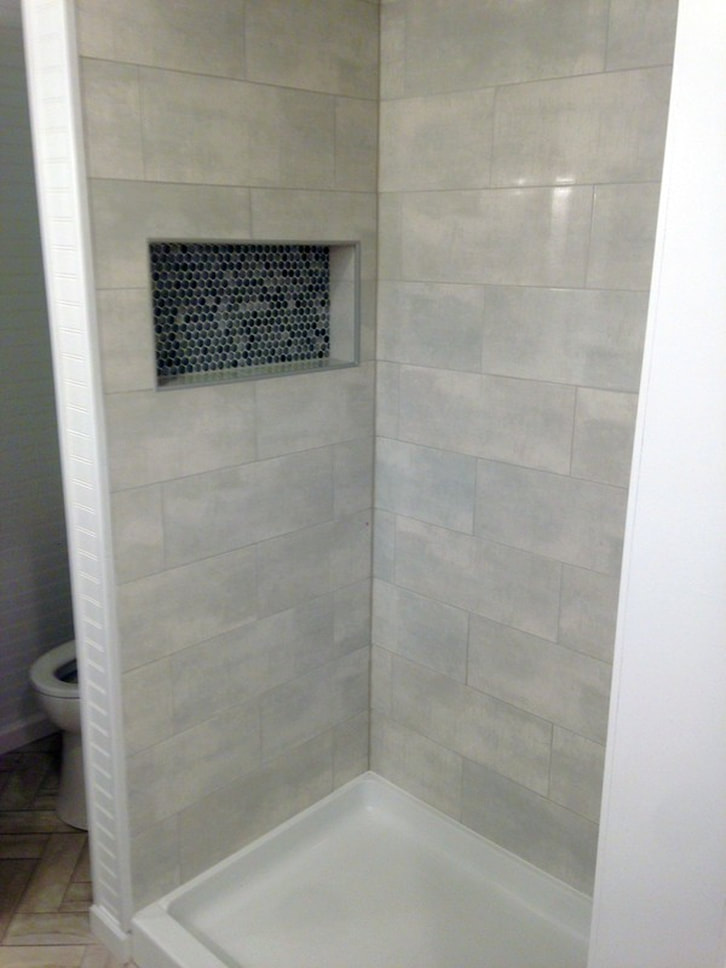 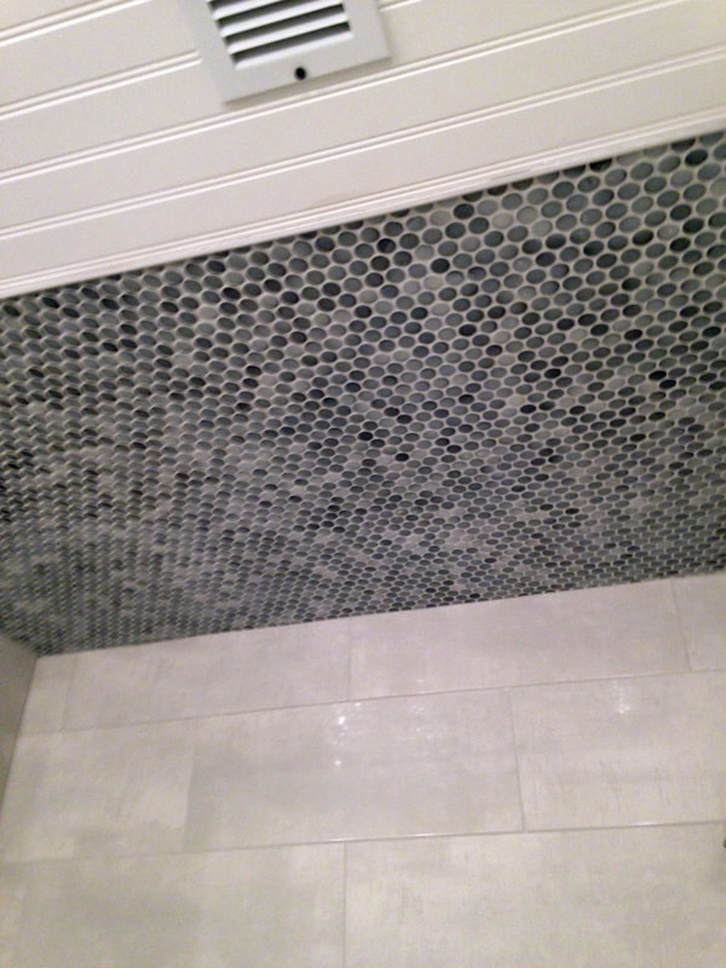 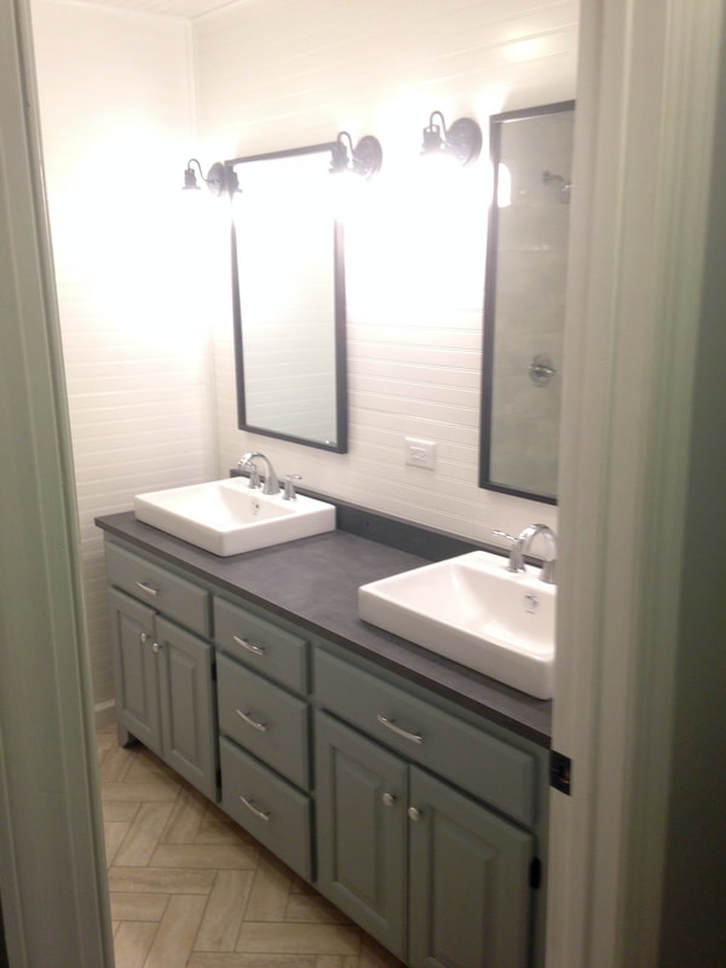 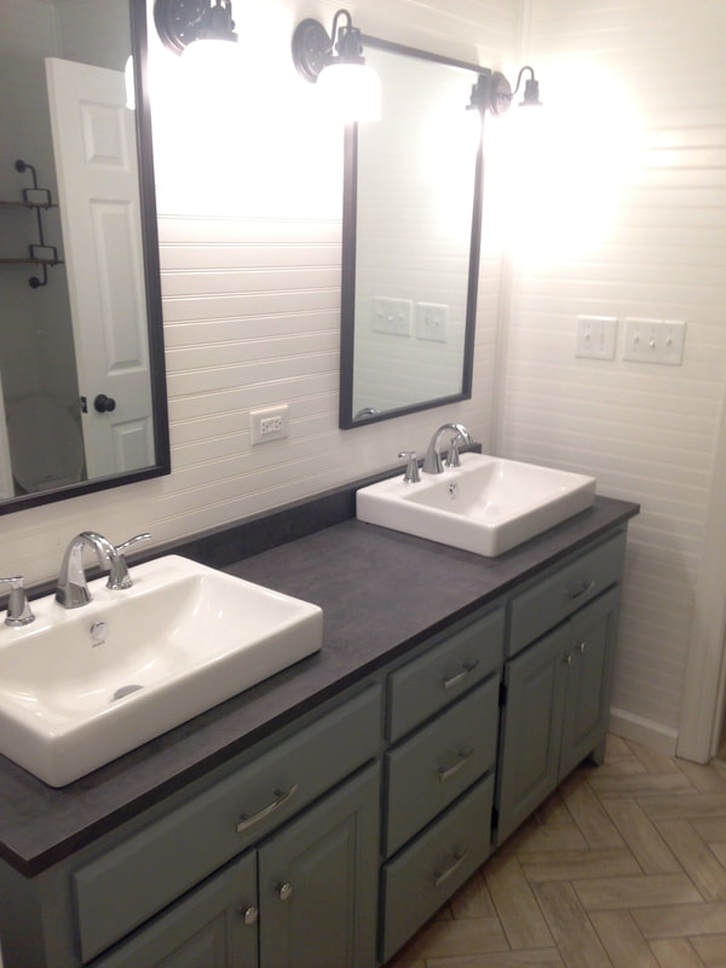 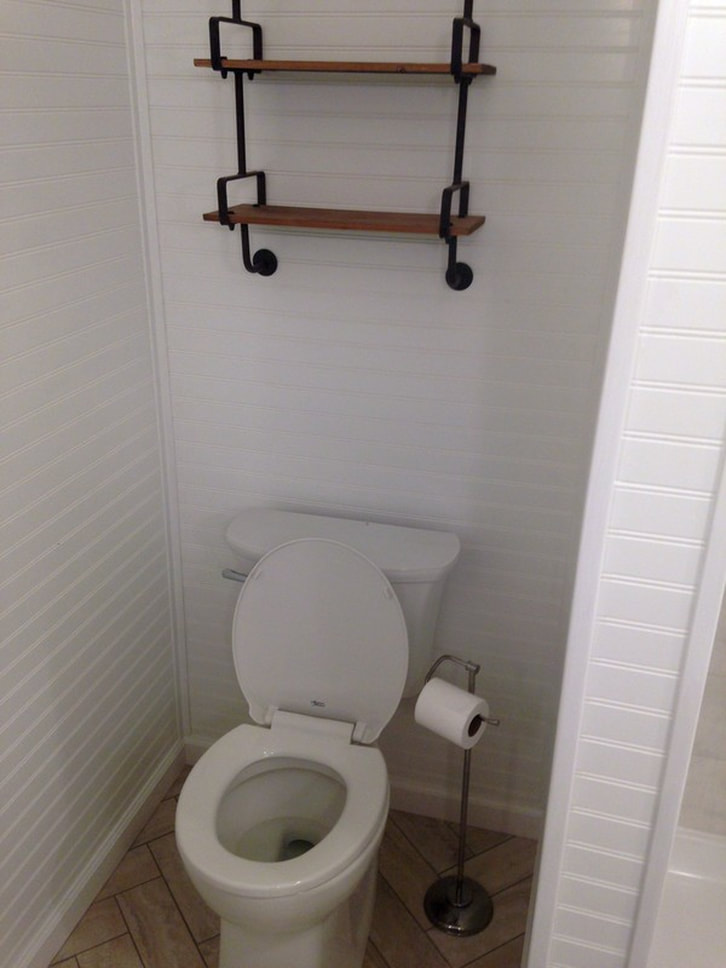 I really wish my pictures were better quality, but since we were in such a rush to finish, I only took them on my cell phone (and apparently not great pictures at that). I wish we could have styled the bathroom with pretty flowers and towels, however these final pictures were taken at 1 am the night before we closed. To remind you, here's a quick before and after picture taken from the hallway:
A recap of the materials used:
Luxury Vinyl Tile - Lowe's @ $1.00/square foot Vessel Sinks - Lowe's @ $99.00 each Faucets - Lowe's @ $89.00 each Delta Shower Kit - Lowe's @ $129.00 Swanstone Shower Pan - Lowe's @ $350.00 Wall Sconces - Amazon @ $25.00 each Vanity - Craig's List @ $30.00 Vanity Top - Ikea @ $99.00 American Standard Toilet - $179.00 Shower Tile - Floor & Decor @ roughly $175.00 total Beadboard - Lowe's @ $20.00/each (although I don't remember it costing this much) Shelf above toilet - Hobby Lobby @ $25.00 (on sale) Mirrors - Hobby Lobby @ $60.00 each (on sale). I spray painted them oil rubbed bronze to match the lights. The shower definitely caused us the most strife in the Master Bathroom. We had to do the most research to see what products we should and should not use, how to frame it up, what kind of base to use, etc. Tears were definitely shed every time we realized we did something wrong and had to go back and fix it. We framed up the shower years ago, and when we finally got around to finishing the bathroom, we were so glad we took the time to frame it properly. 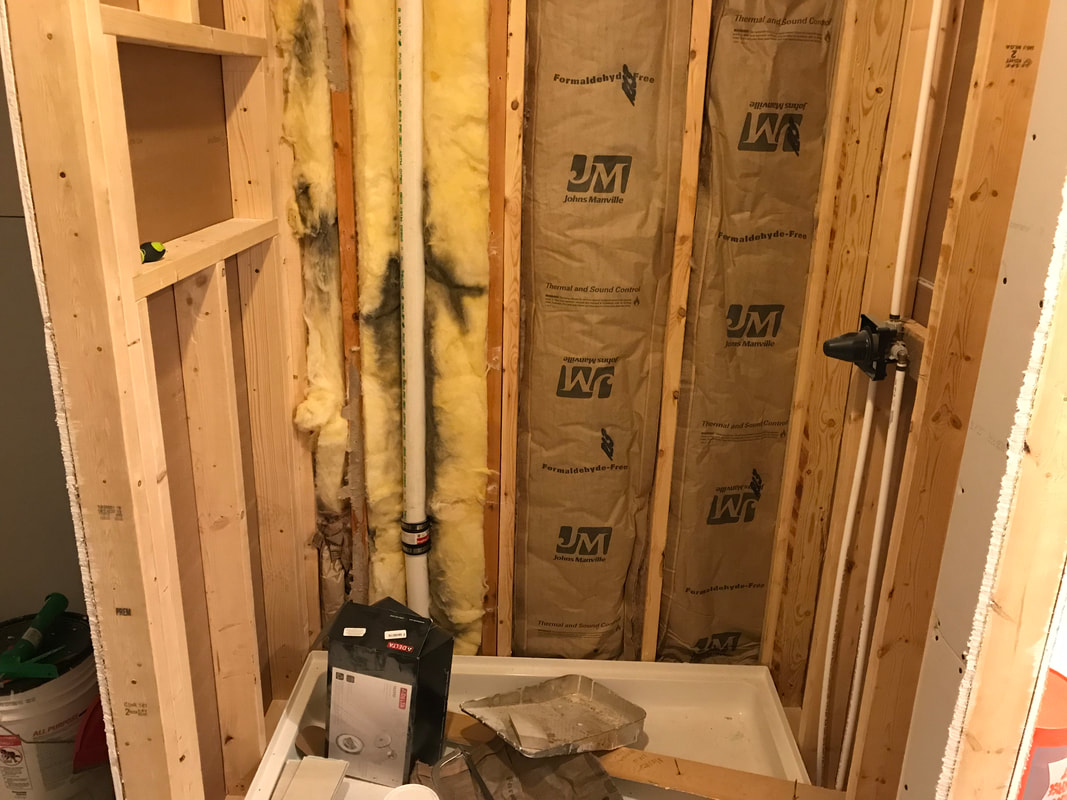 We added insulation all around the shower to help with the noise. We were told it didn't really matter if we put it in or not, but we figured it could help with the noise from the shower. Next, we used Durock as our cement board because Brian hates the other stuff. Durock is a lot easier to cut, but does tend to fall apart and damage easily. Beware when using this stuff, it does NOT come in a 4x8 sheet. 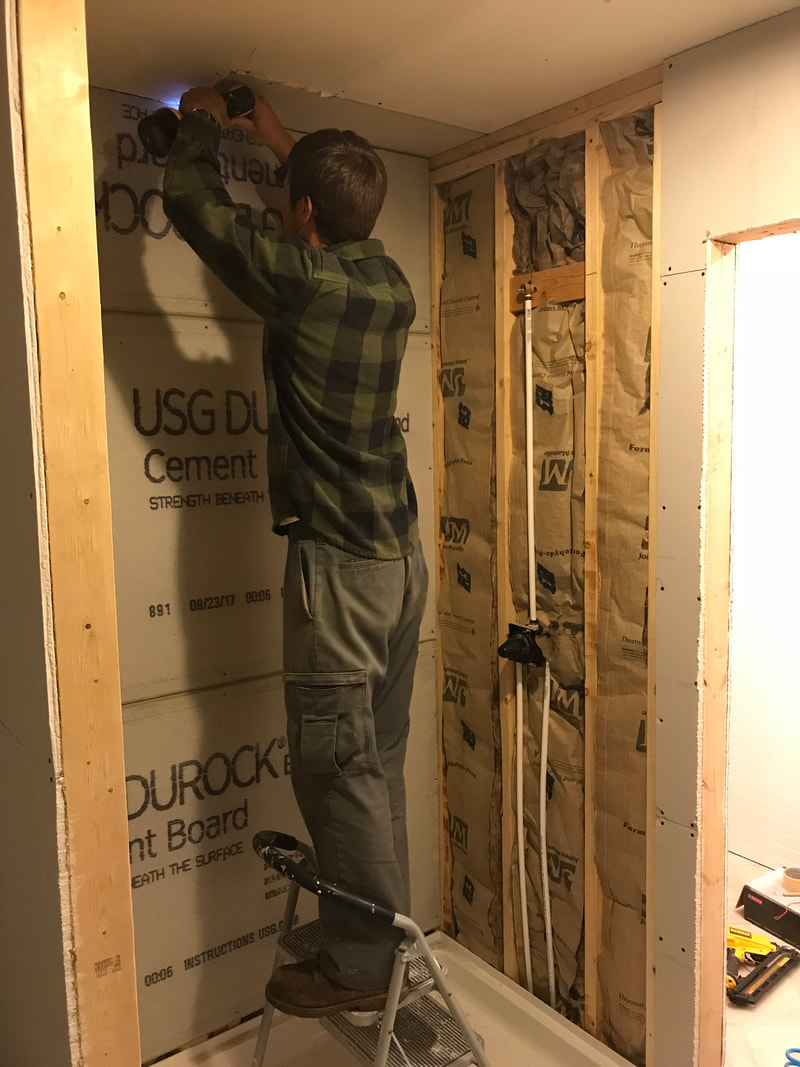 I believe for the shower nook we glued the cement board to the back wall, and then installed smaller pieces around it to help hold it in place (but honestly it was so long ago, I don't exactly remember...). 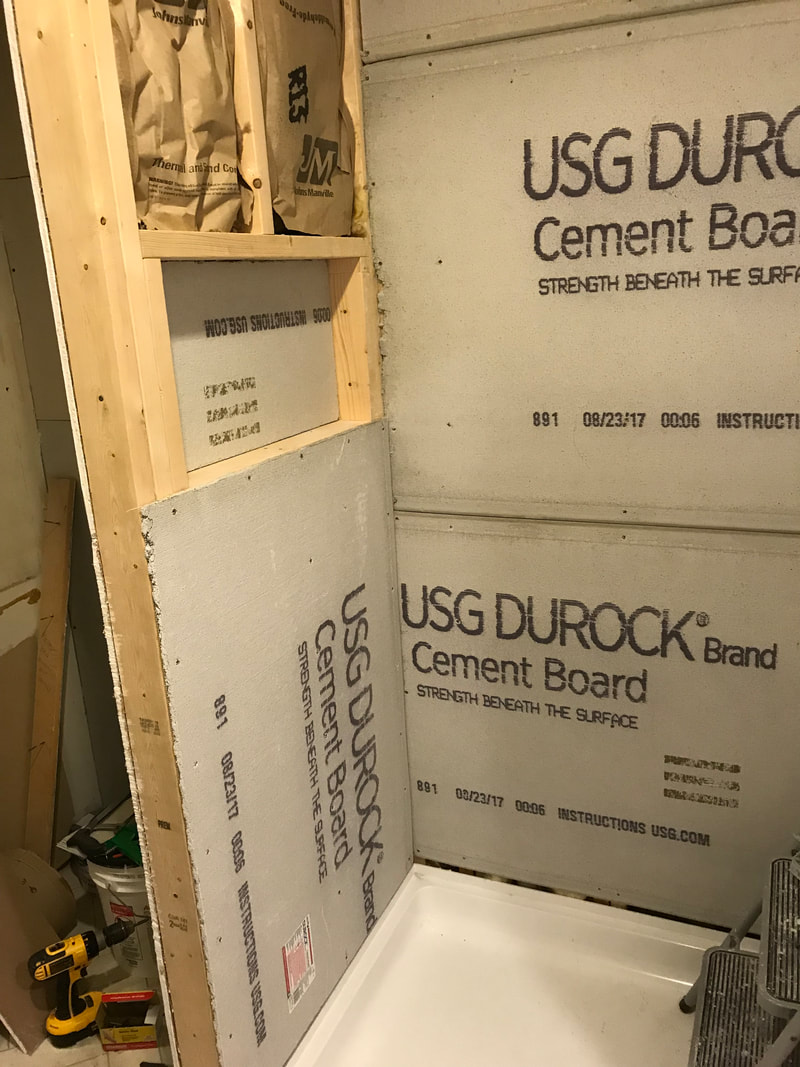 Notice the gap between the shower pan and the cement board. This was one area of frustration as the shower pan instructions were clear that there needed to be a 1/2" gap between the pan and the cement board, yet I couldn't get over how the tile wouldn't eventually let water behind that gap. Ultimately, we decided to tape the gap and mud over it with thin set, and then used Redguard over everything to create a waterproof seal. We did this after we had Redguarded the rest of the shower but before we started to tile. 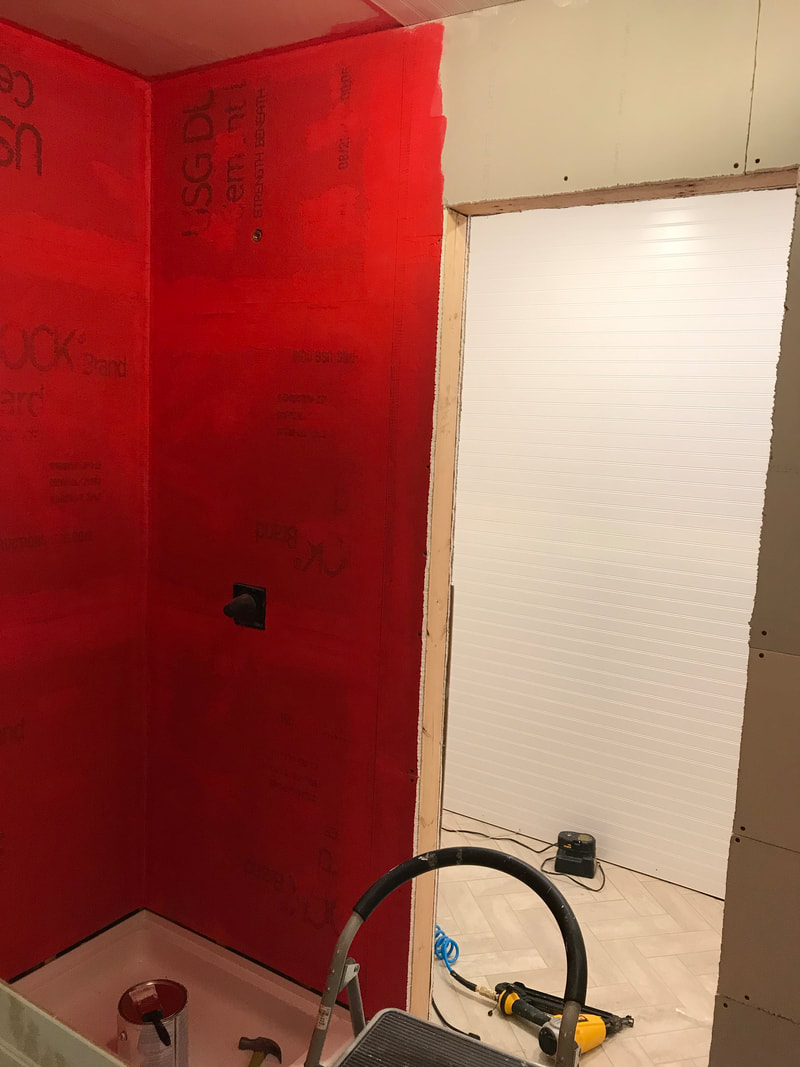 Next we started to tile. We got the tile from Floor & Decor, **ON SALE**, and absolutely fell in love with it. It had a marble-ish look to it without looking manufactured. I believe the size was 8"x18", but again, I can't quite remember. I initially wanted to do subway tile, but thinking about tiling the ENTIRE shower made me want to quit before we even got started. We accented the tile with blue penny tile in the nook and on the ceiling. The tile cost around $150 in total. 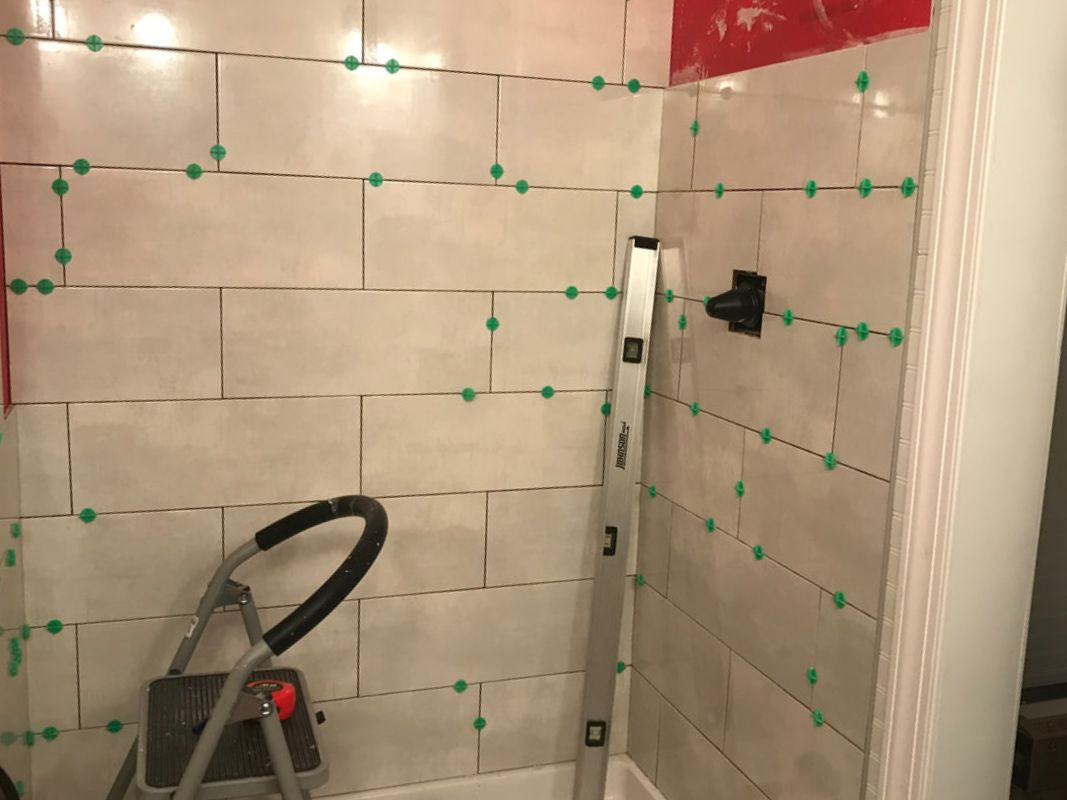  Once we got going on the tile, it went pretty quick. I measured and cut the tile, while Brian slapped thin set on the back. We did all of this in the bathroom and it made a HUGE mess. After cleaning everything up, I spent another day scrubbing everything down multiple times to the bathroom sparkling clean! 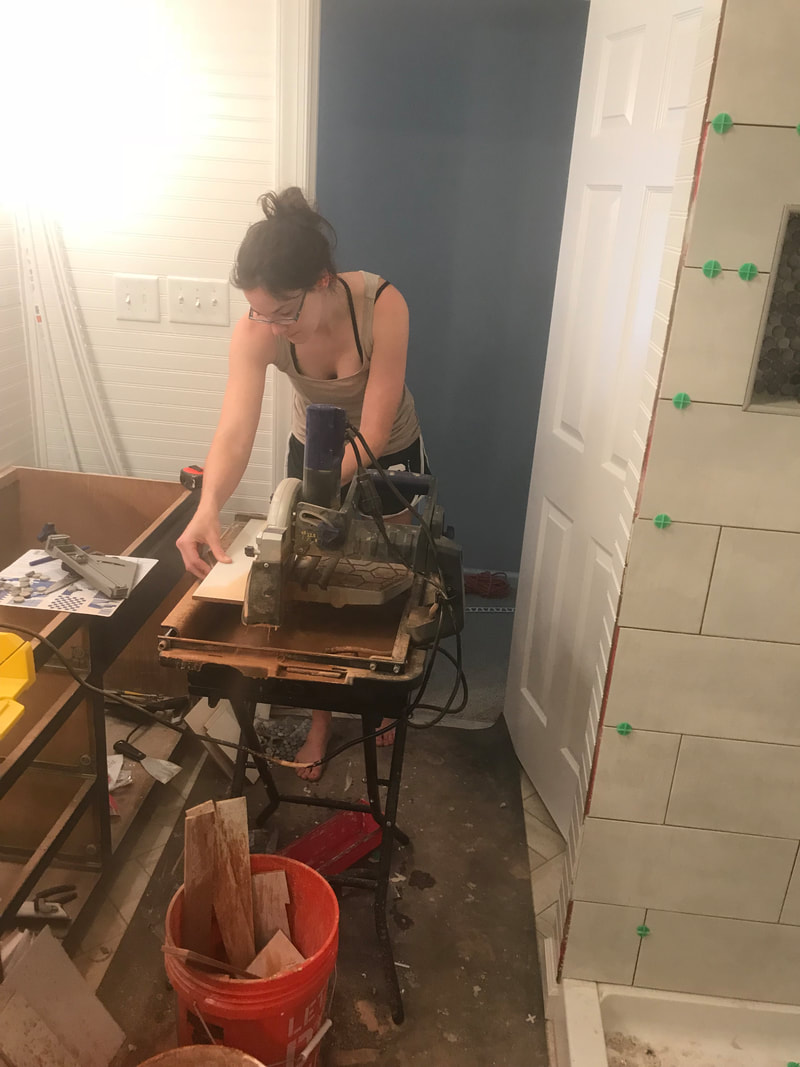 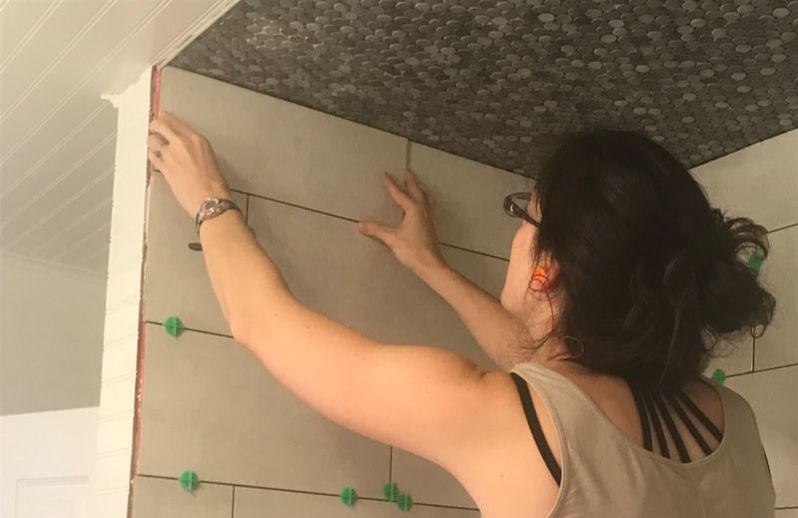 Ah, the last tile! Time to grout! After grouting, we waited a few days and then sealed the grout with a spray sealer. Again, if we hadn't sold the house, we would have installed a shower door as well, but we left that purchase up to the new owner.
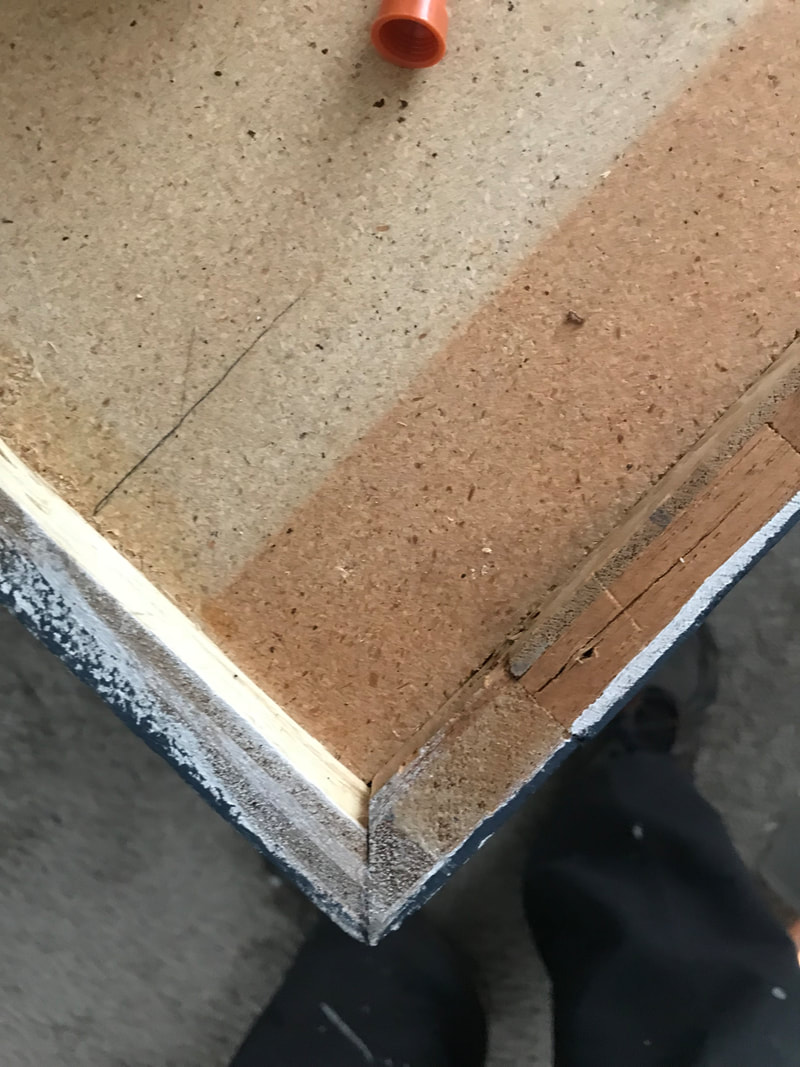
So we wanted to keep the master bath remodel under $5,000, and a huge expense in bathrooms is the vanity. Honestly, I think we spent under $3,000 total (!!), which included all drywall, beadboard, faucets, sinks, light fixtures, the toilet, cement backerboard, floor tile, luan, new exhaust fan, bath accessories, paint, shower tile, and the vanity (and everything else that I missed). So, the vanity. I am in LOVE with Ana White's website, and I had all of these plans of building my own vanity to keep costs down. And I DID build my own vanity! However, when two years go by from the time you start something until when you decide to finish it, sometimes things get repurposed (i.e. a vanity turns into a desk that fits perfectly in a little window alcove).  We put the vanity that I built back in the bathroom to see how it looked with the beadboard, and I really liked it, but I was pretty nervous about the storage situation. The "spa" feel of the vanity seemed nice at first, but the thought of no drawers and no cabinets really started to bother me. Where would you store extra towels, or toilet paper, or makeup?! Plus, then we'd be down a desk! 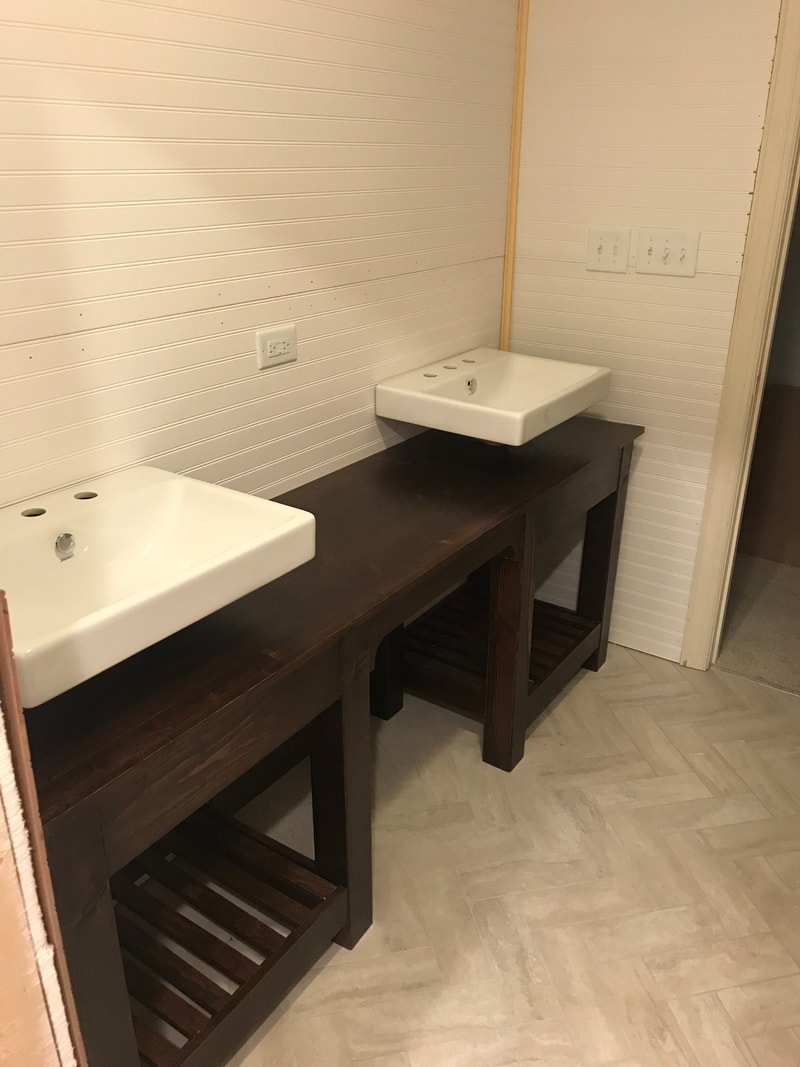 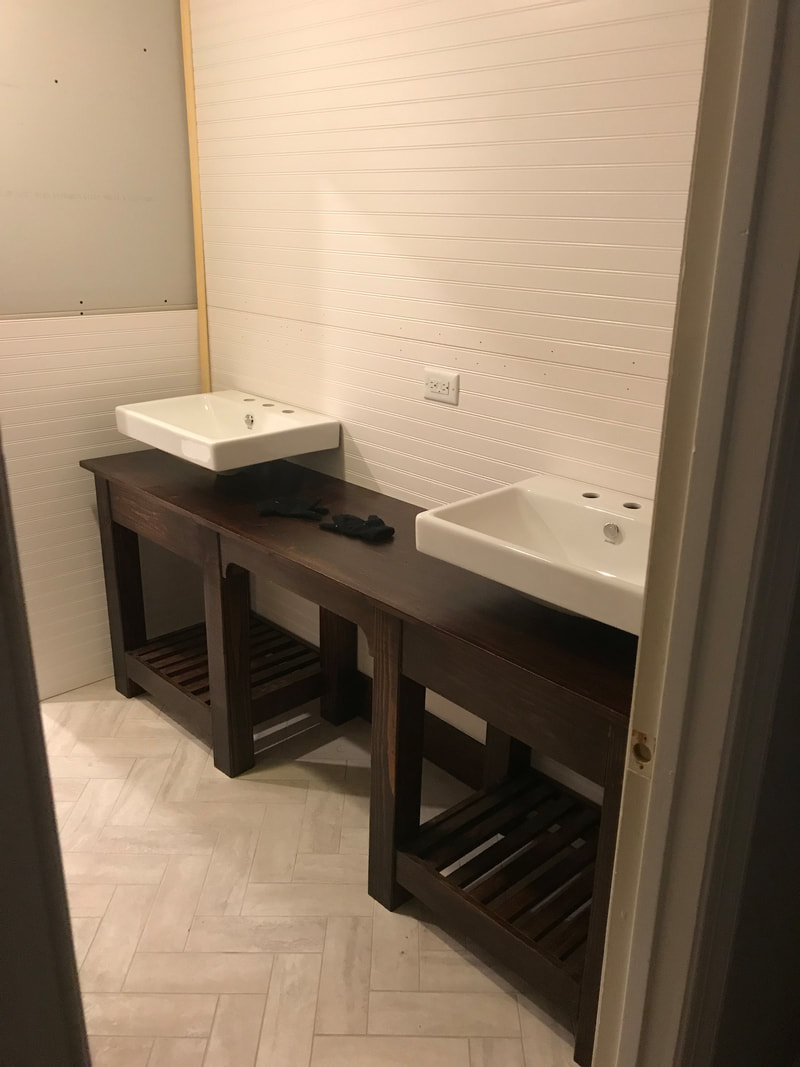 So my search continued until I found a 72" builder grade cabinet for $30 on Craig's List. Unfortunately, I don't have a "before" picture of the vanity, but if you can imagine a 20 year old dark brown cabinet with 1980's handles, then you'll understand what we started with. To spice it up, it got a nice paint job, some furniture feet (I made out of 4x4 scrap lumber), and some new hardware. 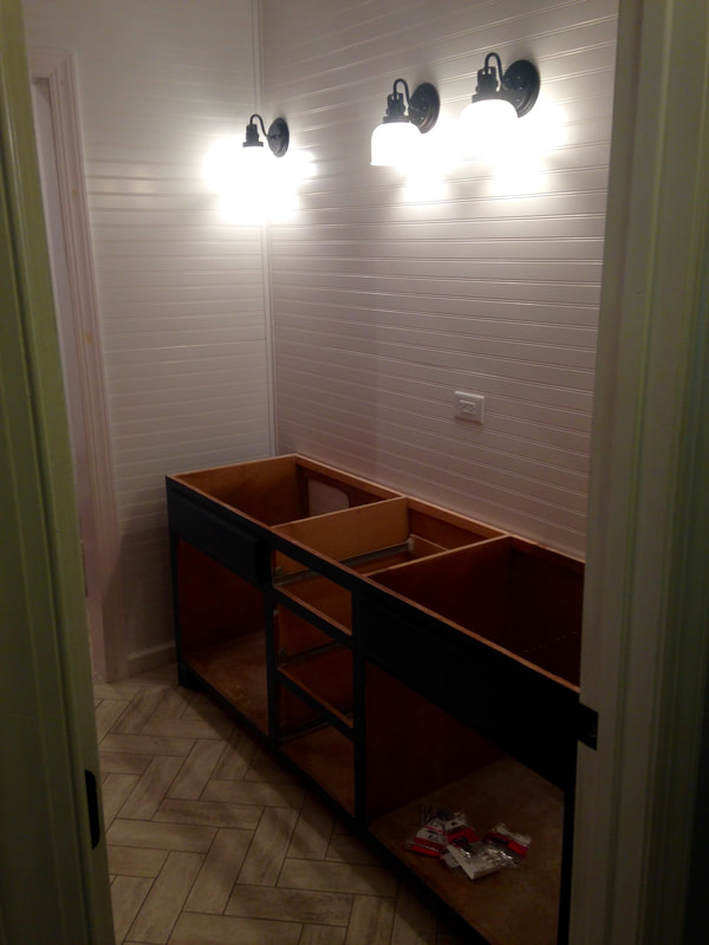 To add height to the cabinet and some extra spice, I built furniture feet for the base. I first demoed the existing base (think of any typical "built in" cabinet with a toe-kick), then added a scrap piece of wood to level the base with the plywood sides, and then fixed the furniture feet to the bottom of the cabinet with L-brackets. I was originally going to buy some fancy furniture feet for the vanity, but they were really expensive and didn't really match the existing cabinet.
You can't really tell in the picture above, but I had initially painted the cabinet a dark navy blue. Once we settled on the Ikea Ekbacken countertop in "concrete effect," the vanity looked too dark for the space. I decided to mix a bunch of colors I already had to create a custom blue-grey color. The pictures on my phone make it look almost like Carolina Blue, but in reality it is more of a light grey with a blue undertone. 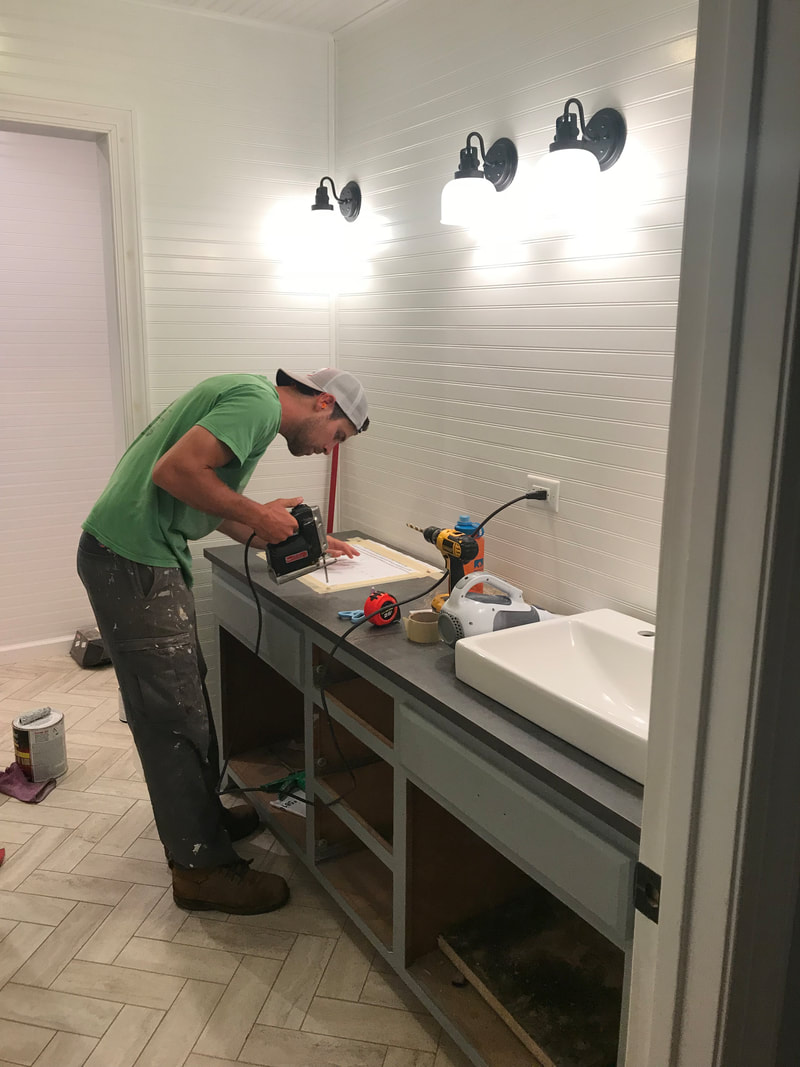 We went with the Ikea countertop for a variety of reasons. First, it was cheap ($100) and looked great. Second, it was long enough to fit the vanity AND we were able to use one of our cut pieces as a backsplash. Third, it was a thinner countertop than other ones we saw, which was perfect since we were using vessel sinks. 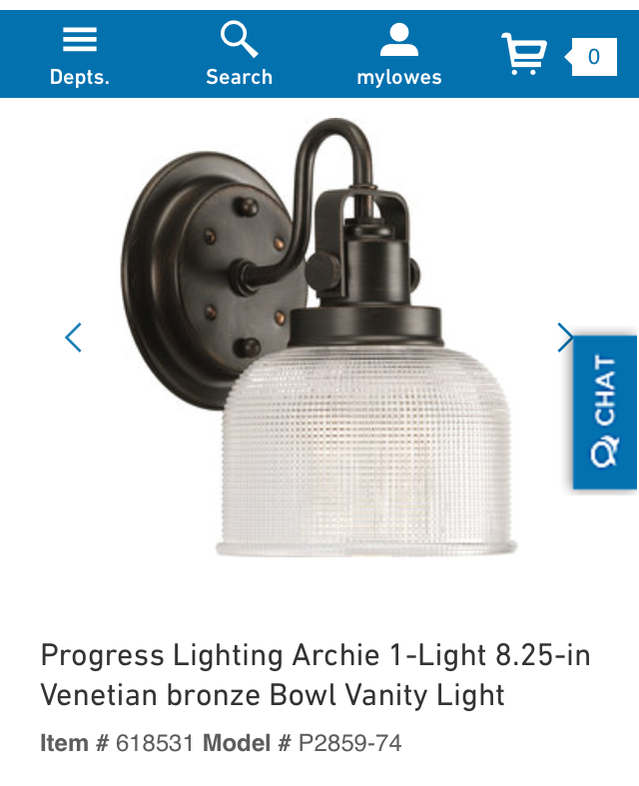 And since they have been in a bunch of photos already - my lights! I LOVE my lights. They were on super-sale at Lowe's, but unfortunately they were sold out! I ended up finding four of them on an Amazon Warehouse deal for only $25 each!!!! STEAL! 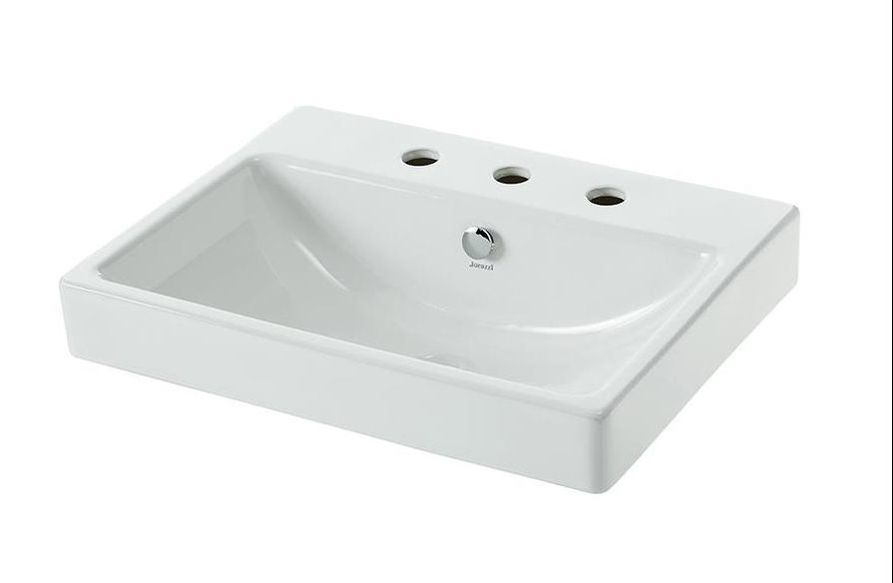 My sinks are Jacuzzi Anna Farmhouse vessel sinks, also available at Lowe's. They are pretty wide but narrow, and aren't too tall. Nice price and look great! I love them!
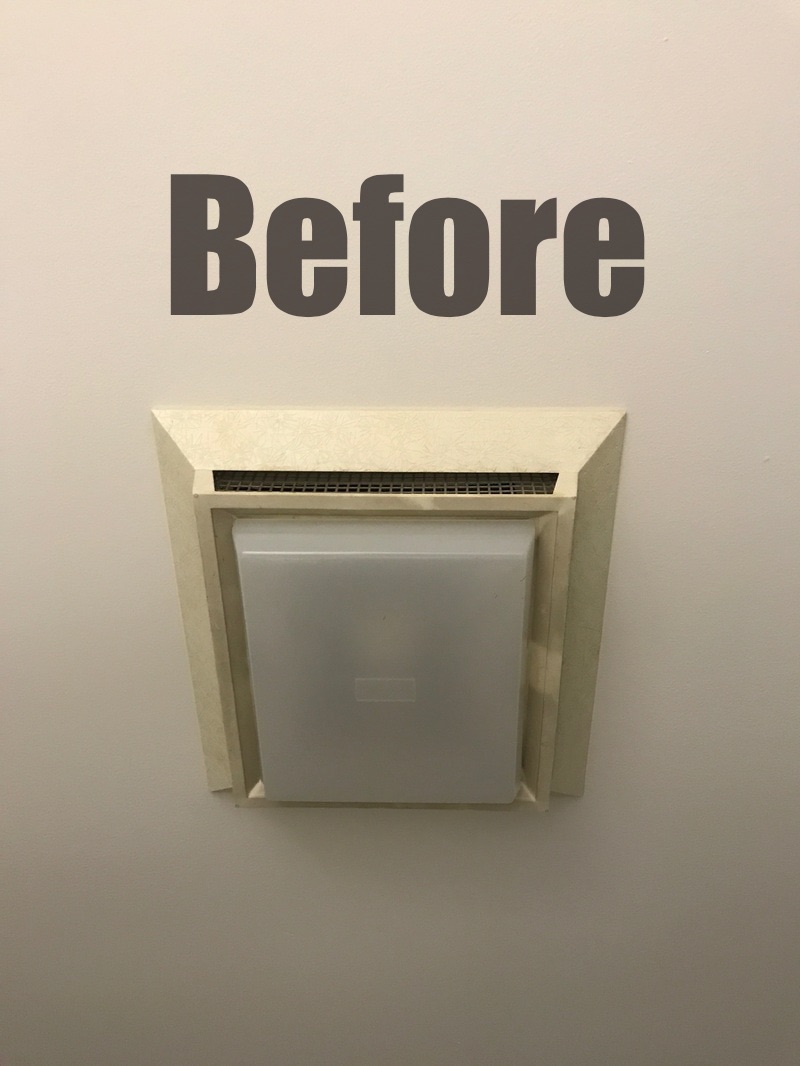
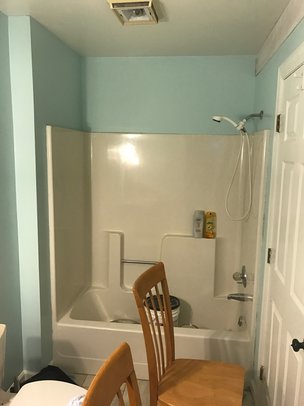
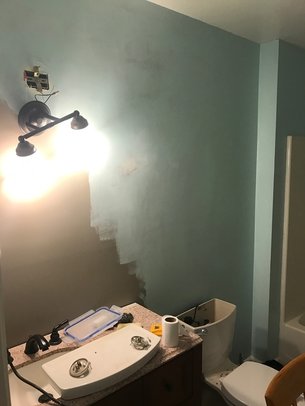
Wow it has been a long time since I've updated. Well, as many of you know, we actually sold the house back in June - however I still have so much to show you! Let's start with the master bath remodel. To remind you what the bathroom used to look like.... 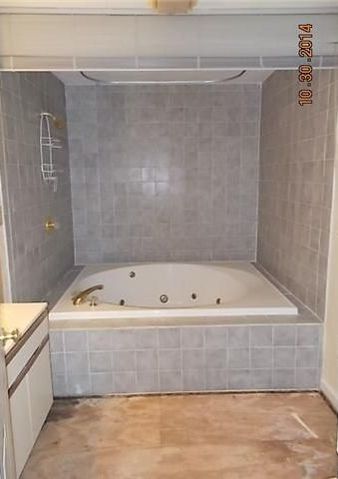 Woof. Well, we gutted the bathroom, rebuilt the bathroom, laid the flooring, and then stopped working on the bathroom for about a year so we could work on other projects. The master bath was our last BIG project in the house, and it was so much fun because it was the only room that really was a complete remodel. To avoid mudding the drywall, we decided to cover it (both the ceiling and walls) with beadboard - a decision Brian was very nervous about in the beginning. 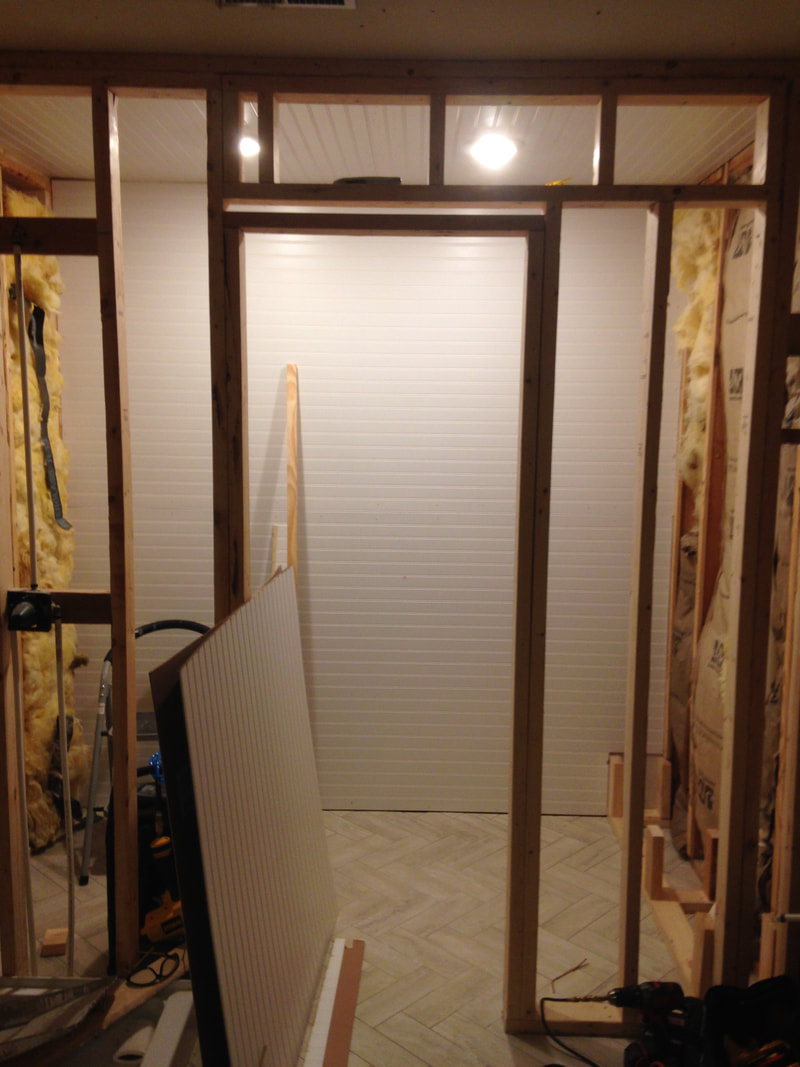 I would definitely say that installing beadboard is not for the faint of heart. It took us a much longer time to install it than we had anticipated, added significantly to the cost of the bathroom, and the board looked pretty terrible at first because it tore easily. We attached the boards using construction adhesive and nails, used Bondo to cover any nail holes and fix any areas where the boards tore, sanded and oil primed the entire surface, and then caulked the seams where the pieces came together. Since there are no windows in the bathroom, I wanted to make the bathroom as bright as possible, so we painted with Ben Moore Chantilly Lace (which is basically bright white). 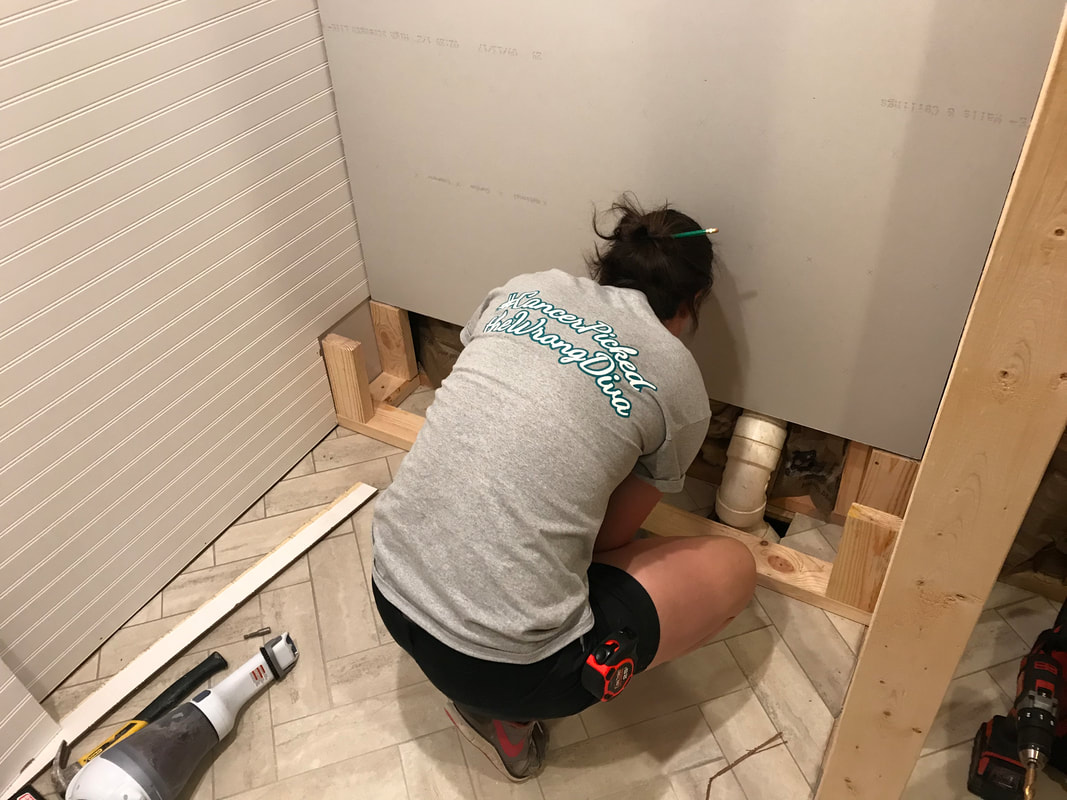 Here, I was working on building a soffit around a pipe in the closet area. 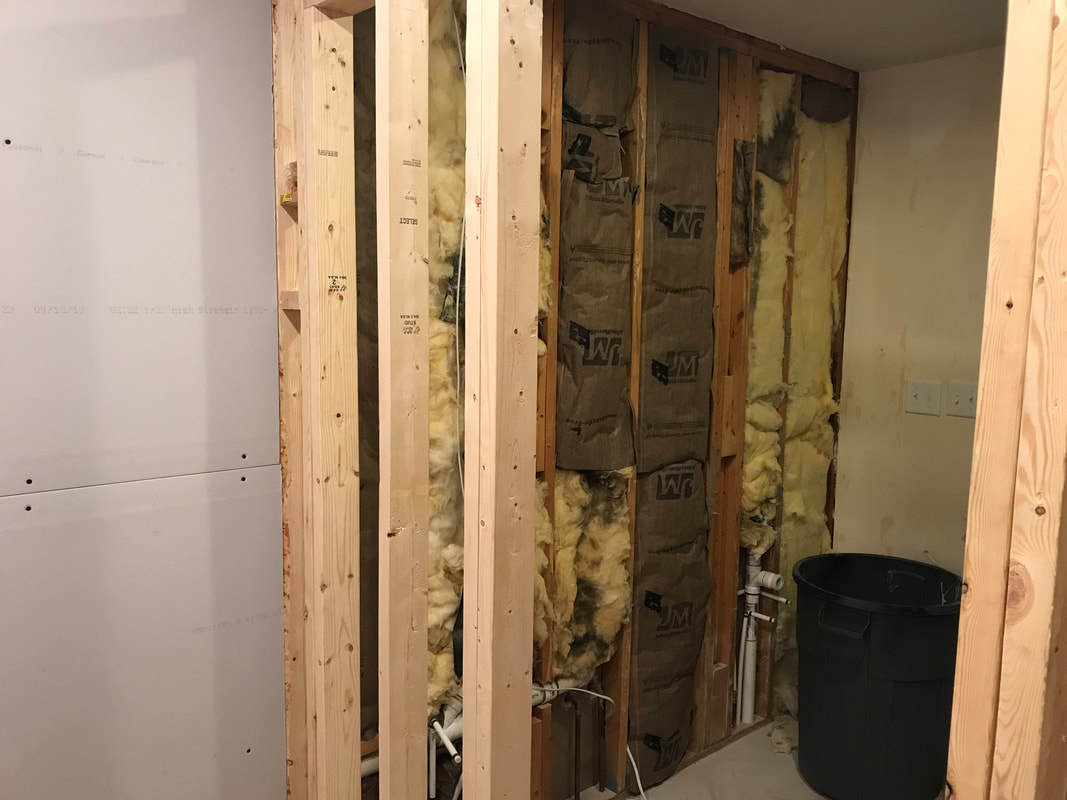 This view is looking from the closet area to wear the vanity and double sinks would eventually go. 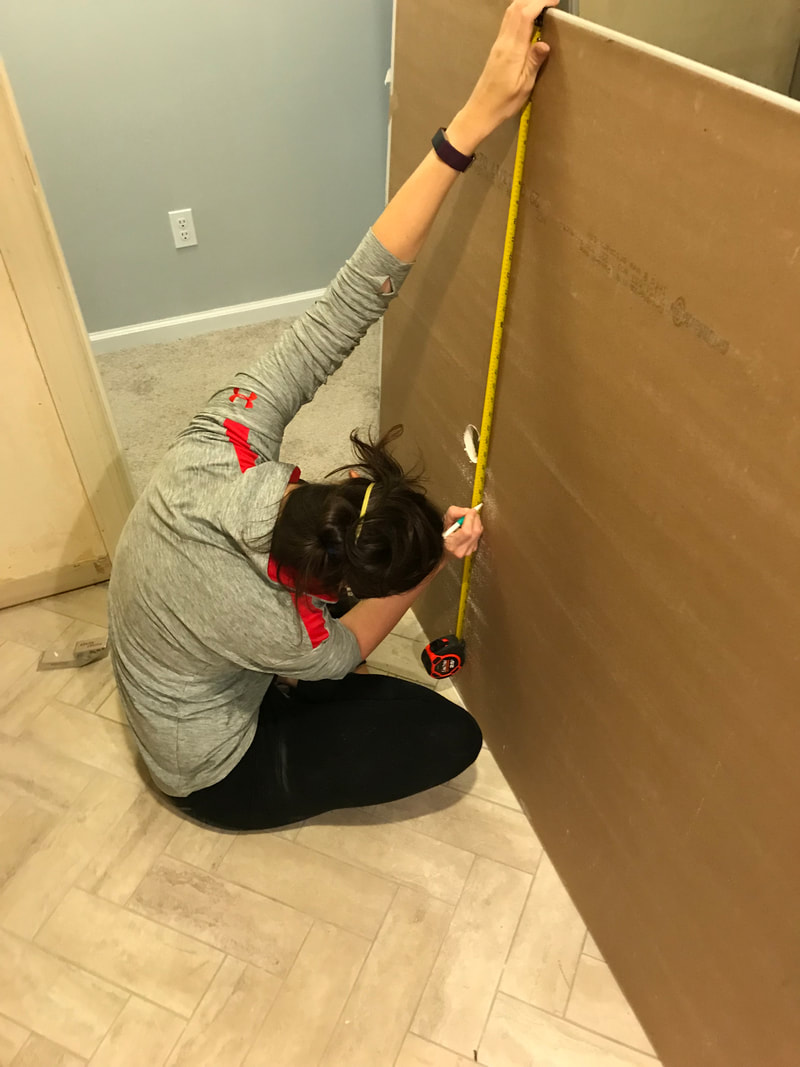 And of course, we had to measure and remeasure before drilling for the pipes. In the picture below, you can see we had already installed the beadboard on the ceiling. This was NOT an easy task, but it also wasn't the hardest project we tackled either. I would say it was more awkward than anything. Of course, we don't have any pictures of the process, but believe me when I tell you that I lost part of my contingency on this ceiling by cutting pieces the wrong way. Whoops! 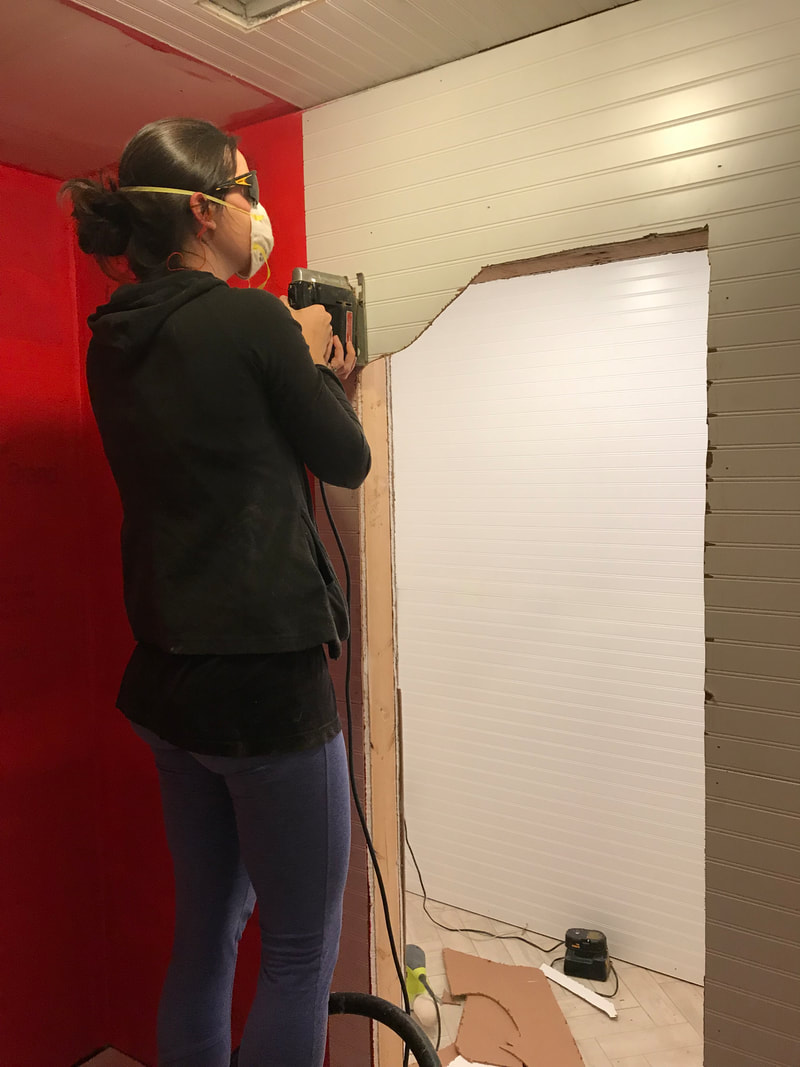 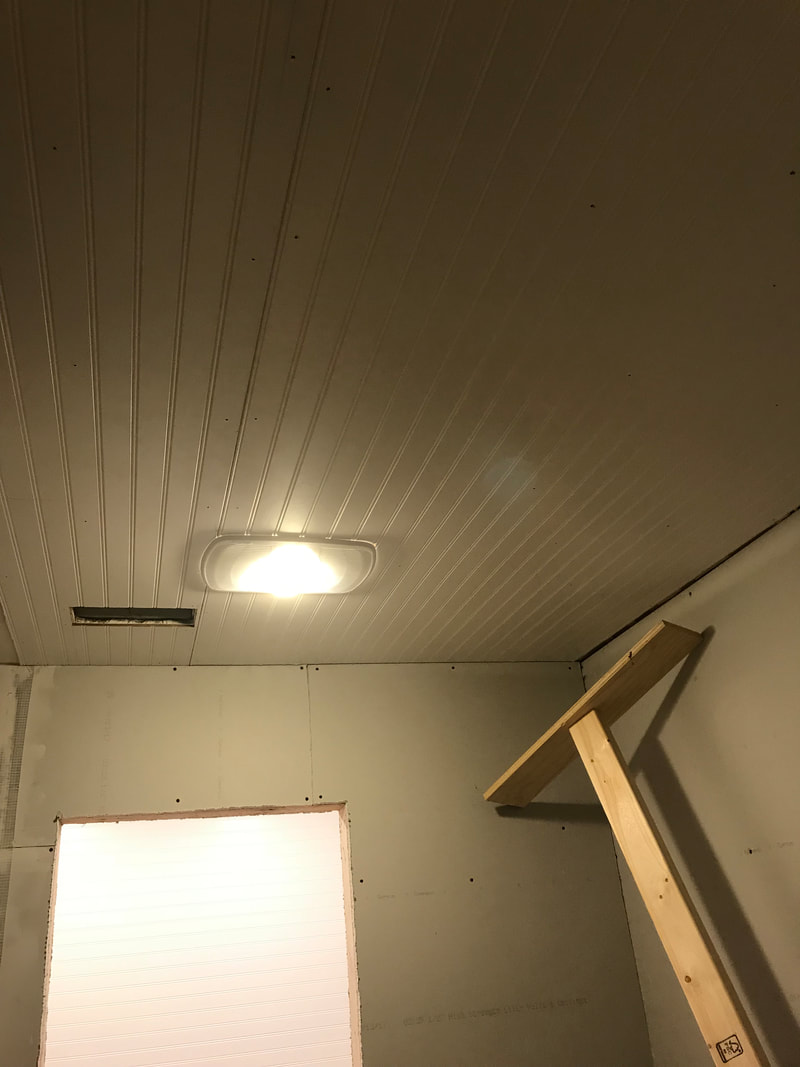 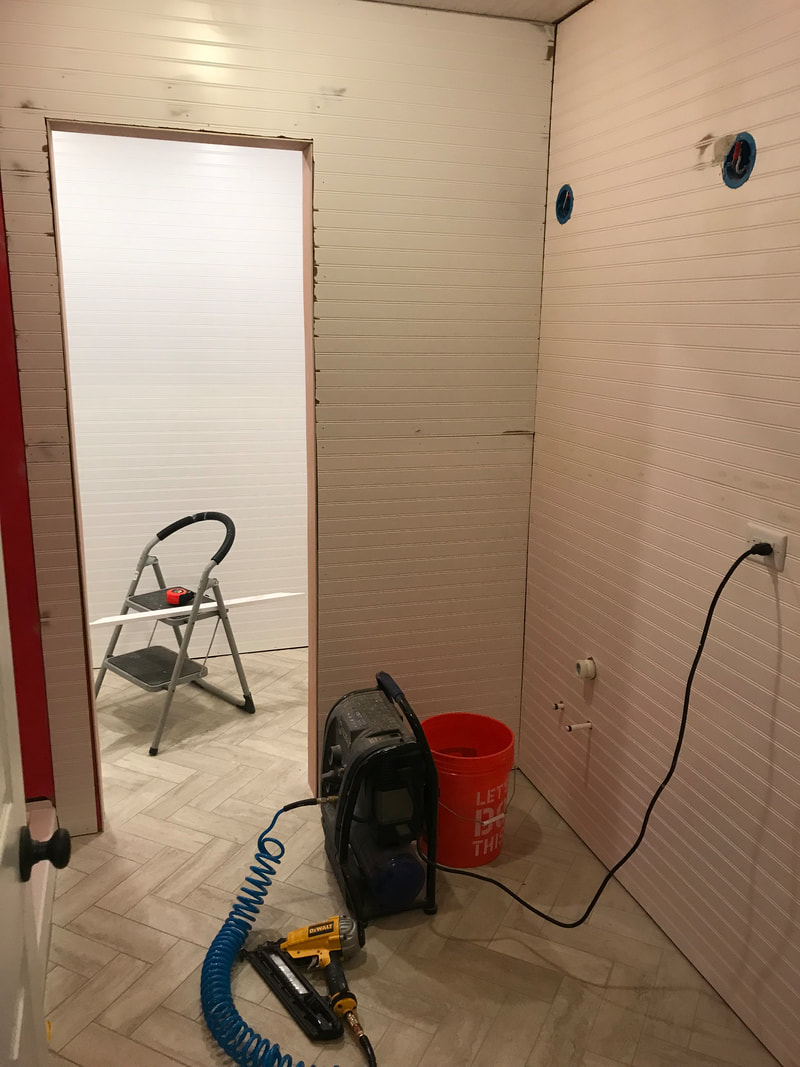 The trim and moulding made a HUGE difference in making the beadboard look "finished". You can really see in the picture above how damaged the board would get in the installation process. Below is a view toward the master hallway. That drywall was original and full of awful patchwork and wallpaper glue that was impossible to remove. We did NOT remove the door moulding before installing the beadboard on this wall; we simply worked around the existing moulding to save us time and hassle later. 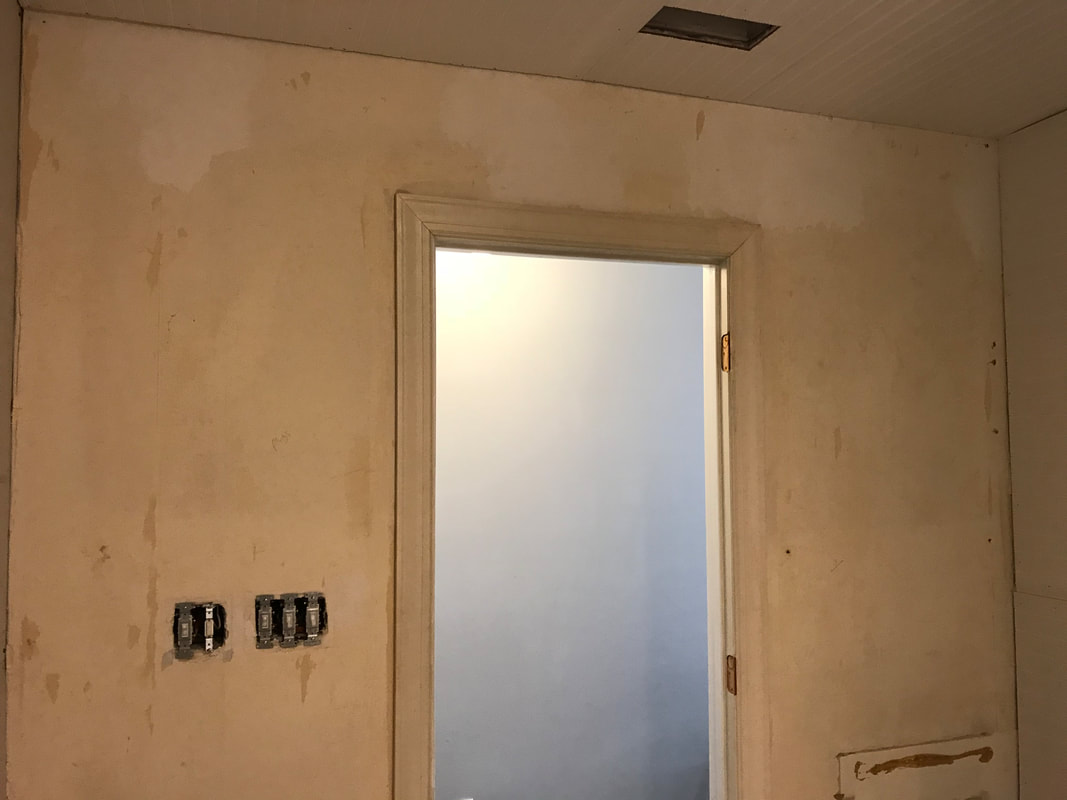 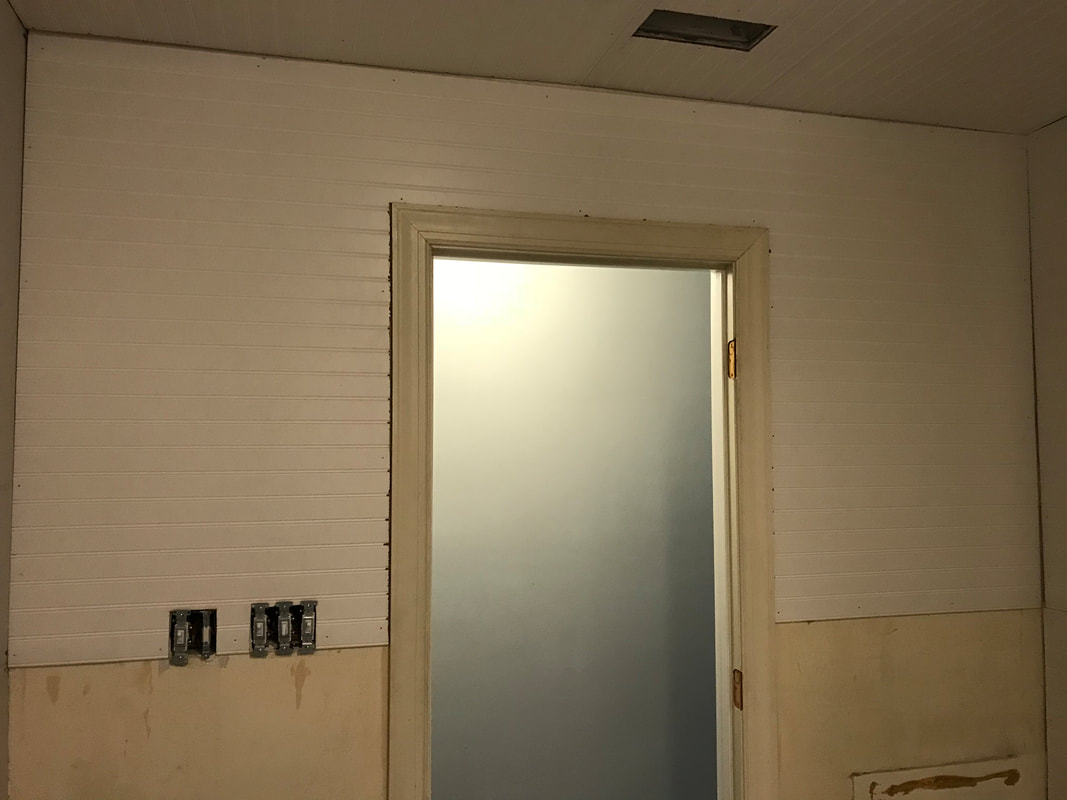 For the doorway leading to the closet, we opted to install luan over the framed wood because it is a relatively narrow opening. We figured in the future maybe we would install a barn door to make it more separate from the rest of the bathroom (but then we sold the house). 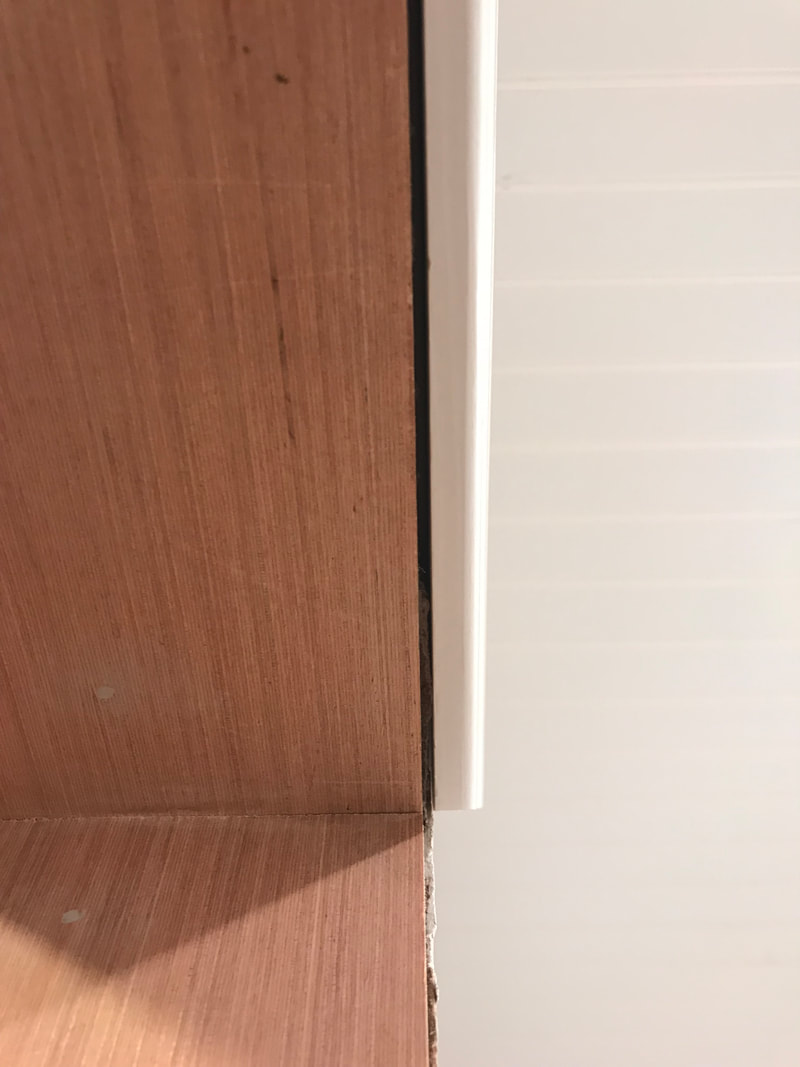 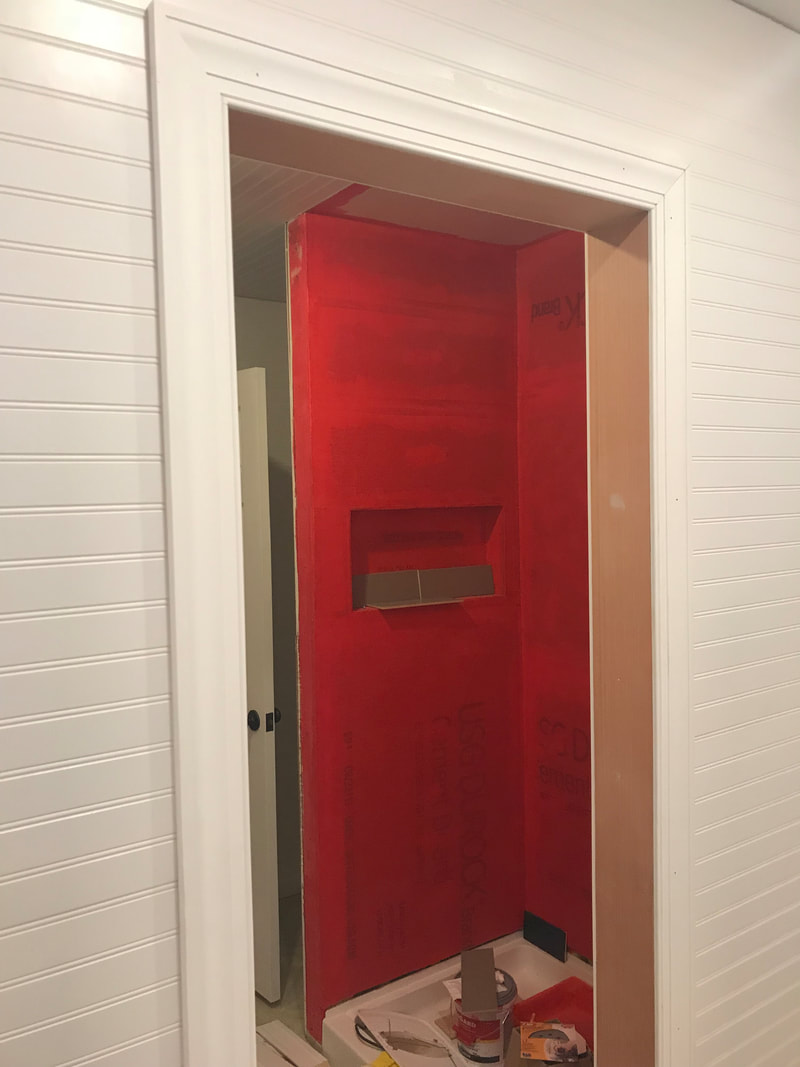 Incredible what a little bit of trim can do! I decided to go for a very minimal pvc moulding around the corners and ceiling because the beadboard was already pretty busy. For the base moulding, we installed the same stuff we had around the rest of the house. 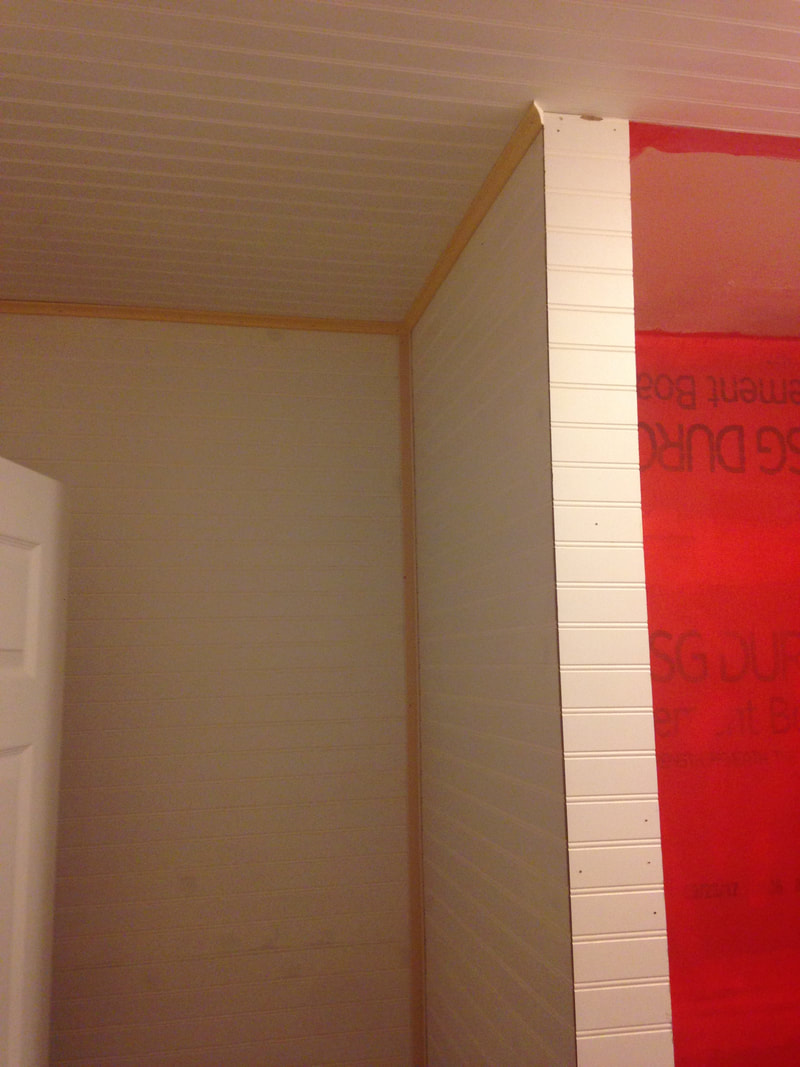 After I installed the trim and Brian Bondoed all of the nail holes (and there were a LOT of nail holes), we could finally start painting. Since the beadboard was installed in a "wet" area, I made sure to prime EVERYTHING with oil primer. Oil primer is not my favorite thing in the world, but the stuff works magic and we didn't want to ruin all of our hard work! 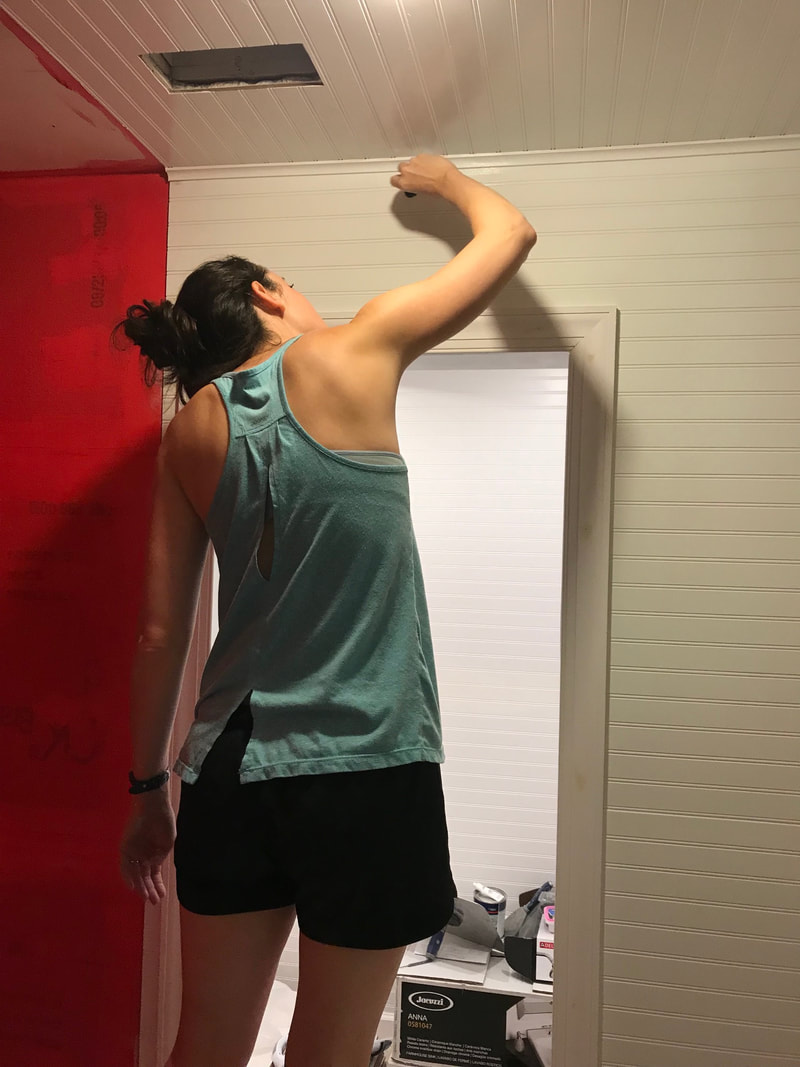 What a difference! What do YOU think of the beadboard look?! 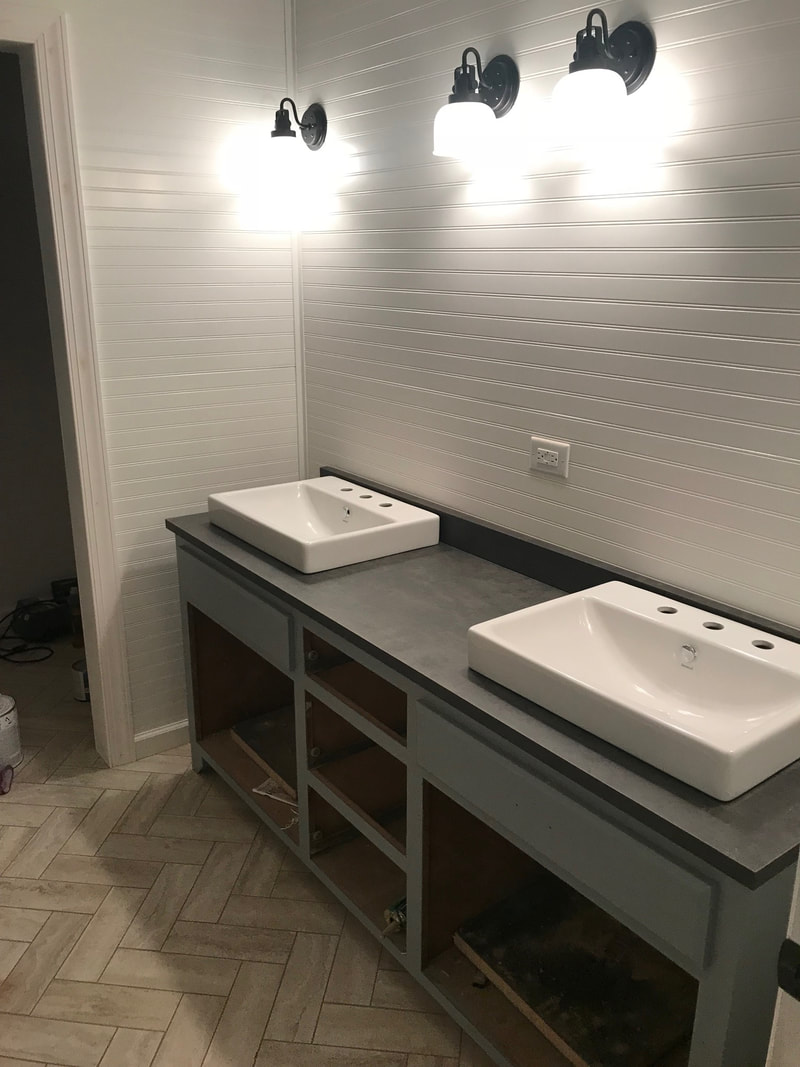 This summer, I built a farmhouse table for my dining area. I have absolutely ZERO pictures of the process (I guess I was too busy building the thing), so here are the final pictures! 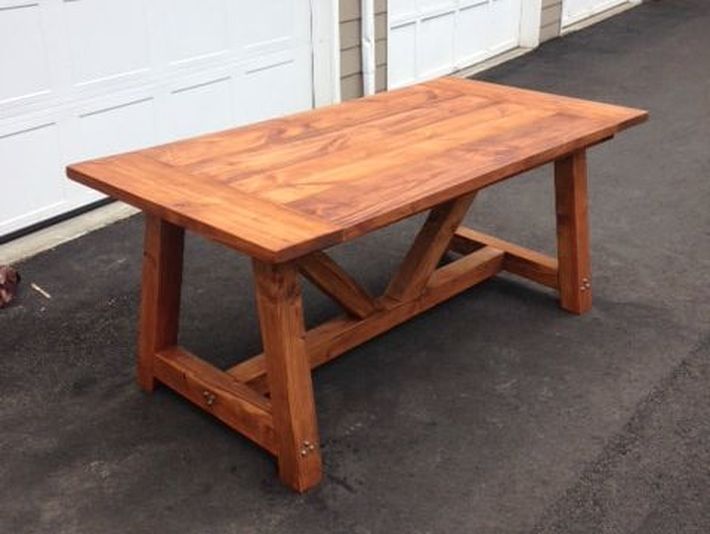 The base is made out of fur, while the top is pine. In order to make sure they stained the same, I did a light coat of Minwax English Chestnut on the pine before covering everything in one coat of Minwax Honey. If I do say so myself, I think I did a great job matching the woods together! 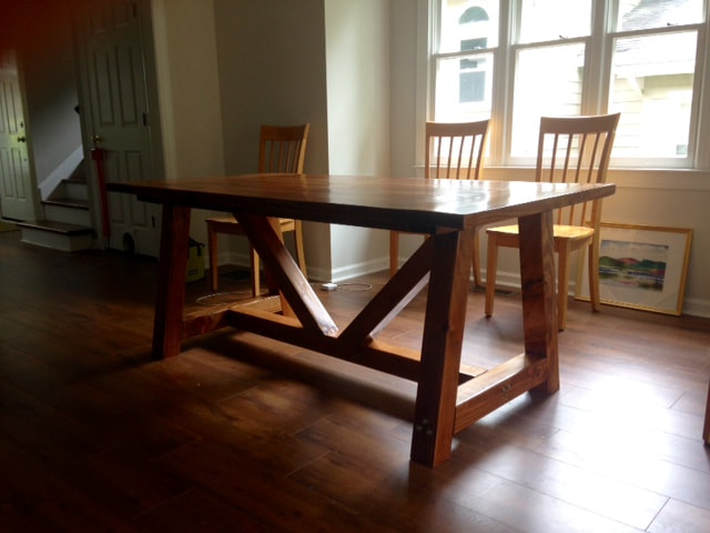 I used a water-based polyurethane to seal the table, putting on 4 or 5 coats on the tabletop and only two coats on the base. 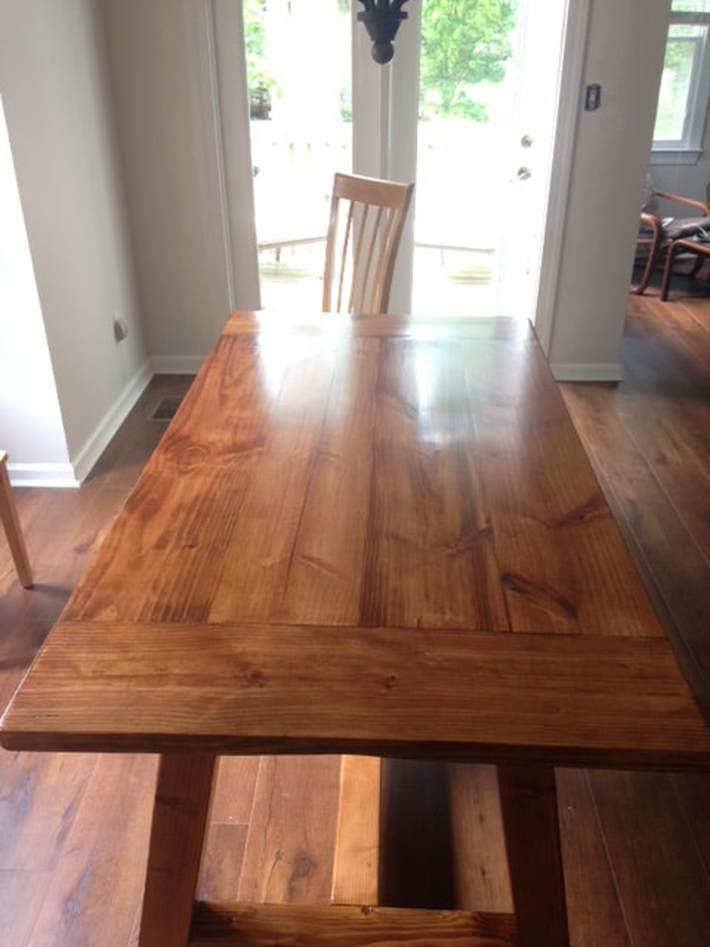 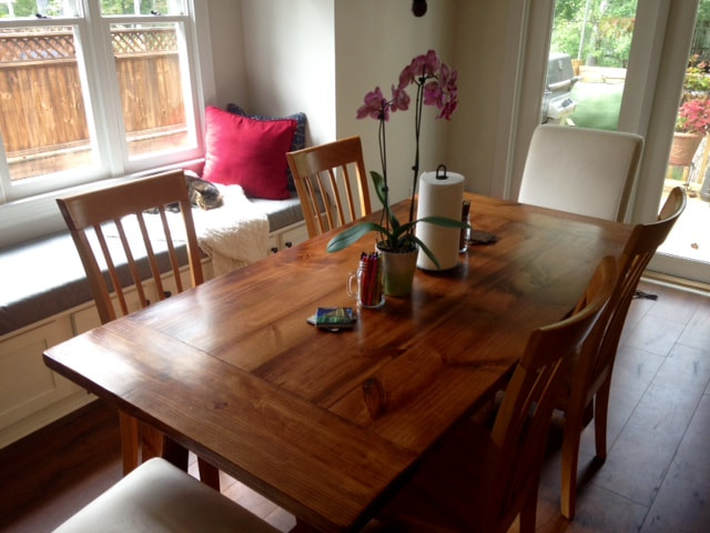 Notice my newly finished window seat in the background! 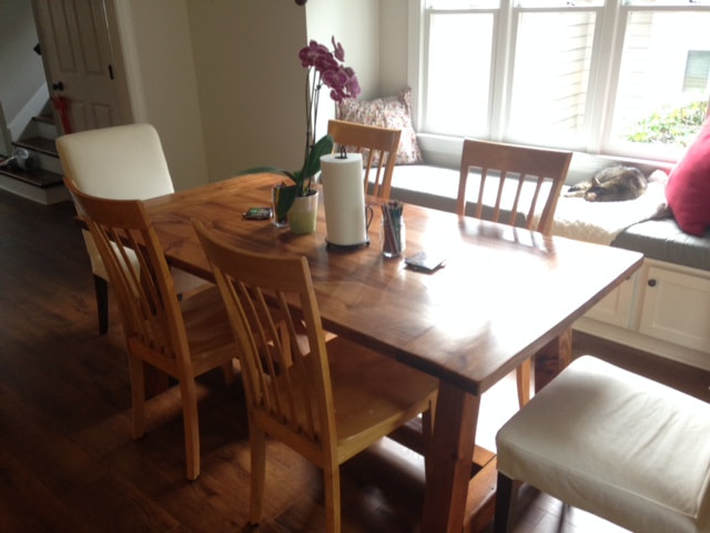 I still need to either find new chairs or build benches to mach the table. The wood chairs that are there now are the chairs that go with my old table. The cloth chairs are from Ikea. I want to keep those but recover them with a slip from Etsy. Also, notice my chandelier! I snagged it from Lowe's on clearance for $35!!!! 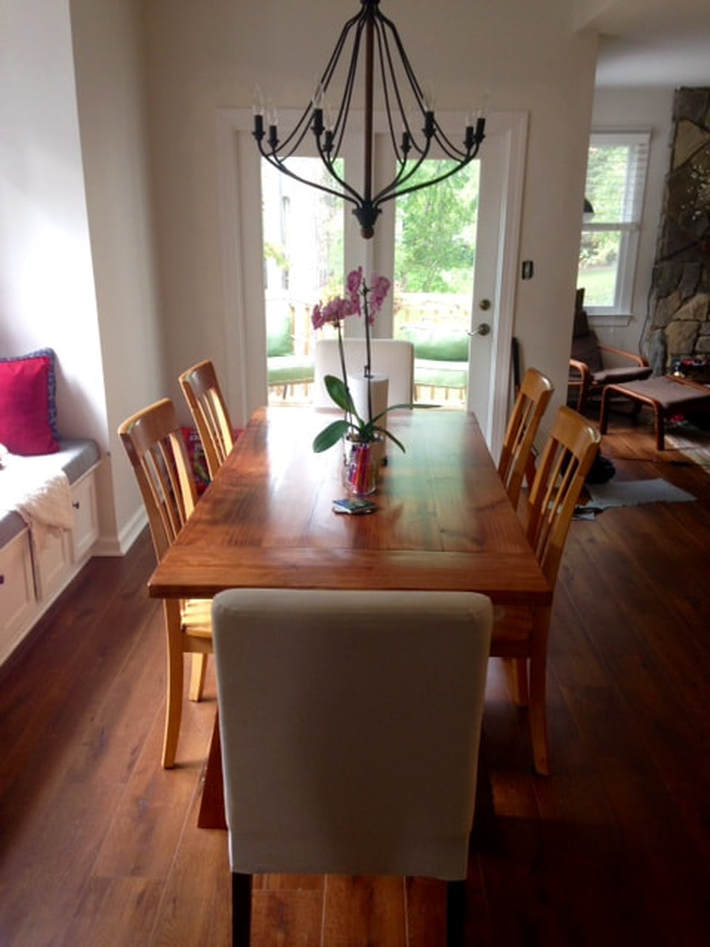 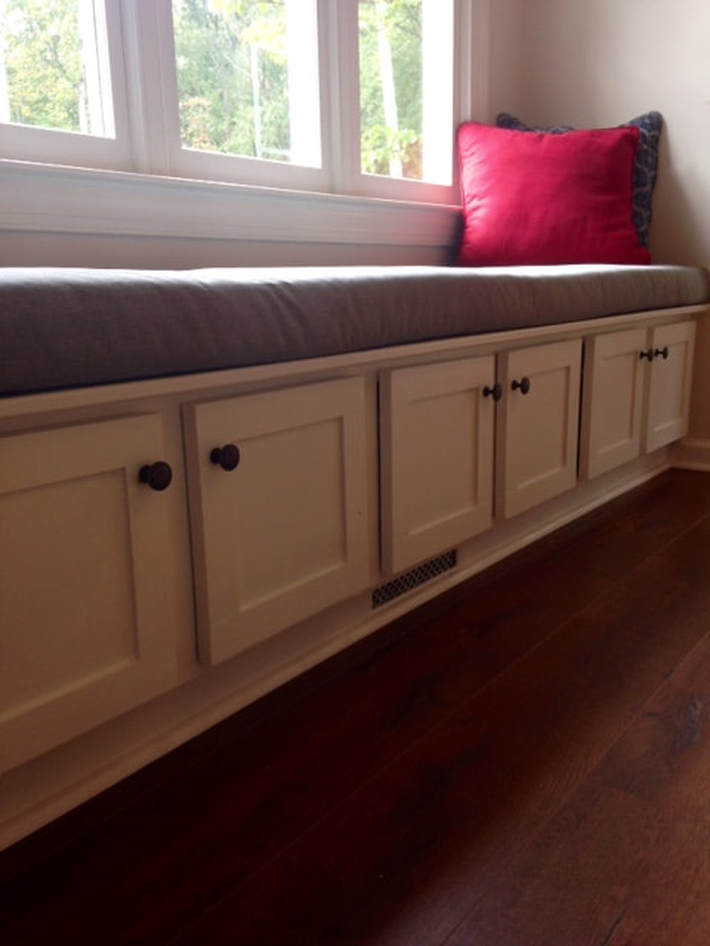 I've been meaning to post this for a while, but as the school year got back underway... I've been a bit on the lazy side with the blog. This summer, I spent my time with two main projects: a window seat and a dining table. The dining table was actually built first (post to come), and after it was built, I felt like the space behind it needed to be filled. I'm actually really happy with the way the window seat turned out, but FYI - it was definitely more expensive than I thought it was going to be. 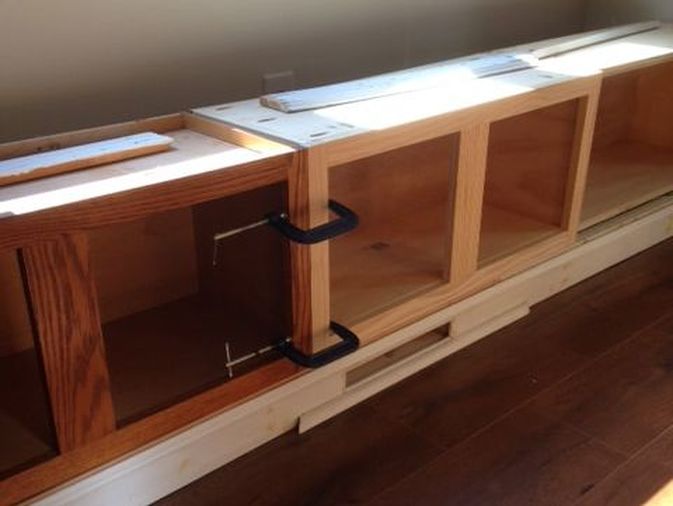 So my original idea was that I would salvage microwave cabinets from Habitat ReStore and create the window seat from those, however after some major searching and lots of driving to five different ReStores, I was only able to find one microwave cabinet (I snagged it for a whopping $12). I decided instead of searching for more, I would just spend a day and build two others. I happened to have enough scrap wood and plywood to get this done for (almost) free. The cabinets are 30" wide, 14" tall, and 12" deep. 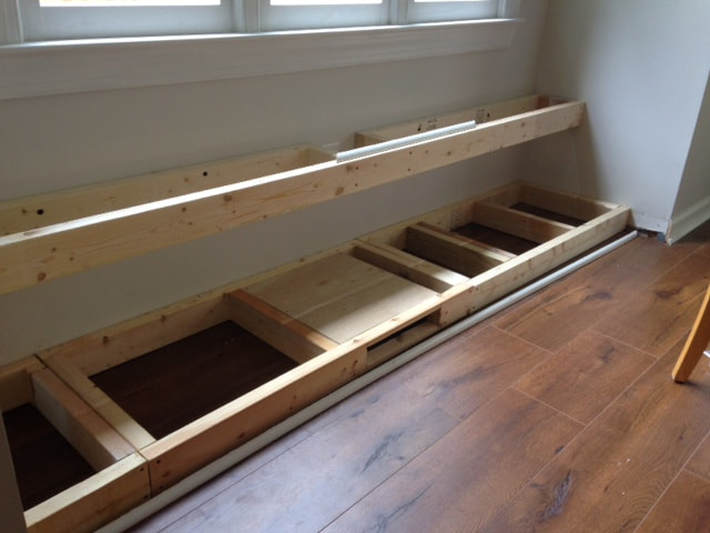 After building the boxes, I then had to frame up the floor and the wall behind the cabinets. The reason for the wall frame is simply to make the window seat larger - a 12" window seat would definitely not work in the space, so I built it up without having the make the boxes deeper. I tried to use as much scrap wood as possible for the frame, hence the million pieces. I also built a box within the floor frame to help direct the air out of the air duct. I did this by ripping a 1/4" off of a couple 2X4's, then attaching a piece of luan to the top. I also cut out a rectangular piece so the air could escape. 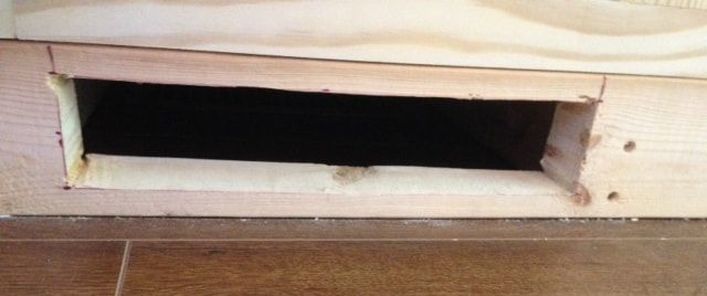 The moulding around the floor also needed to be cut to allow for the air to escape. I measured it out, cut the rectangle with the jigsaw, and then used a small piece of moulding to frame out the edges on the inside. I debated on routing the inside instead of adding the extra moulding, but decided against it. I then bought a piece of decorative metal from Hobby Lobby, cut to size, and stapled it to the inside frame. 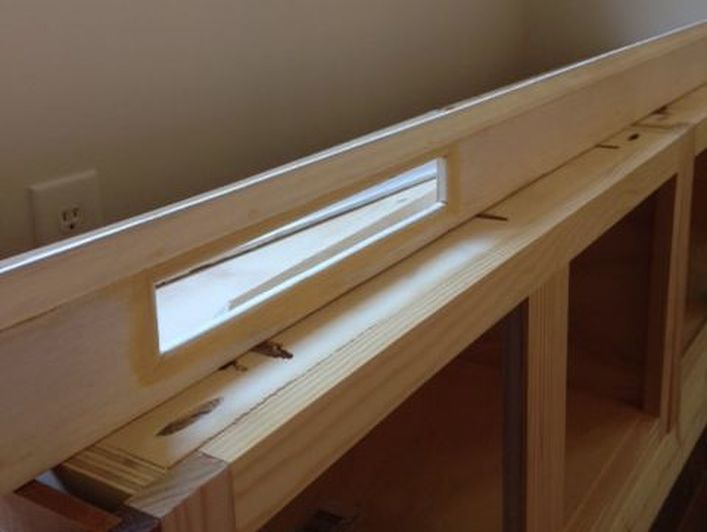 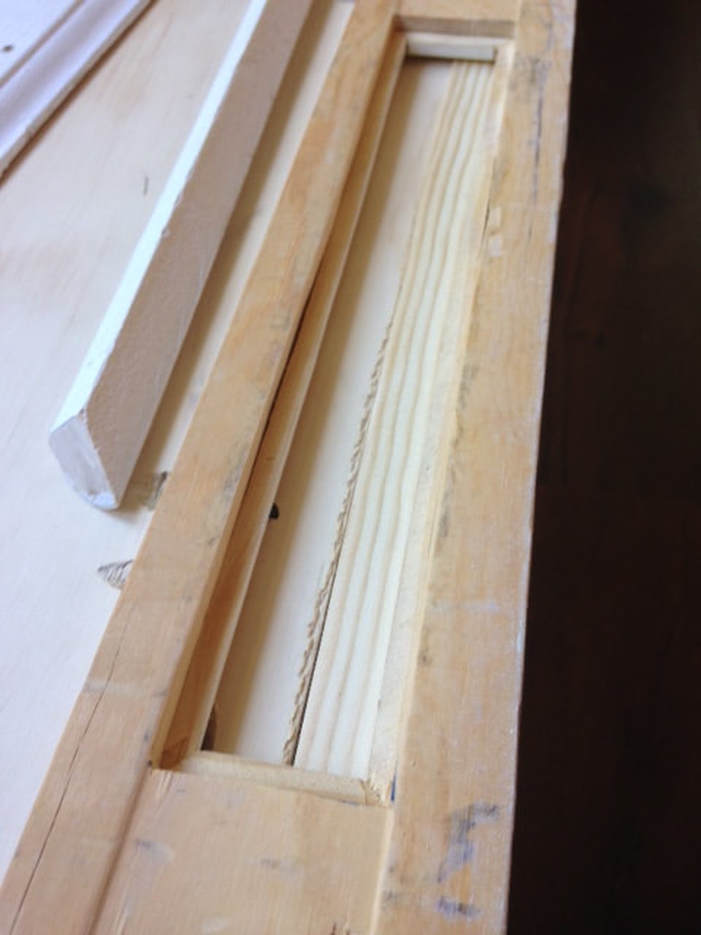  Instead of building my own doors, I went to a local building materials shop in town and found pre-made oak wood doors for a whopping $5 each. I primed, painted, and attached the doors using hinges I bought through Woodworker Express. They had exactly what I needed and were the cheapest place around! The top is made out of 3/4" plywood with a piece of moulding glued to the unfinished edge. The pulls are from Amazon and are leftover from my kitchen cabinets. 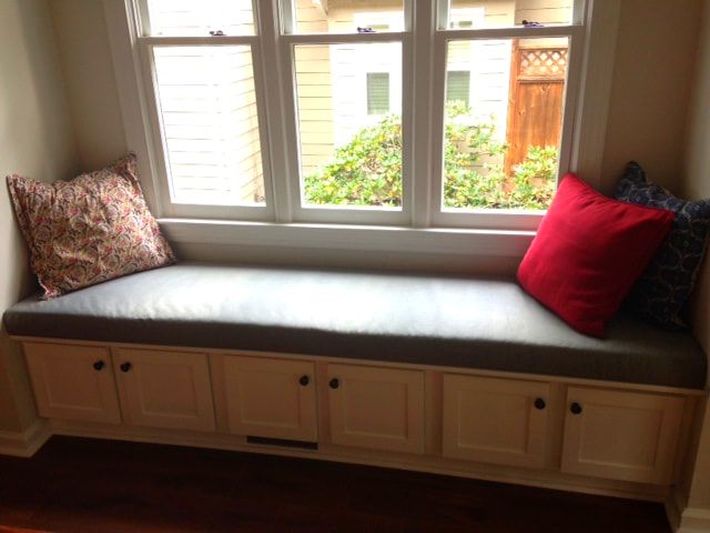 I made the cushion on top TODAY (maybe this is why I'm posting so late....). Although I had a student volunteer her time to sew me a top (I am NOT a sewer), I'm simply too impatient to wait and used the "no sew" technique demonstrated here (sans the spray adhesive). The fabric is a green heather canvas that I found at a fabric outlet for $15 while on vacation in Virginia. I still have an entire ROLL leftover, so if I do ever decide to have my student sew me a top, I'll have plenty for her to tackle the project. 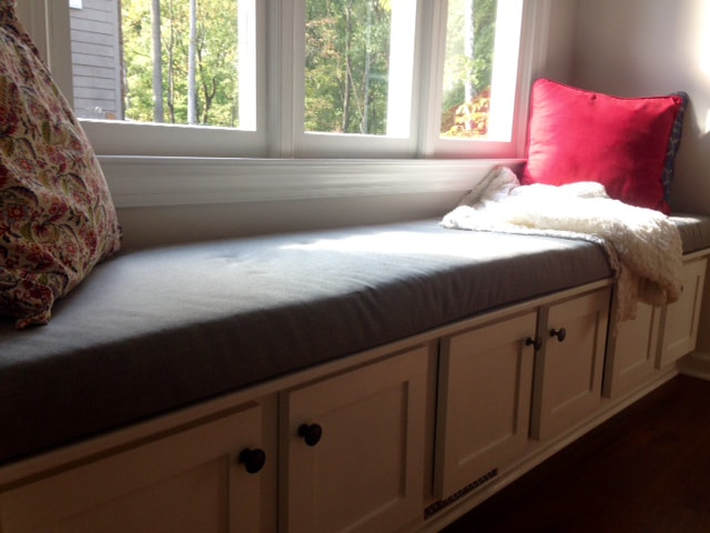 Can I get a sigh of relief? It's finally finished! And look who loves their new seat!!!!! 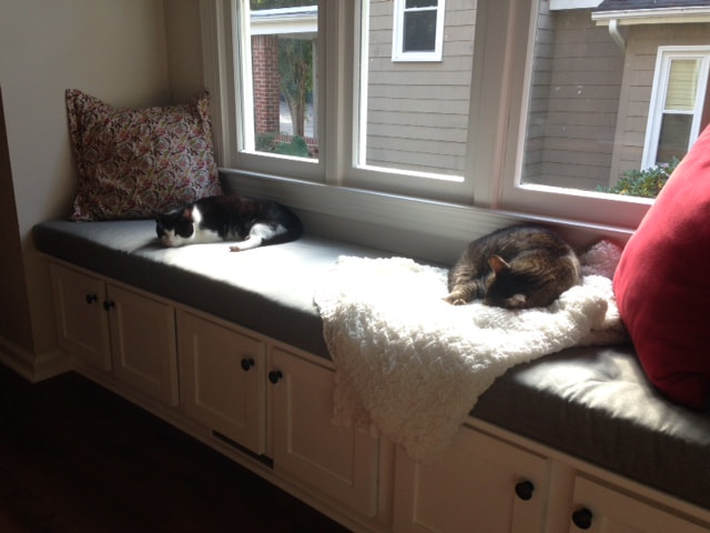 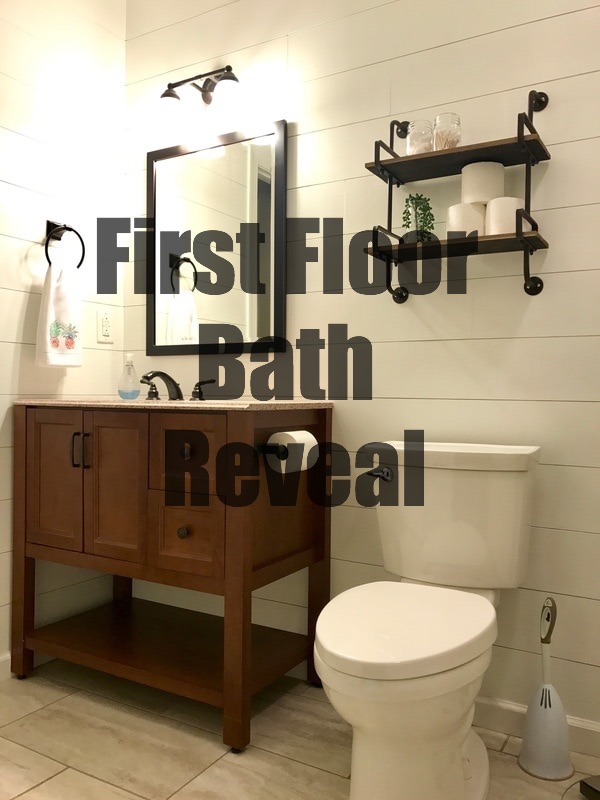 After 4 weekends, the first floor bath is *officially* (but not really) finished. I know, I know, you're probably wondering at this point "What do you have left to do?" Honestly, I swear I am almost done; just one more coat of paint on the baseboards and moulding! Just as a reminder of where we started two years ago.... 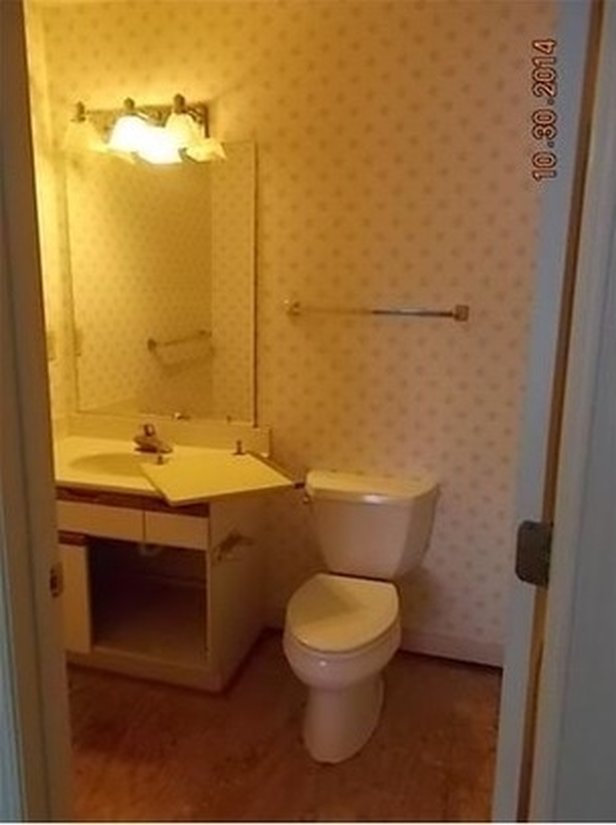 To now.... 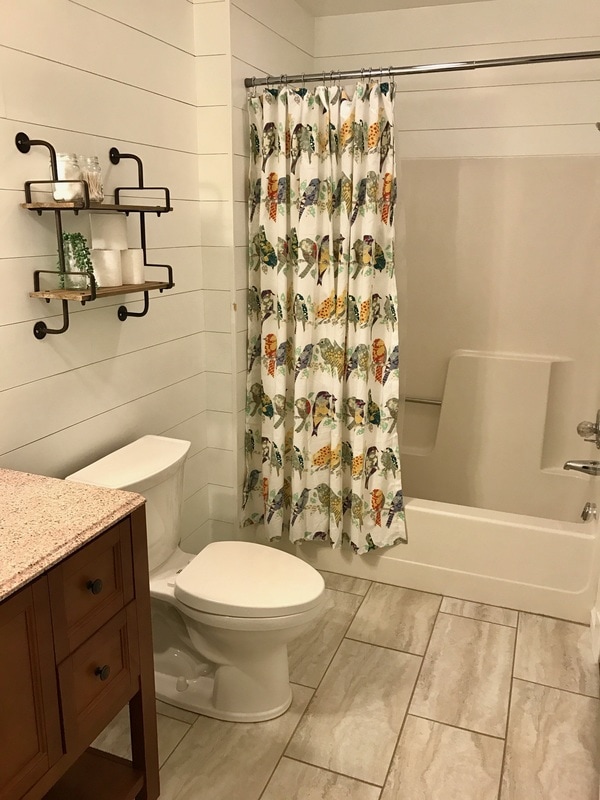 I love, love, LOVE the shiplap walls, but I felt like the white walls needed some color somehow. I went on a search to find a colorful shower curtain and World Market had the winner! The bird shower curtain was about $25 with a coupon, and I replaced the old tension rod with this $8 one from World Market as well. 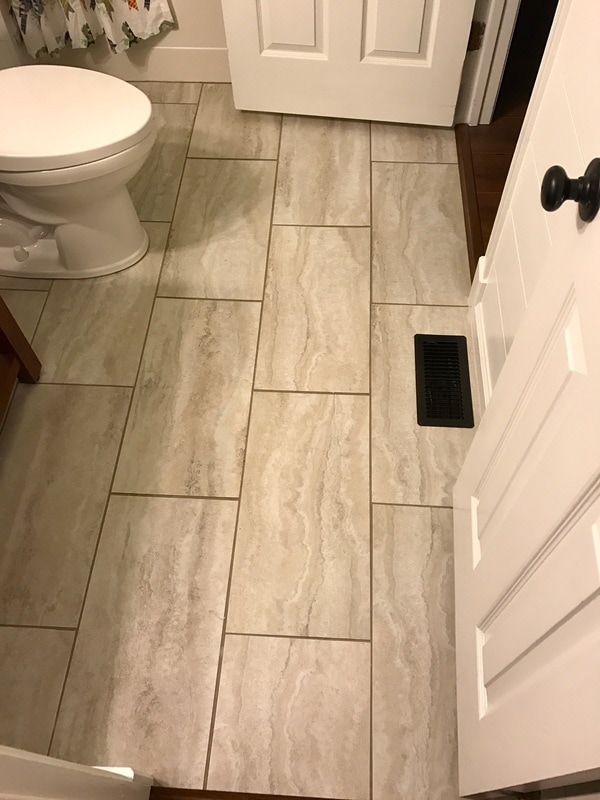 I put down the floor almost two years ago, but I tried my best to really clean it up. I scrubbed away the grout haze and swept, vacuumed, and scrubbed the floor some more. I also spray painted the rusty old floor vent cover oil rubbed bronze. One of the smallest (but biggest) changes in the room was the shower fan. New fans are pretty expensive, and mine was working perfectly fine but it was pretty gross. A couple coats of spray paint and it was as good as new!
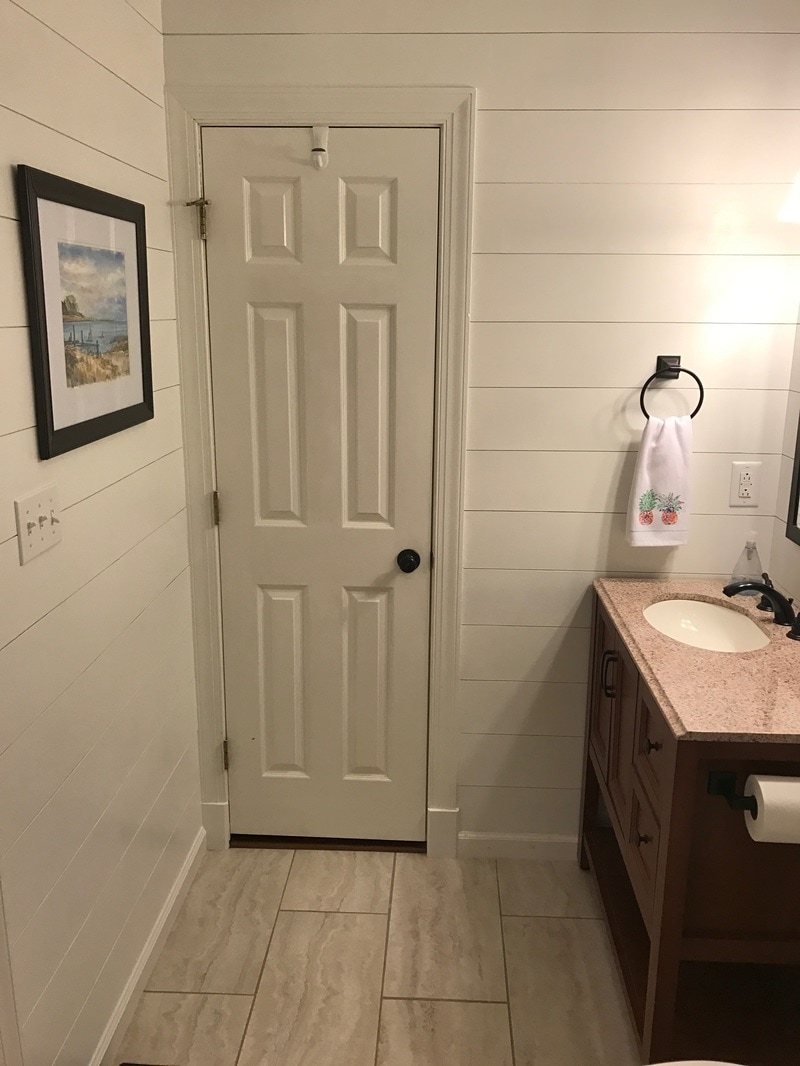 Brian's grandmother painted the watercolor on the wall. Its so beautiful and fits right in with the beach theme! I love it! We picked up the frame from Marshall's for $10, and spray painted it oil rubbed bronze. The original color wasn't great, but for ten bucks, I decided it was something we could easily change. 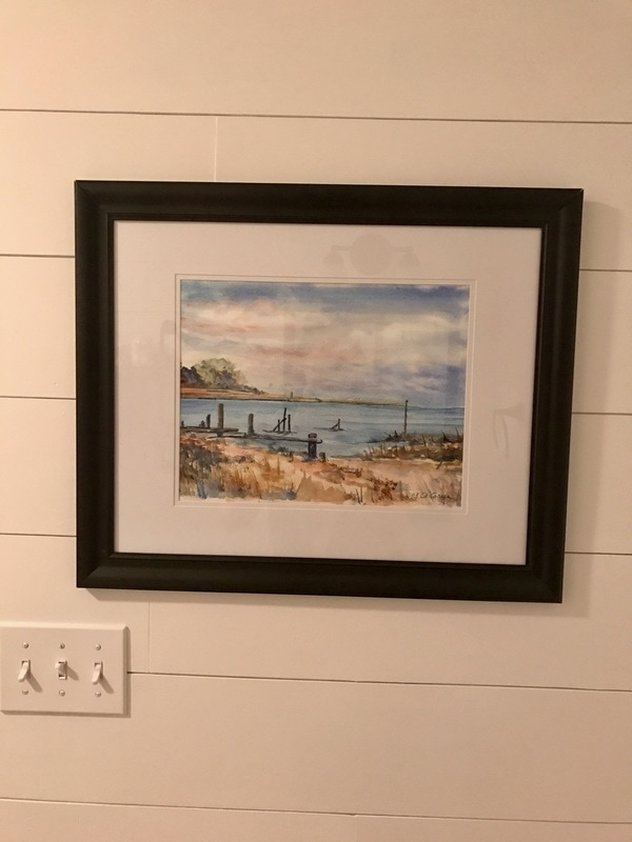 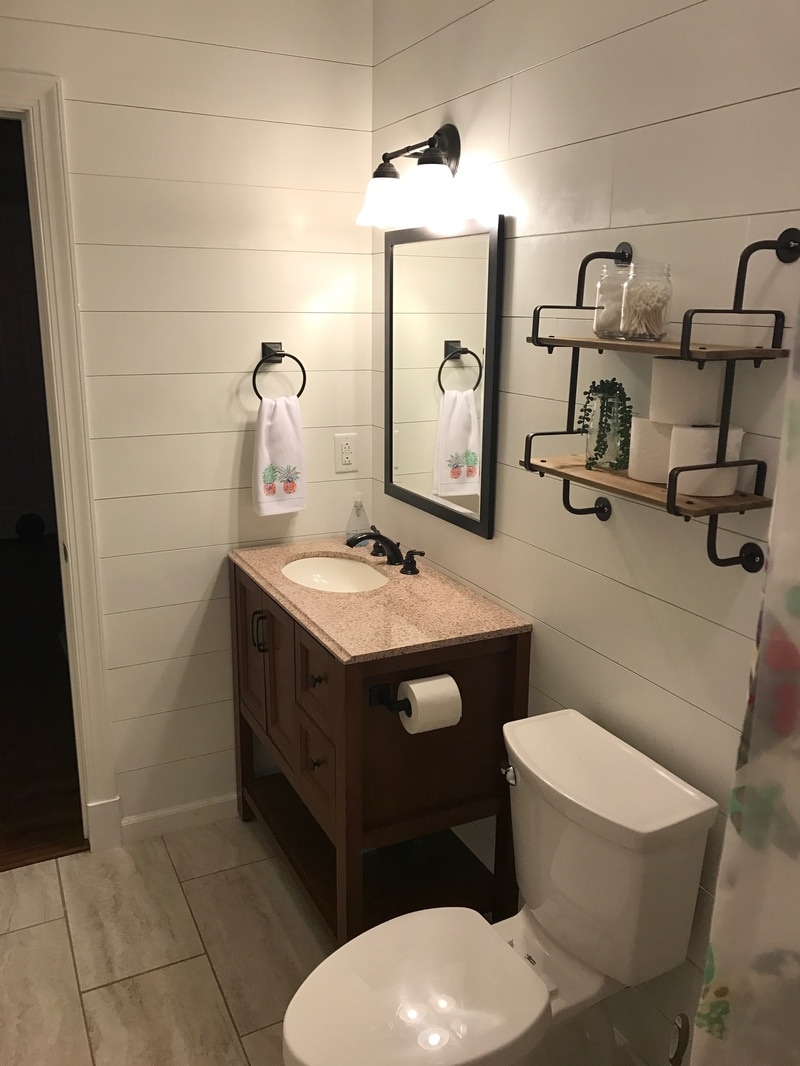 I ordered both the hand towel ring and the toilet roll holder from Amazon. The mirror is from Lowe's, and the vanity and light are from the Home Depot (although I'm not sure I would recommend the vanity anymore). The vanity is beautiful and sturdy, however the laminated wood is peeling off in some areas on the doors and drawers. This vanity literally never gets used so I don't understand why it is peeling off. 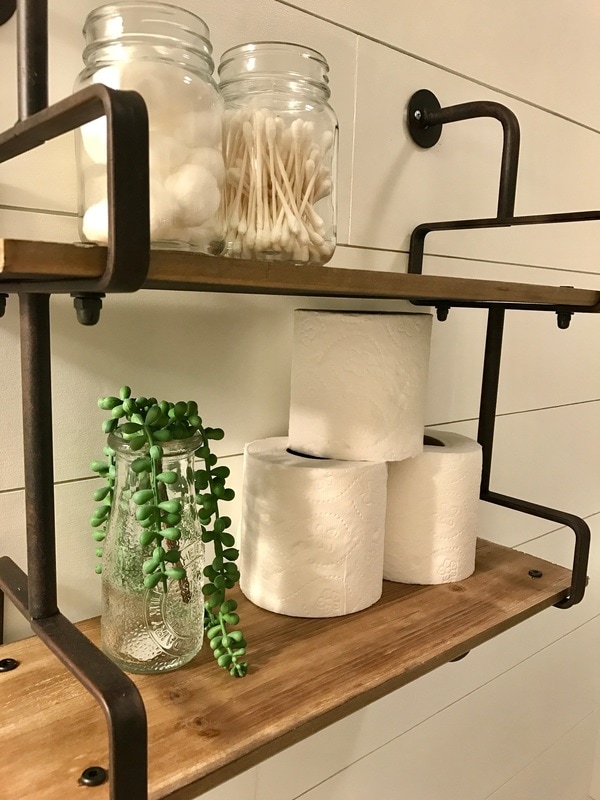 The adorable shelf above the toilet is from Hobby Lobby. I snagged it on sale for $25. I love it! 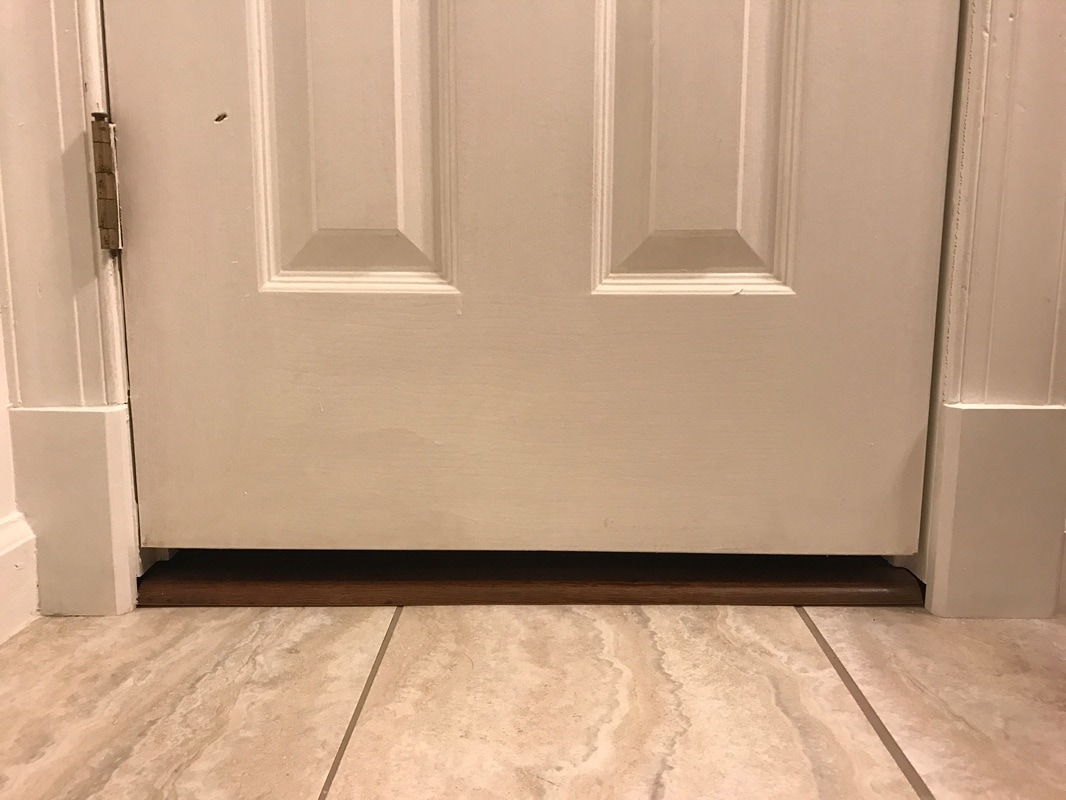 And look at those plinth blocks! No more giant gaps!!! Woot woot!! 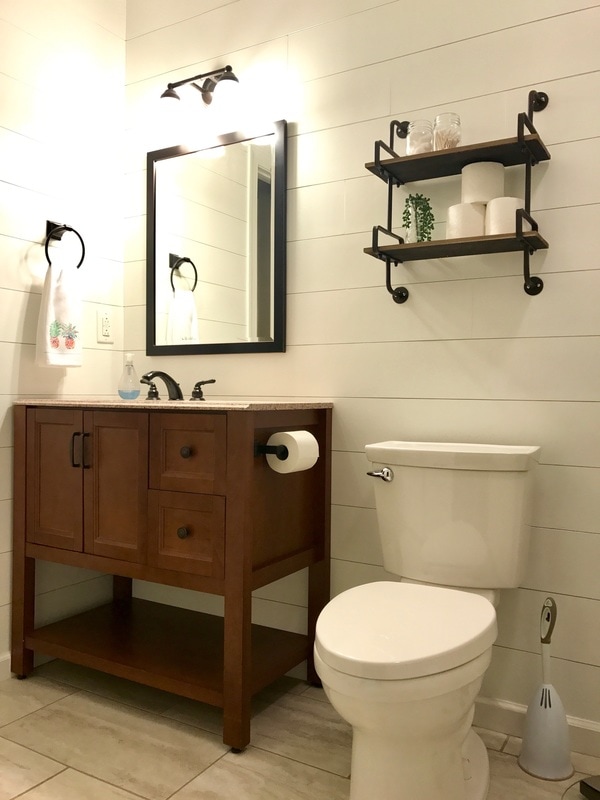 I have to admit, I LOVE this bathroom! I am so happy it turned out so well, and I am so happy that it is finally done. So, what do you guys think?
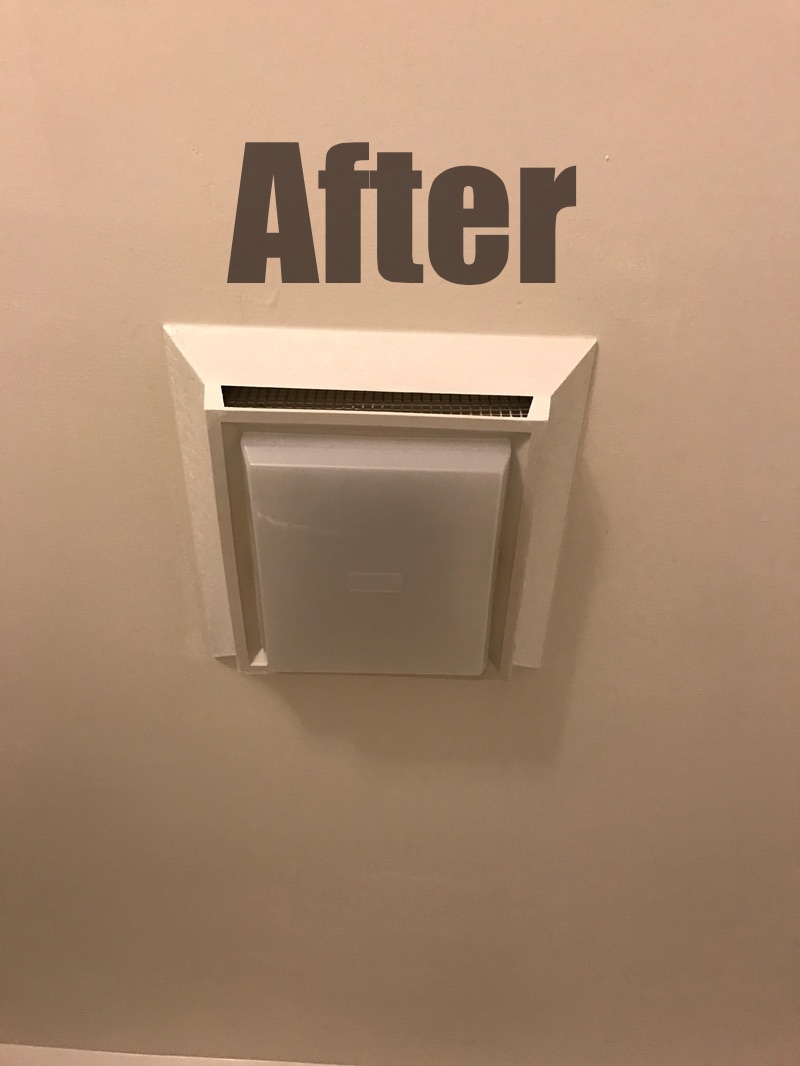
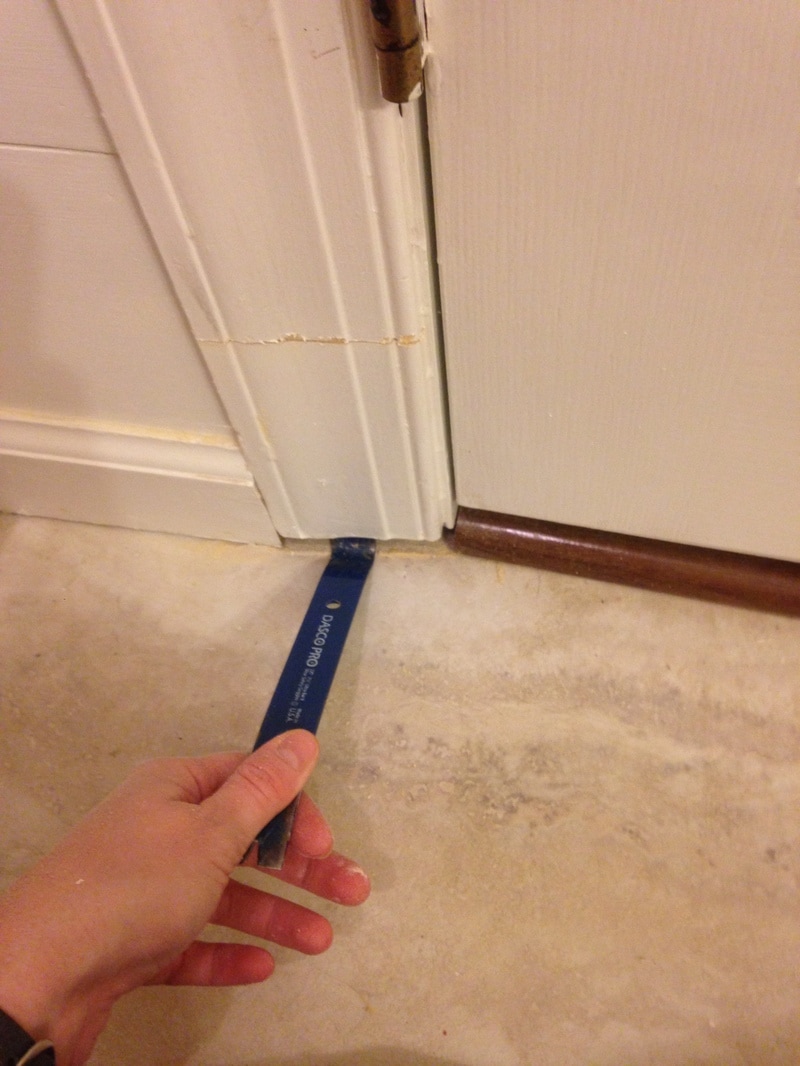
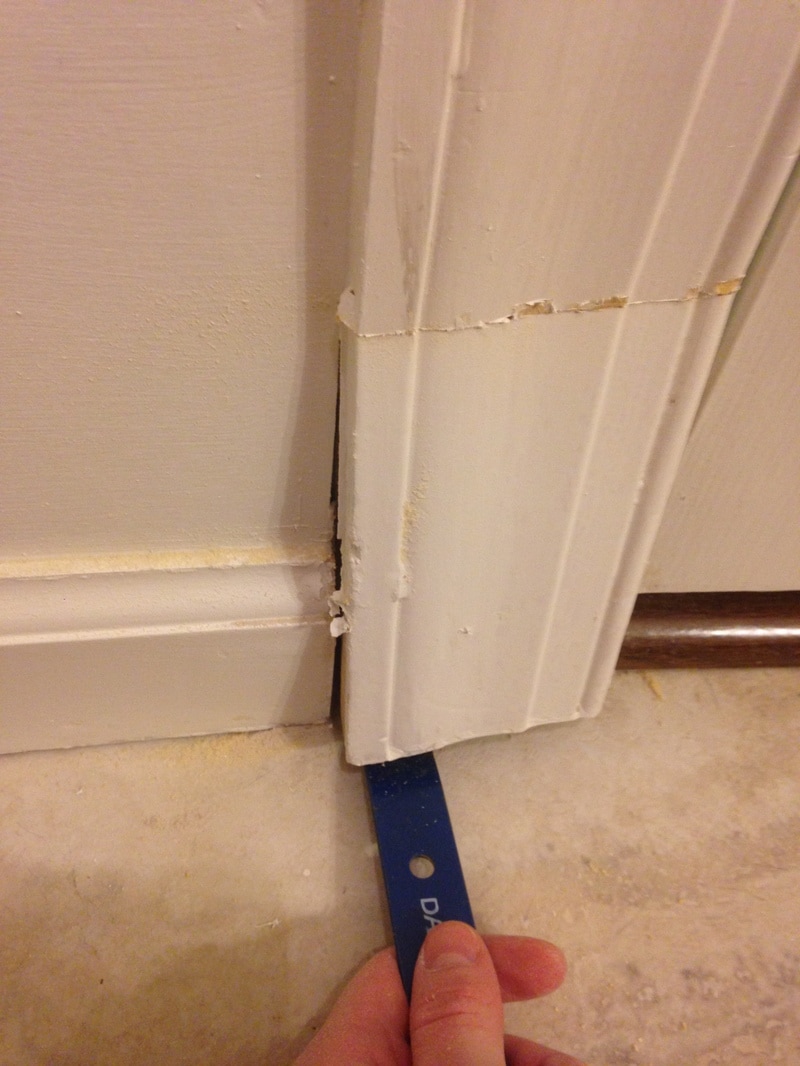
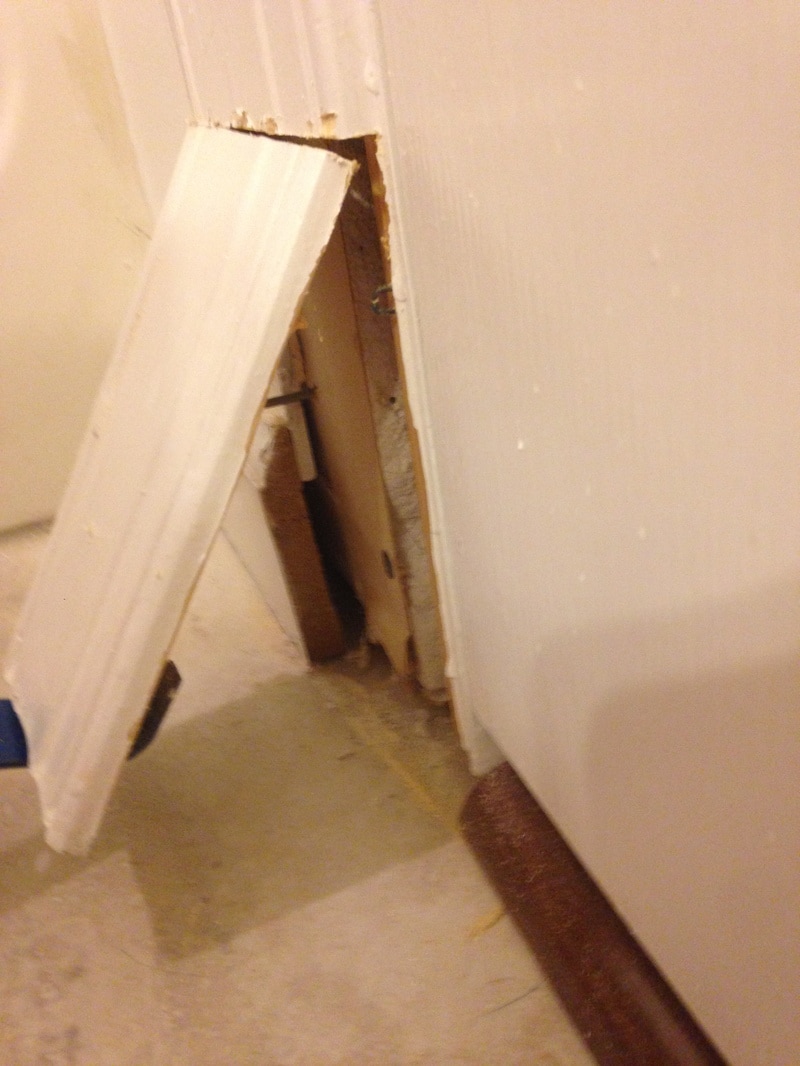
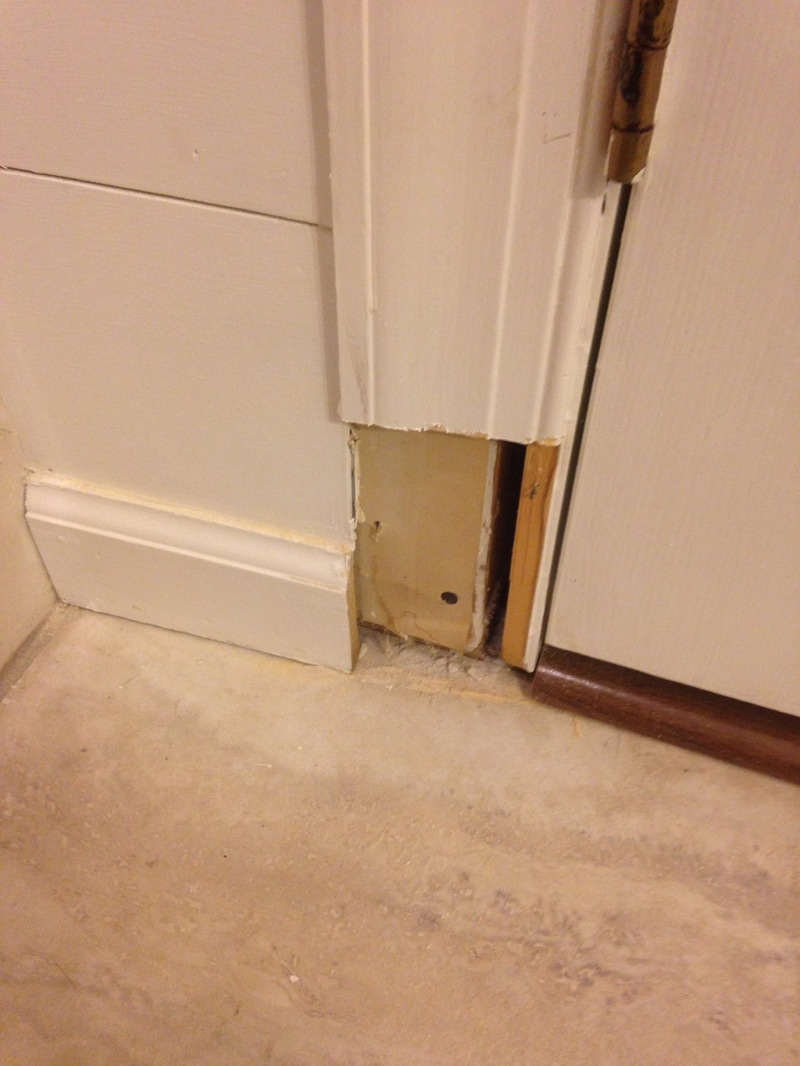
 One of the issues that bothered me for a while in the first floor bath was a giant gap between the floor and the door moulding. When I first bought the house, every inch of flooring had been covered in carpet. Yes, carpet. Even in the bathrooms (cue the throw-up noise now). Fortunately for me, the bank had removed the carpeting before I closed on the house (yay!). When I finally installed flooring throughout the house, most of the gaps created from the carpet went away, except in the bathroom. Hence, my dilemma. 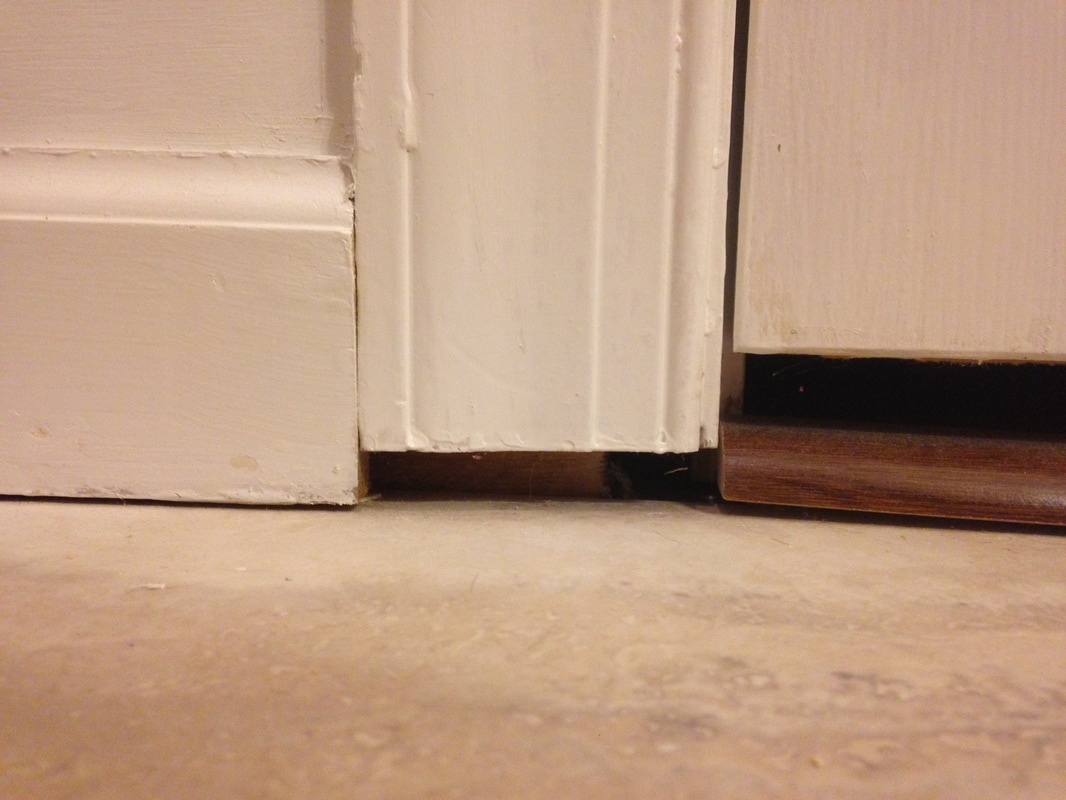 I went through many options to cover the gap, from replacing the trim to installing quarter round, however quarter round is not meant to go in front of door trim, and replacing the trim is too much work. After doing some research, I discovered the "plinth block." A plinth block is simply decorative moulding that is placed at the bottom of door trim to make the moulding look more substantial. Perfect. 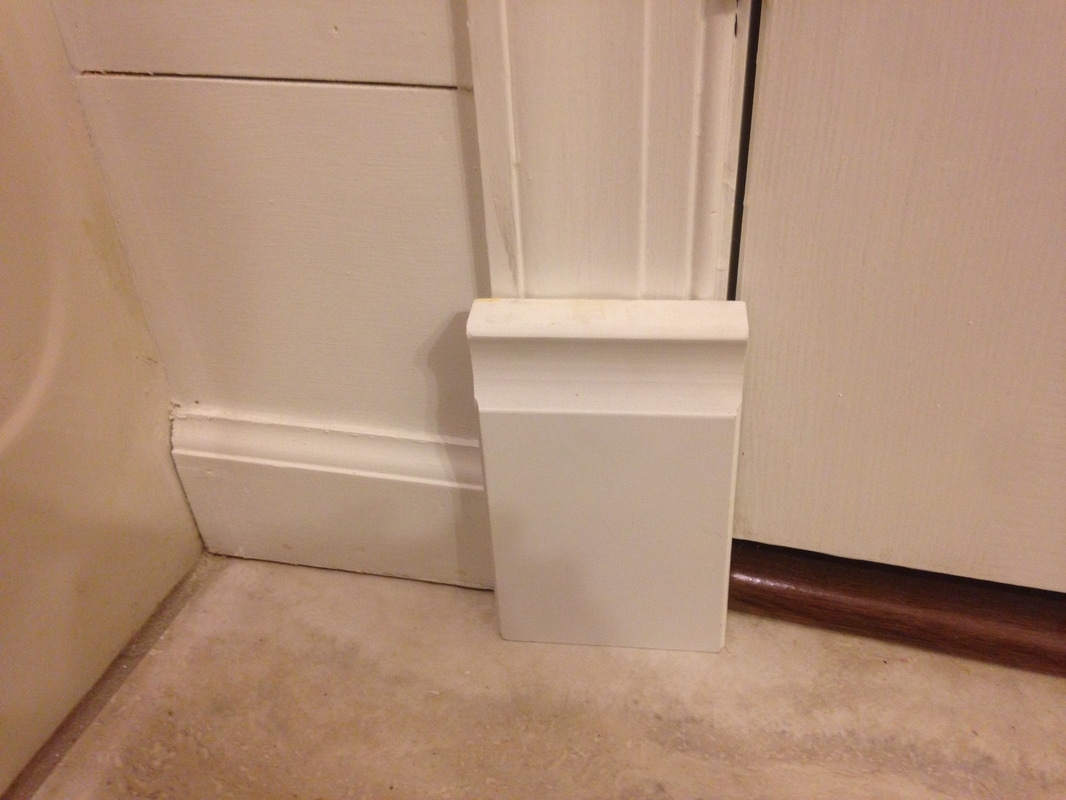 Although I wasn't sold on the plinth block available at The Depot (see above), it was the only option they had so I bought it. At around $4 each, it wasn't a huge investment but made a big impact. 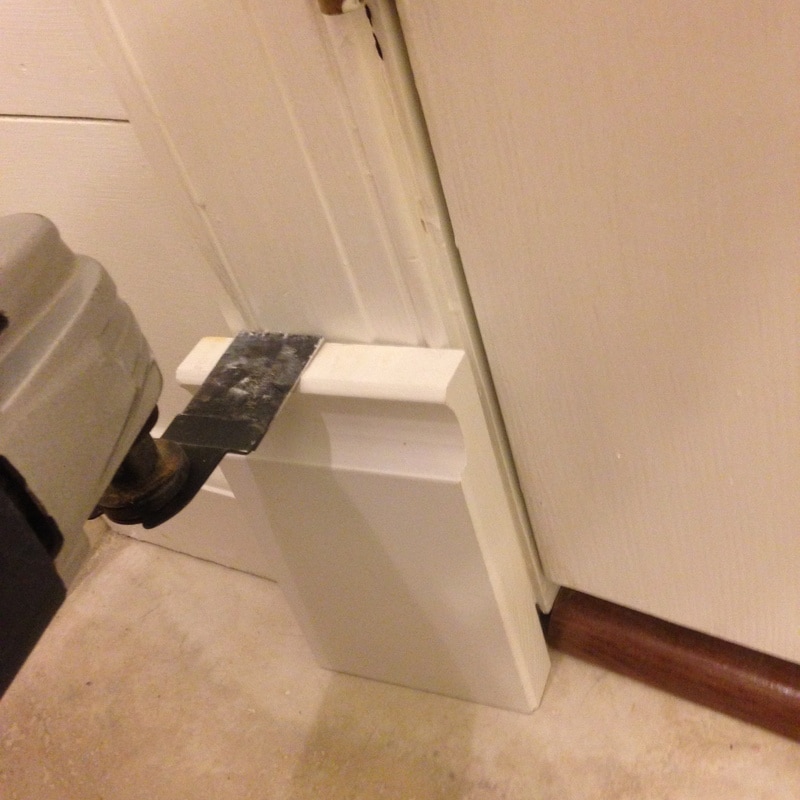 To install the block, I started by using a door jam saw to cut the current trim at the correct height. I then pried it out, being carful not to split any wood.
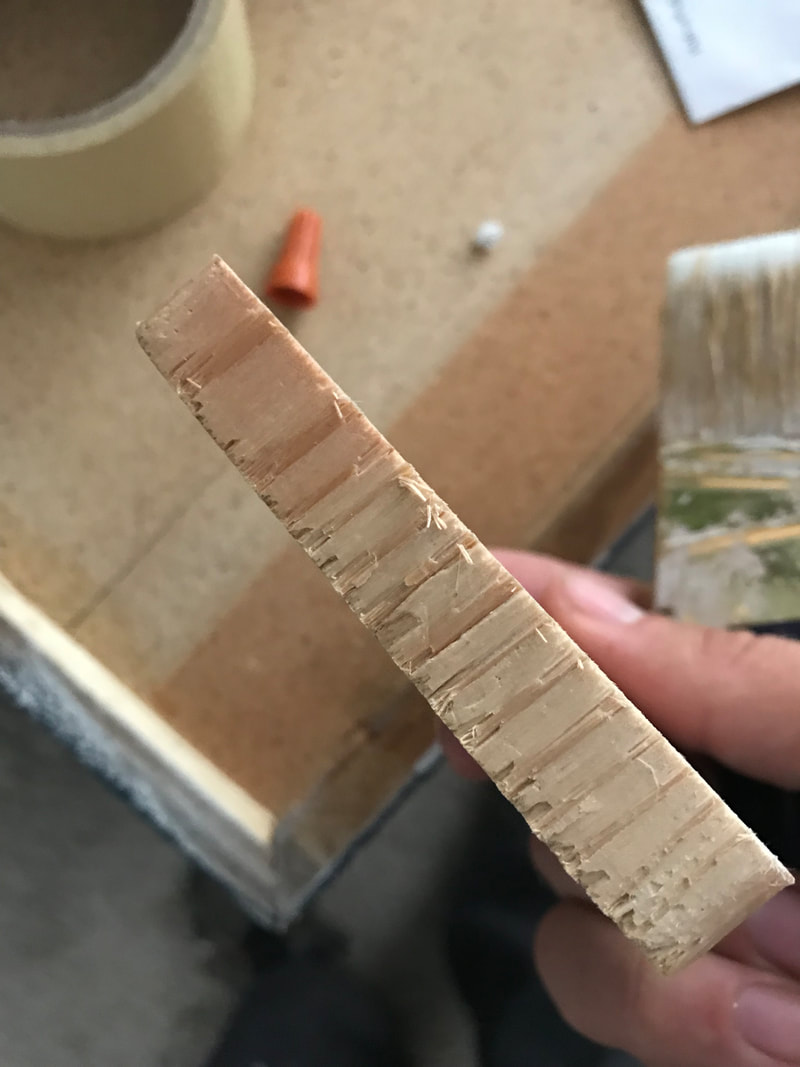
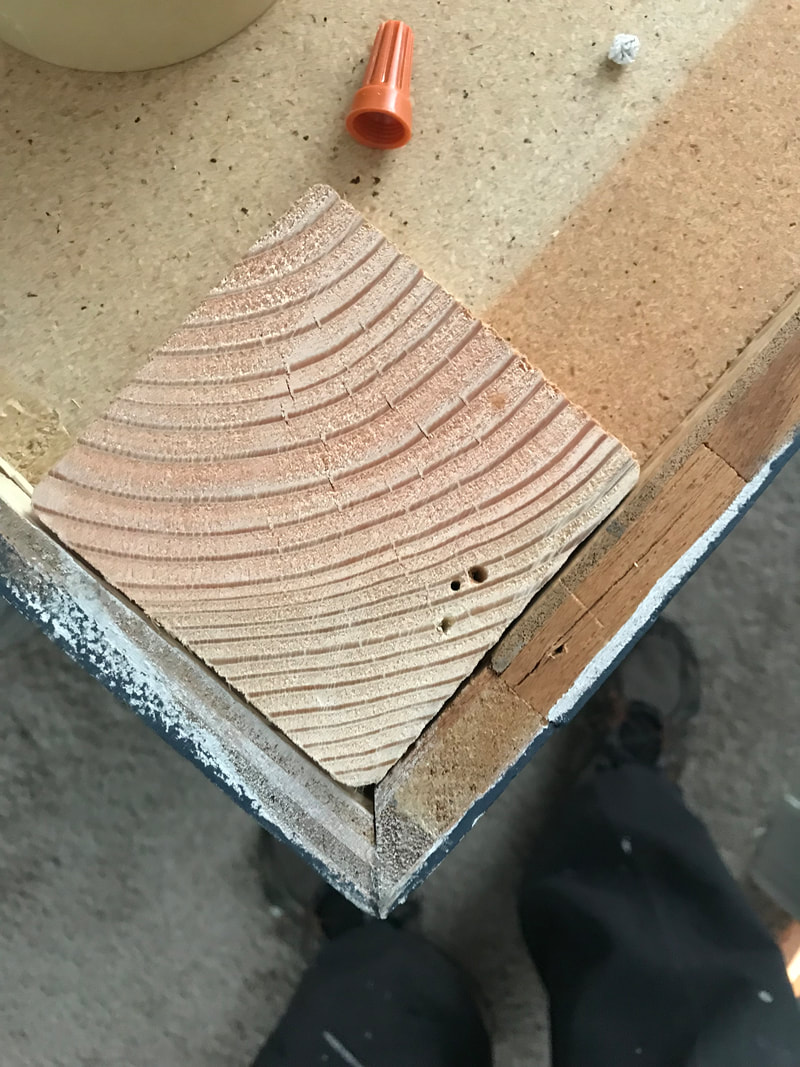
After I removed the trim, I cut the plinth block down to size on my table saw and installed it. 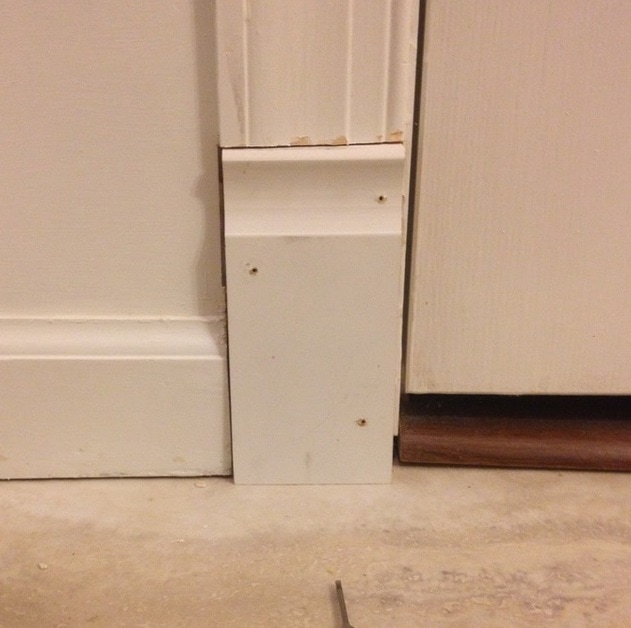 I hated it. It looked too dinky and the victorian style of the block just didn't match the rest of the bathroom. I did more research online and decided that I could just make my own simple plinth block on the table saw with 3/4" MDF. Luckily, I had enough leftover from a pervious project to create 4 blocks, so I cut them to size (a bit wider than the door trim), and ripped two bevels into the sides to make it a bit more decorative. Simple, easy, and they solve my gap problem. 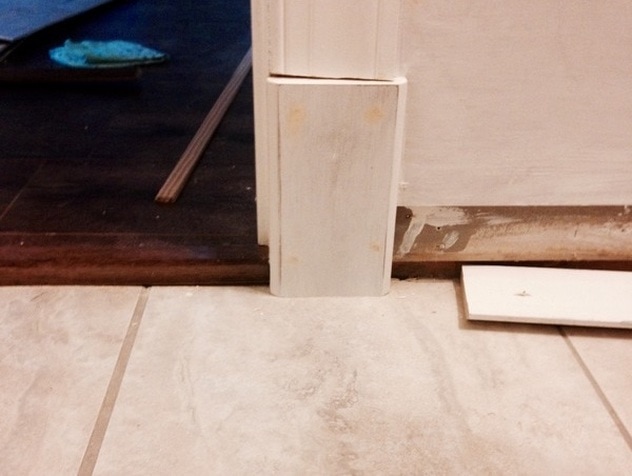 I even tried my best to scribe one plinth around the base moulding. It isn't perfect, but for doing it on the table saw I'd say its great! 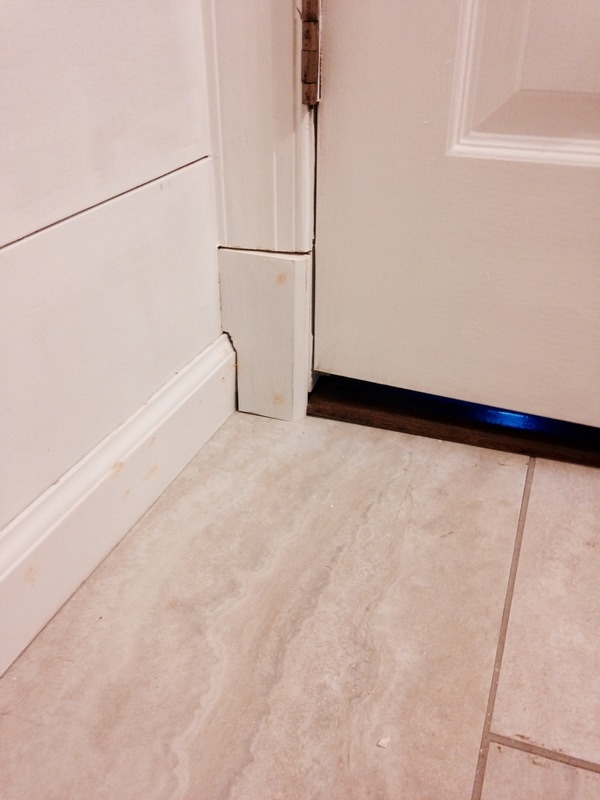 Now I just need to caulk and throw on another few coats of paint! The bathroom is almost done! 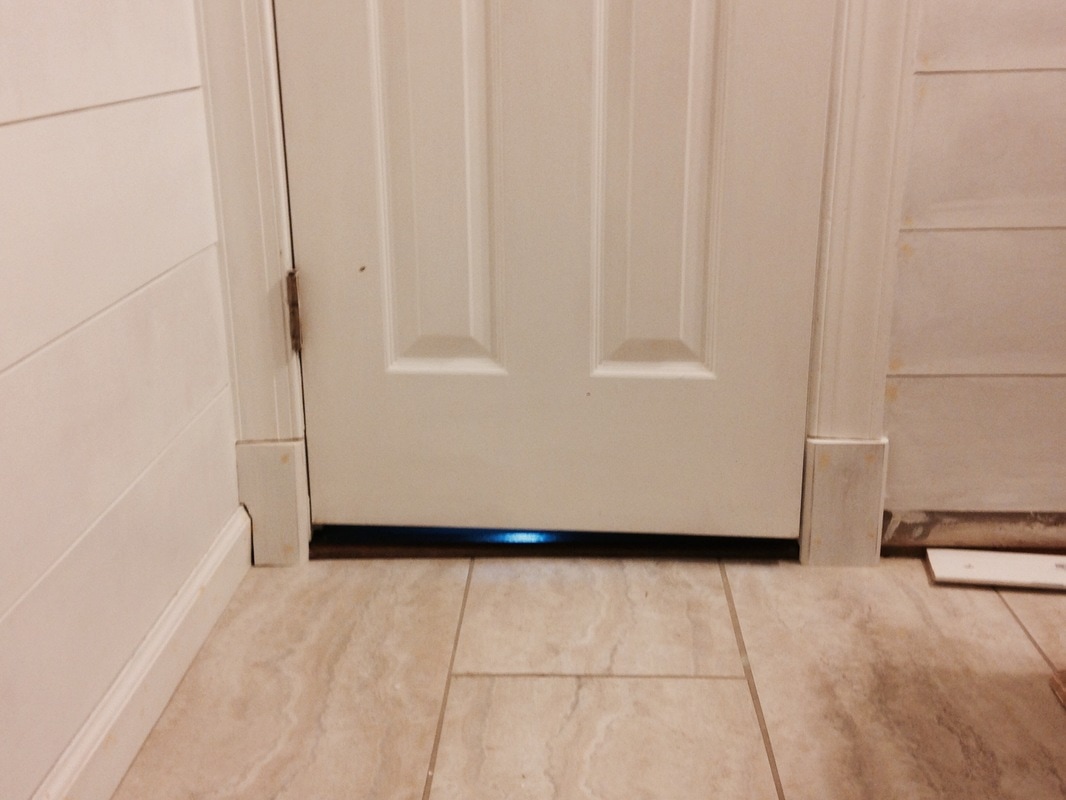 I'm just going to put this out there - Joanna Gaines makes me want to cover everything with shiplap. And DIY network makes you think you can do anything on your own. And as I've learned over the past two years, all in moderation. With that being said, I'm renovating my first floor bath (again), this time with shiplap.  The above bathroom isn't actually the first floor bath, however both guest bathrooms were essentially the same. Awesome 80's wallpaper, wonderfully disintegrating melamine cabinets, some pretty great lights, and no flooring. 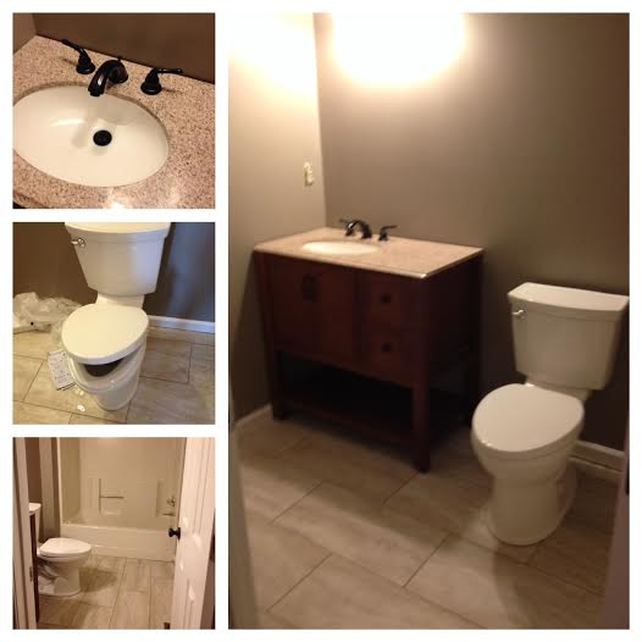 Above is the first remodel, which really was a huge change from the 1980's melamine. I never really fully finished this remodel though - the vanity isn't attached to the wall and I still don't have a mirror for above the sink. After living with the brown walls for about a year, I decided I hated the color and painted it a bright blue.
When I was almost finished painting it blue, I decided I hated that color as well and stopped. The bathroom has been like this for the past six months or so. It's been a sad six months for this poor bathroom. Well - time for an update! Again! 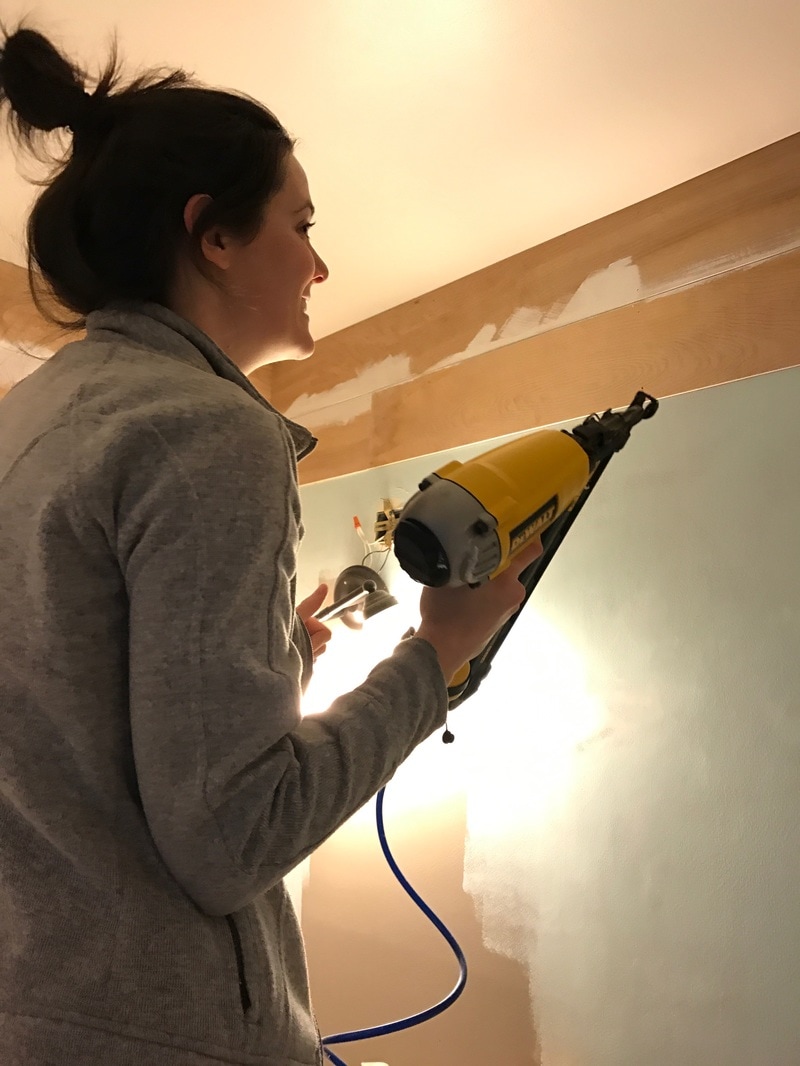 More pictures and updates soon!
|

about meHi! I'm Lauren! I'm a twenty-something teacher and homeowner in North Carolina. I love math, decorating, and getting down and dirty learning new things about home renovation and repair. Categories
All
Archives
December 2018
|
 RSS Feed
