|
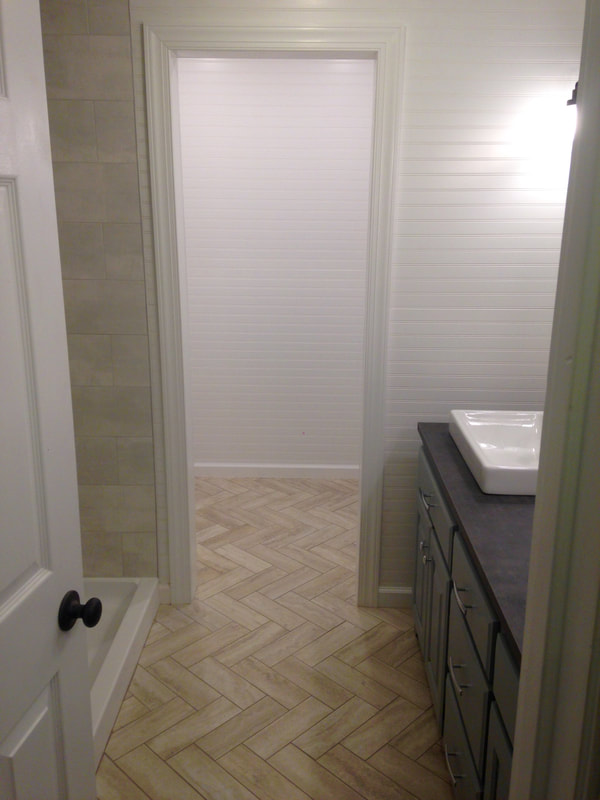
After almost three years, the Master Bathroom is finally finished! We literally put the last touch on AFTER we closed on the house (I forgot to caulk around the shower handle). With about $3000 invested and lots of blood, sweat, and tears, it was a total transformation. 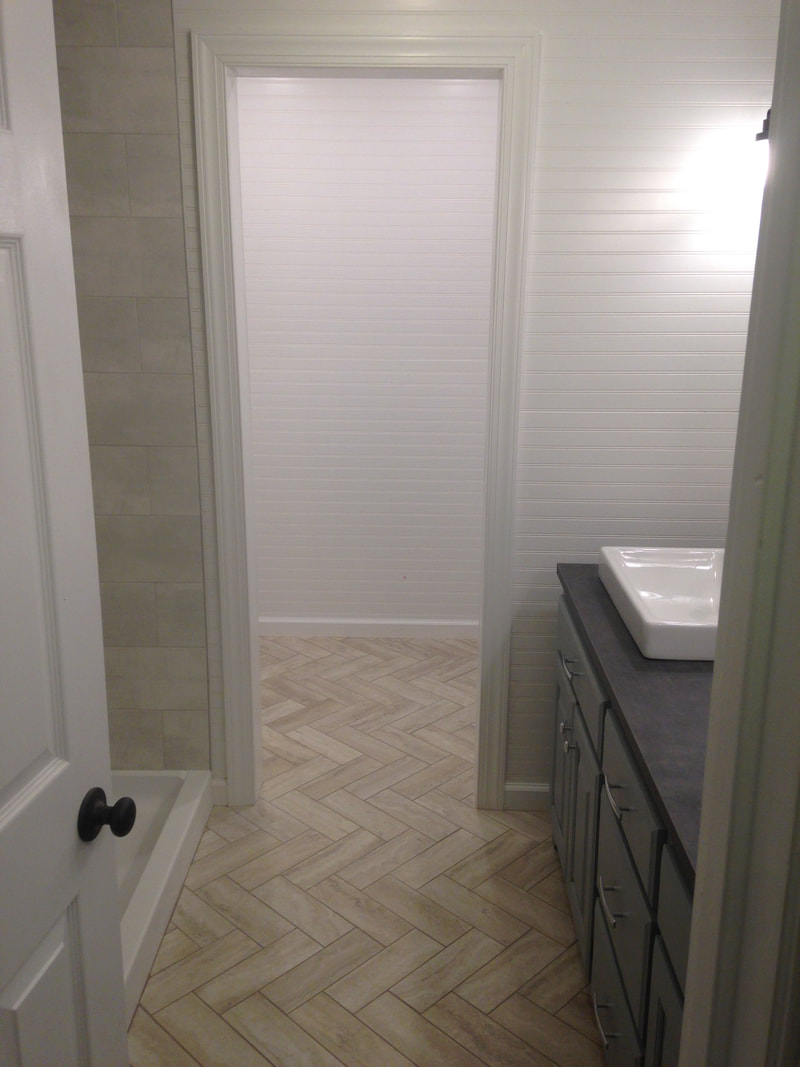 A view of the empty closet area. If we hadn't sold the house, we would have built custom storage for the closet, including two or three built-in dressers, space for shoes and accessories, and poles to hang shirts/dresses. However, the new owner will be able to layout storage in the closet as they see fit. 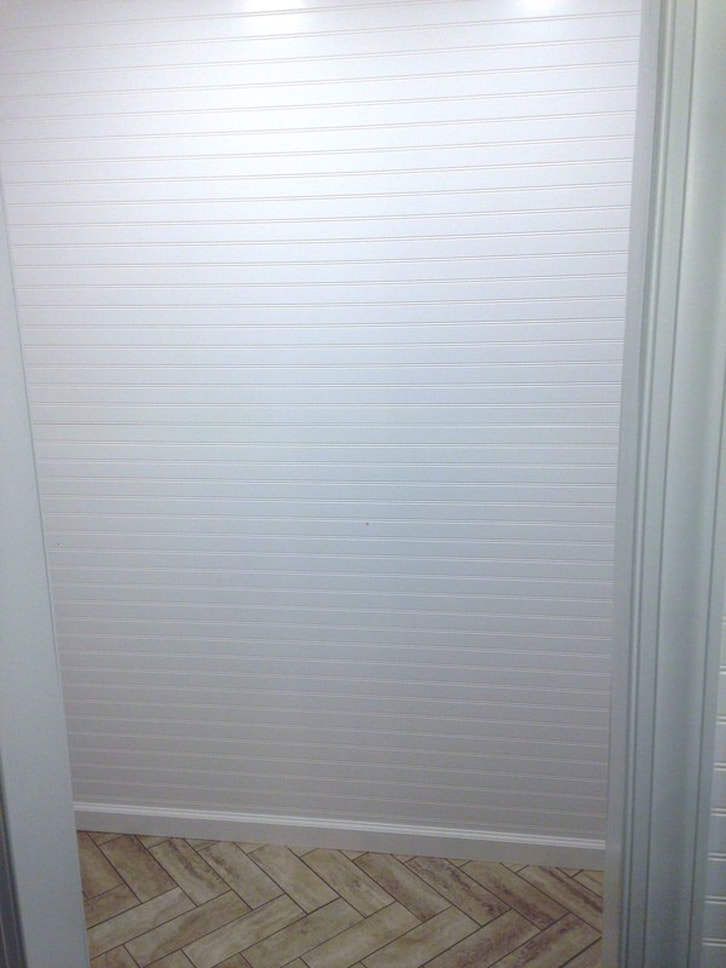 The soffit in the closet hides a giant pipe coming from the other bathroom. I think it turned out pretty well! 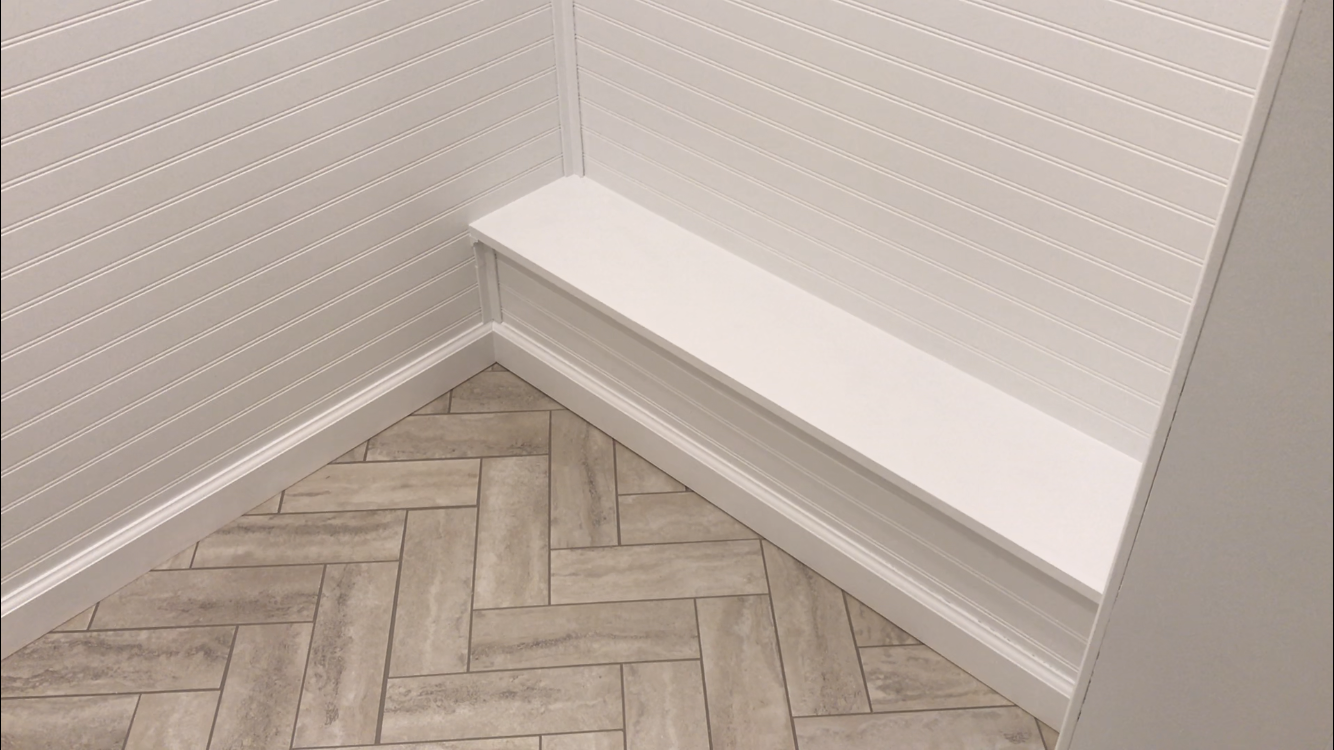 Apparently it was difficult for me to get the entire shower in one shot... 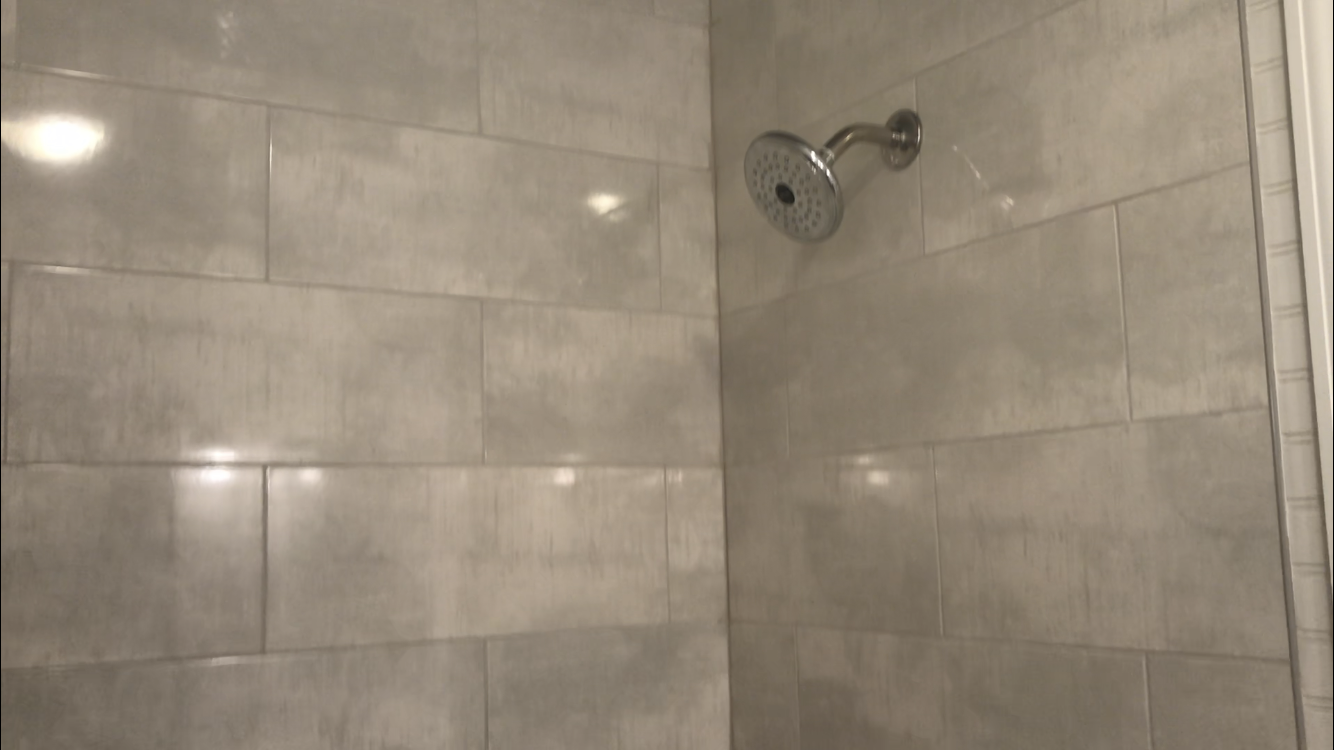 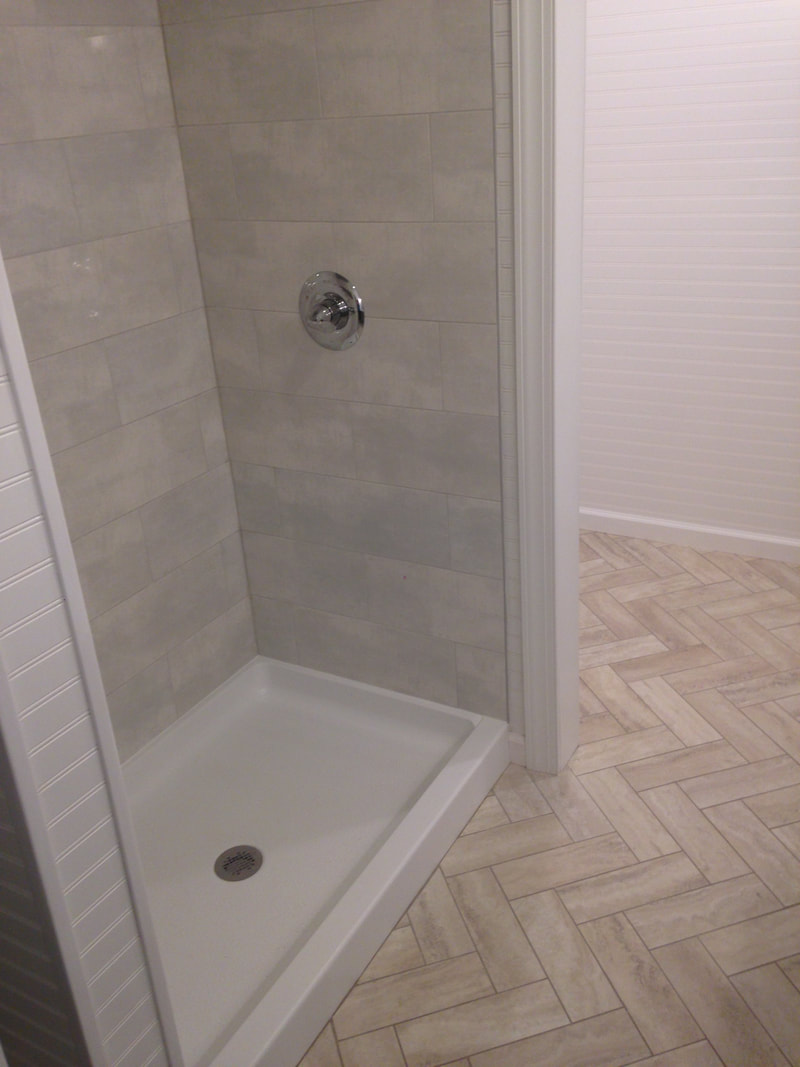 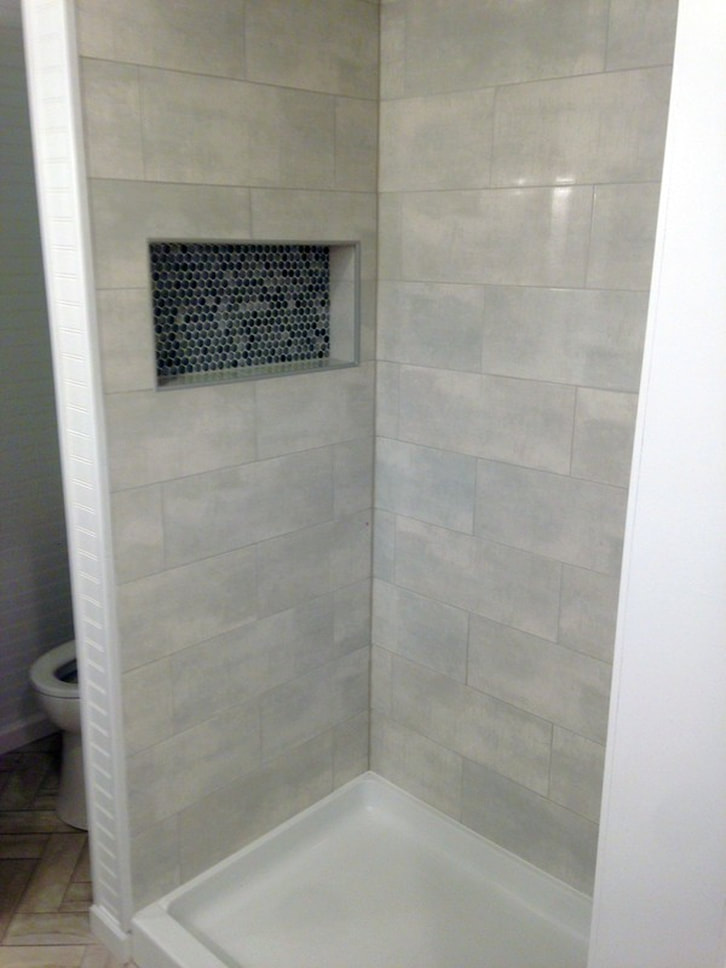 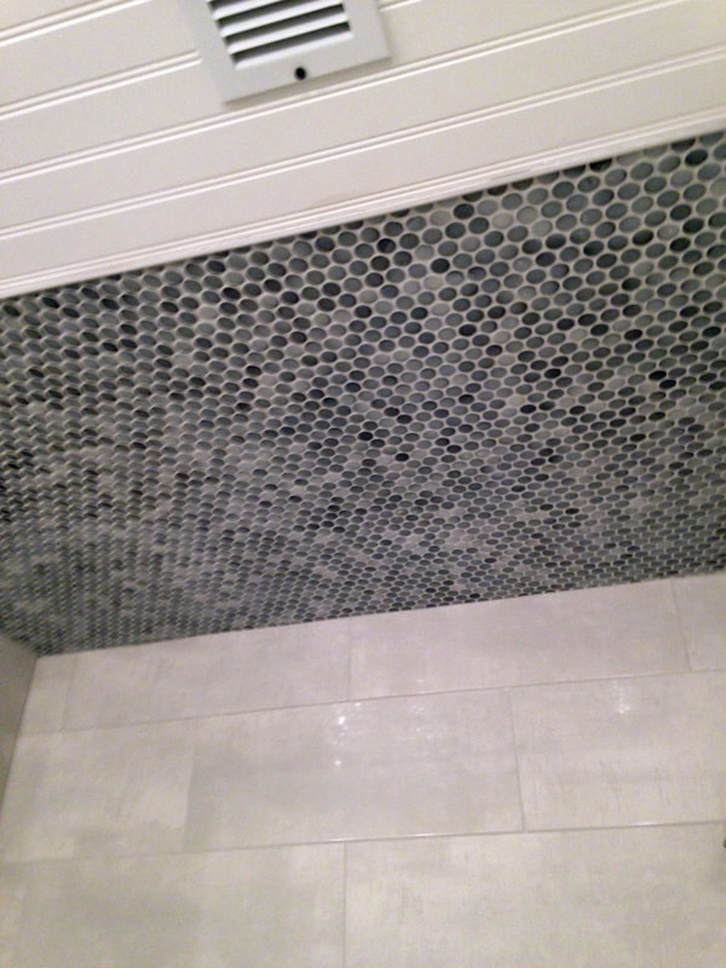 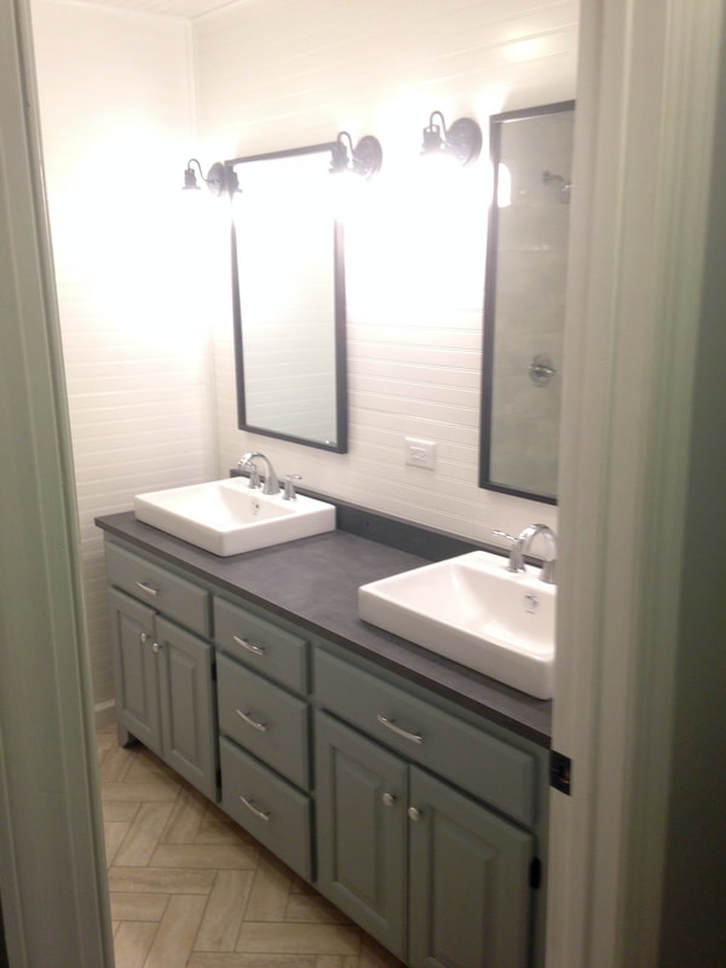 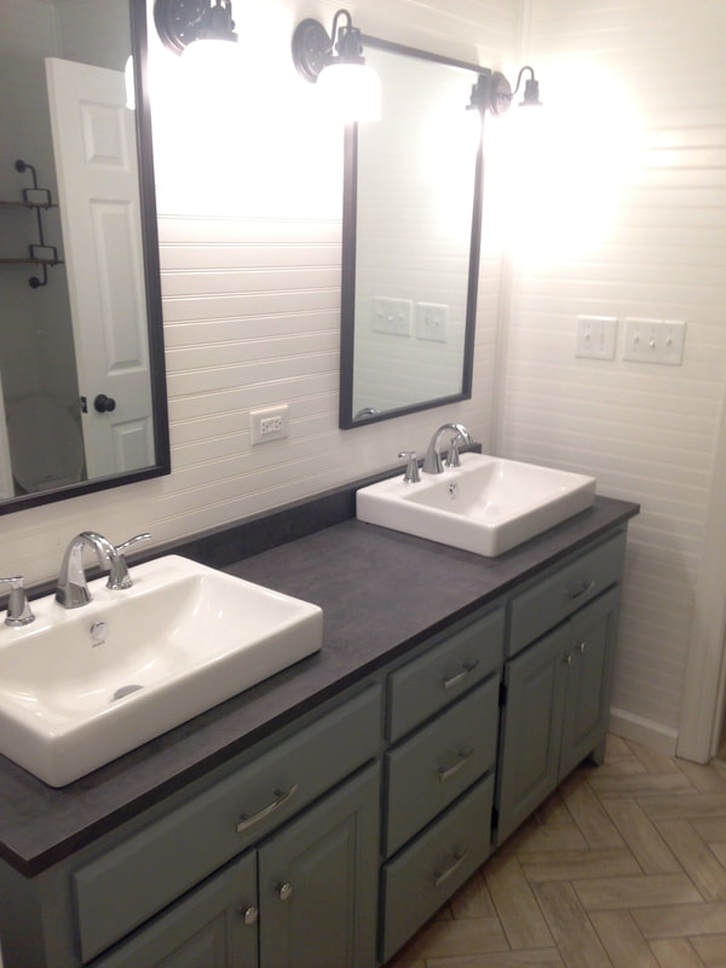 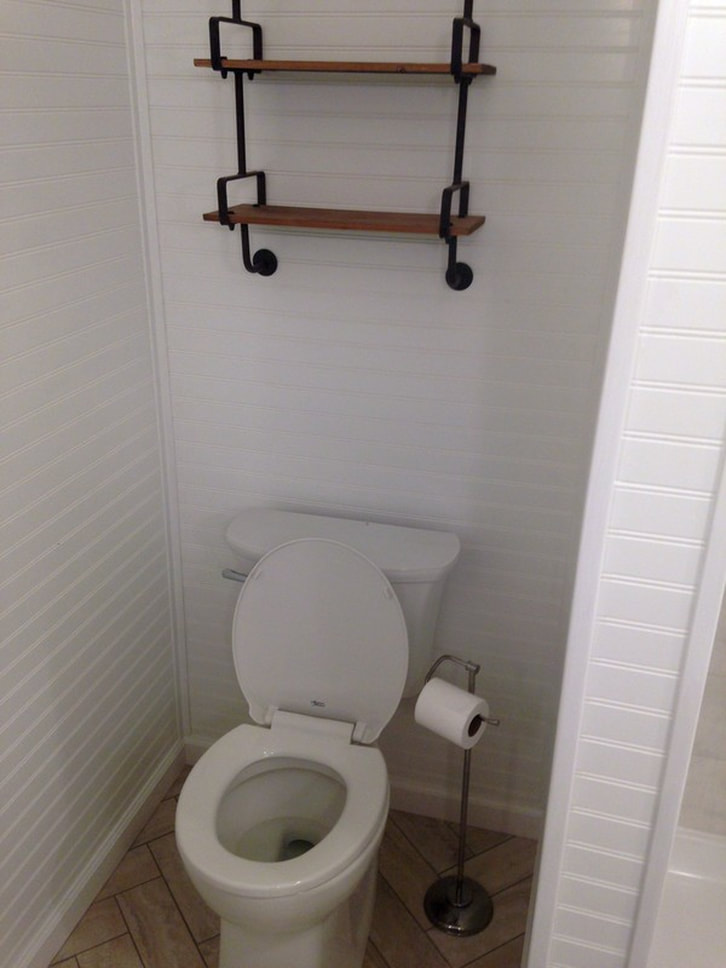 I really wish my pictures were better quality, but since we were in such a rush to finish, I only took them on my cell phone (and apparently not great pictures at that). I wish we could have styled the bathroom with pretty flowers and towels, however these final pictures were taken at 1 am the night before we closed. To remind you, here's a quick before and after picture taken from the hallway:
A recap of the materials used:
Luxury Vinyl Tile - Lowe's @ $1.00/square foot Vessel Sinks - Lowe's @ $99.00 each Faucets - Lowe's @ $89.00 each Delta Shower Kit - Lowe's @ $129.00 Swanstone Shower Pan - Lowe's @ $350.00 Wall Sconces - Amazon @ $25.00 each Vanity - Craig's List @ $30.00 Vanity Top - Ikea @ $99.00 American Standard Toilet - $179.00 Shower Tile - Floor & Decor @ roughly $175.00 total Beadboard - Lowe's @ $20.00/each (although I don't remember it costing this much) Shelf above toilet - Hobby Lobby @ $25.00 (on sale) Mirrors - Hobby Lobby @ $60.00 each (on sale). I spray painted them oil rubbed bronze to match the lights.
0 Comments
So we wanted to keep the master bath remodel under $5,000, and a huge expense in bathrooms is the vanity. Honestly, I think we spent under $3,000 total (!!), which included all drywall, beadboard, faucets, sinks, light fixtures, the toilet, cement backerboard, floor tile, luan, new exhaust fan, bath accessories, paint, shower tile, and the vanity (and everything else that I missed). So, the vanity. I am in LOVE with Ana White's website, and I had all of these plans of building my own vanity to keep costs down. And I DID build my own vanity! However, when two years go by from the time you start something until when you decide to finish it, sometimes things get repurposed (i.e. a vanity turns into a desk that fits perfectly in a little window alcove).  We put the vanity that I built back in the bathroom to see how it looked with the beadboard, and I really liked it, but I was pretty nervous about the storage situation. The "spa" feel of the vanity seemed nice at first, but the thought of no drawers and no cabinets really started to bother me. Where would you store extra towels, or toilet paper, or makeup?! Plus, then we'd be down a desk! 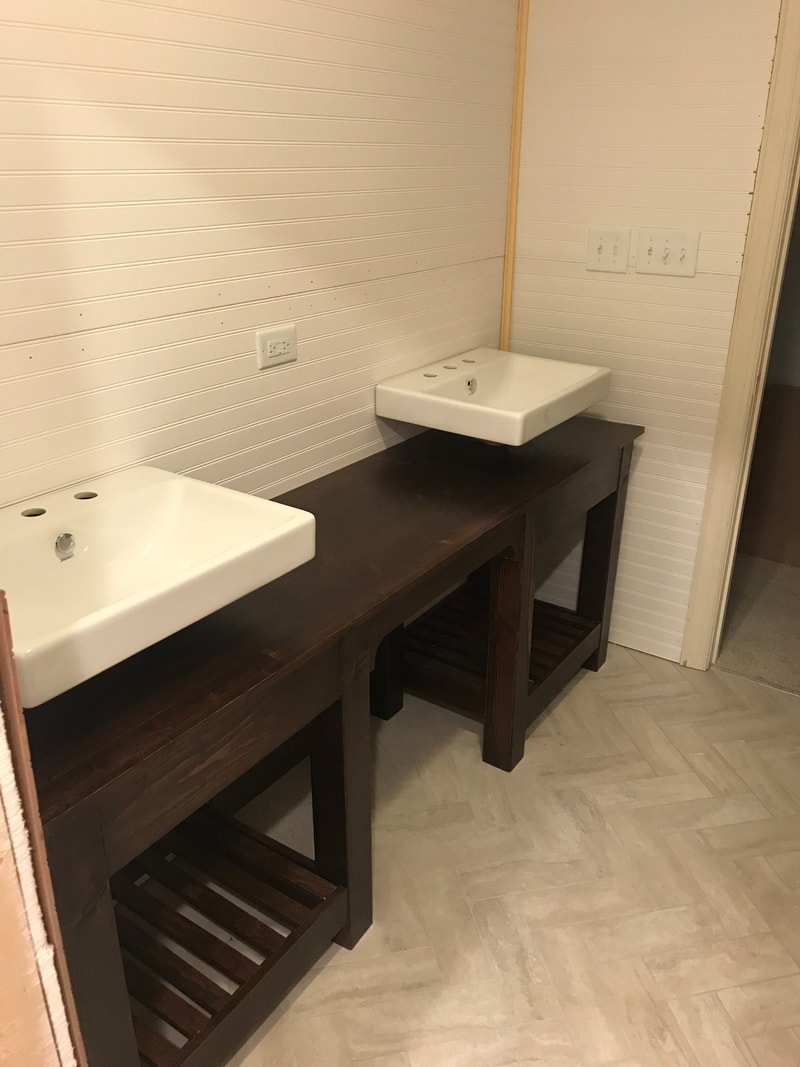 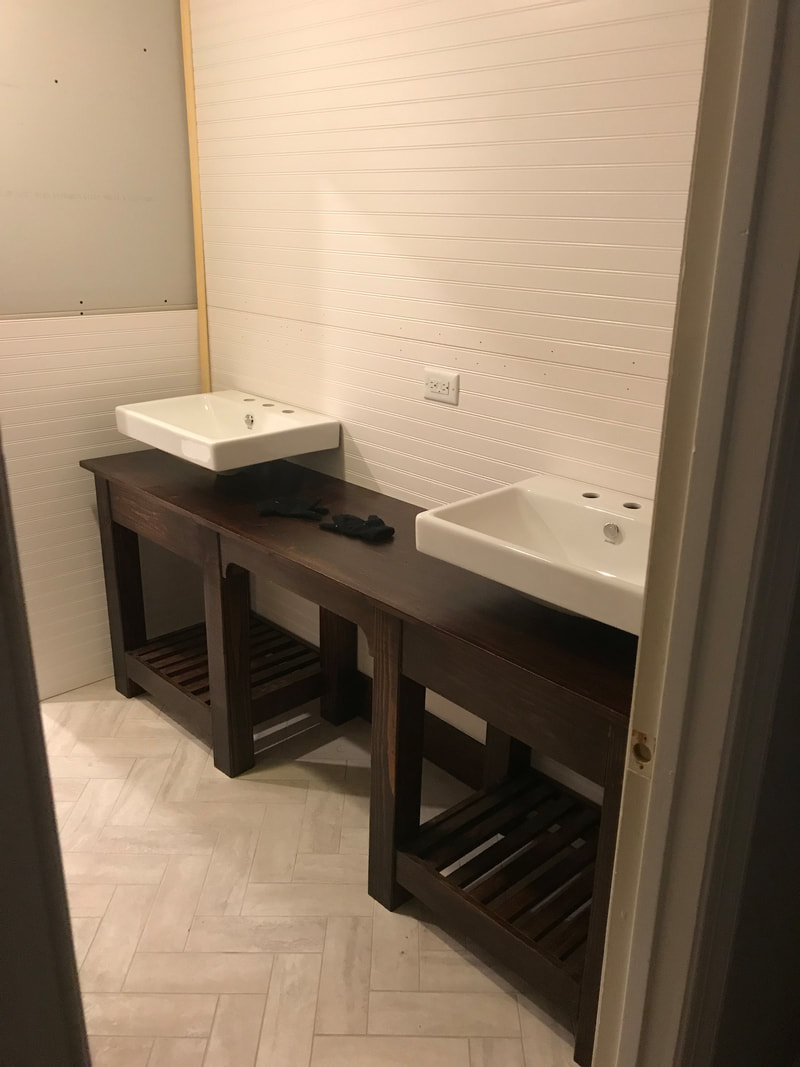 So my search continued until I found a 72" builder grade cabinet for $30 on Craig's List. Unfortunately, I don't have a "before" picture of the vanity, but if you can imagine a 20 year old dark brown cabinet with 1980's handles, then you'll understand what we started with. To spice it up, it got a nice paint job, some furniture feet (I made out of 4x4 scrap lumber), and some new hardware. 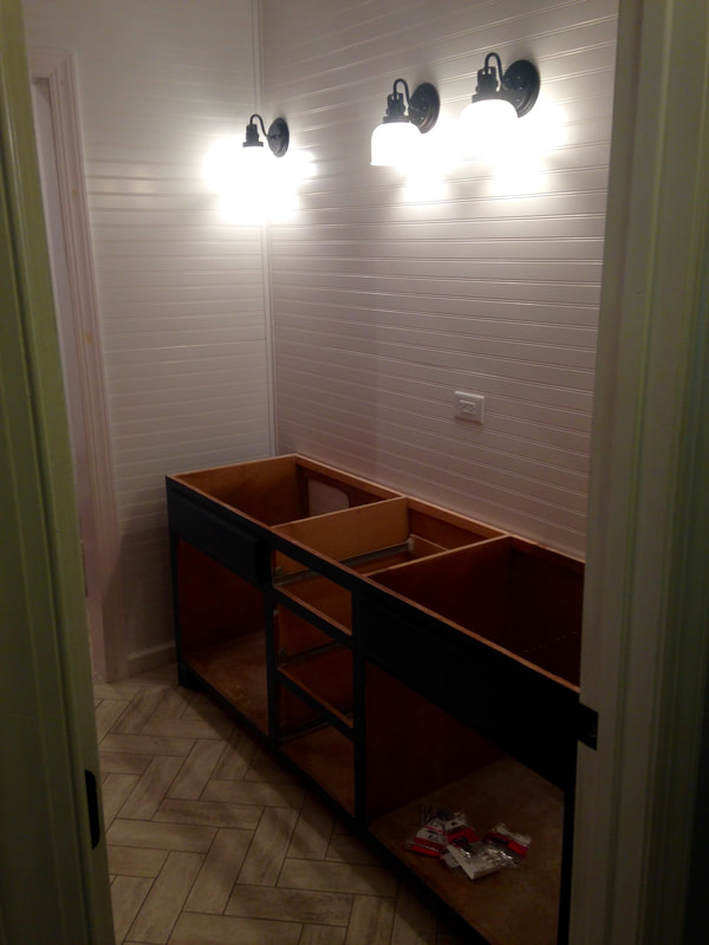 To add height to the cabinet and some extra spice, I built furniture feet for the base. I first demoed the existing base (think of any typical "built in" cabinet with a toe-kick), then added a scrap piece of wood to level the base with the plywood sides, and then fixed the furniture feet to the bottom of the cabinet with L-brackets. I was originally going to buy some fancy furniture feet for the vanity, but they were really expensive and didn't really match the existing cabinet.
You can't really tell in the picture above, but I had initially painted the cabinet a dark navy blue. Once we settled on the Ikea Ekbacken countertop in "concrete effect," the vanity looked too dark for the space. I decided to mix a bunch of colors I already had to create a custom blue-grey color. The pictures on my phone make it look almost like Carolina Blue, but in reality it is more of a light grey with a blue undertone. 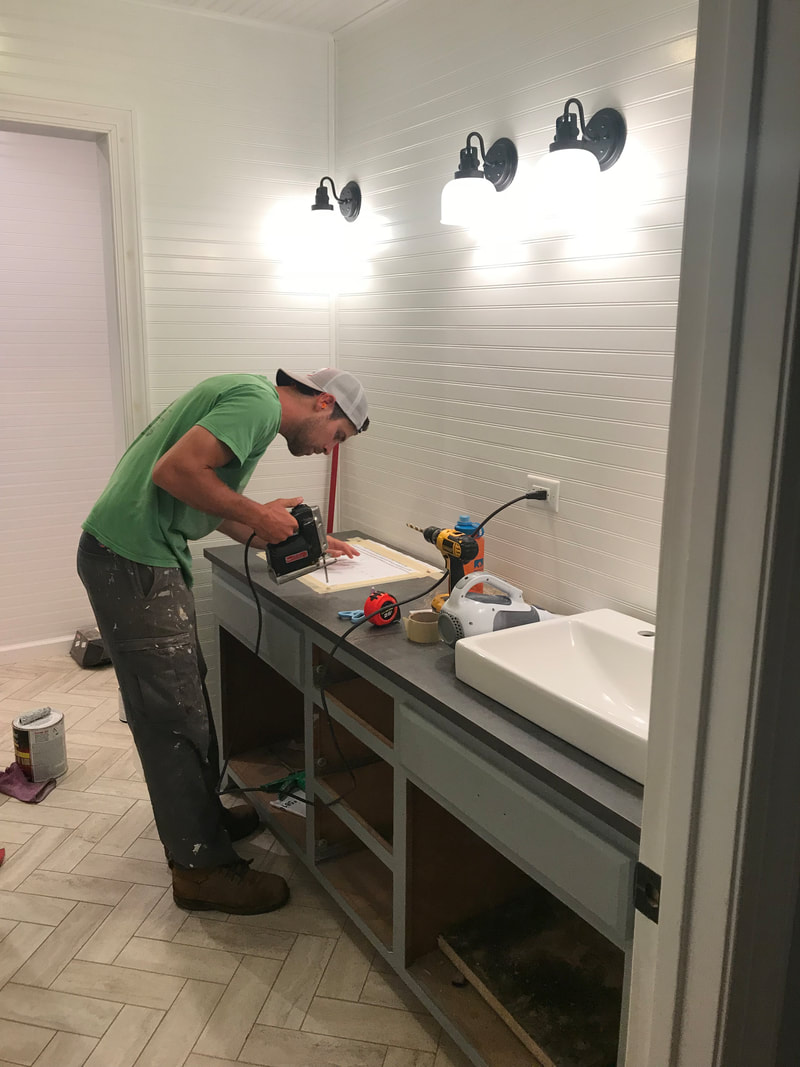 We went with the Ikea countertop for a variety of reasons. First, it was cheap ($100) and looked great. Second, it was long enough to fit the vanity AND we were able to use one of our cut pieces as a backsplash. Third, it was a thinner countertop than other ones we saw, which was perfect since we were using vessel sinks. 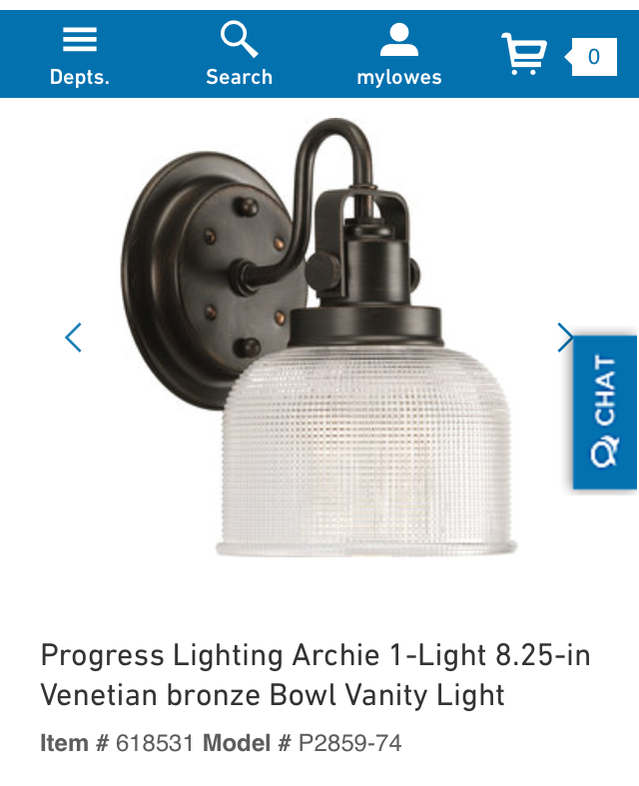 And since they have been in a bunch of photos already - my lights! I LOVE my lights. They were on super-sale at Lowe's, but unfortunately they were sold out! I ended up finding four of them on an Amazon Warehouse deal for only $25 each!!!! STEAL! 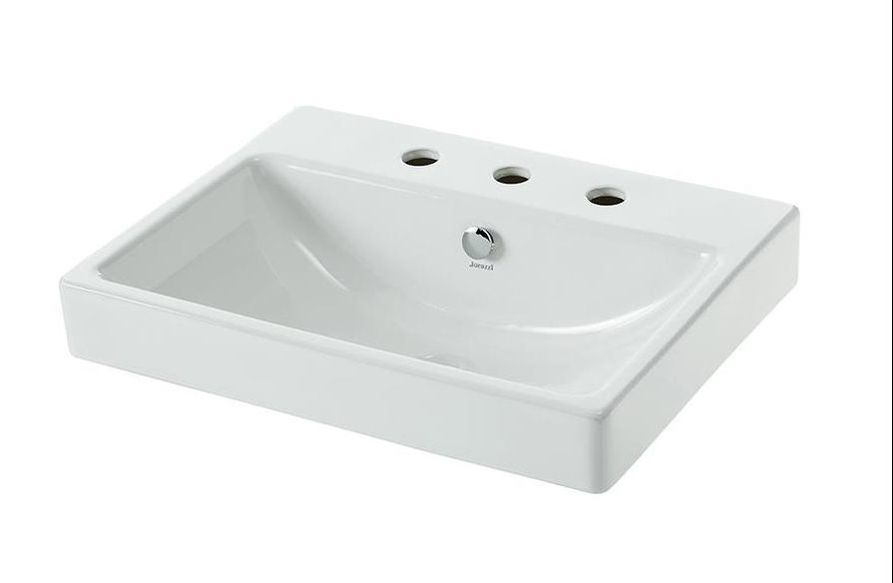 My sinks are Jacuzzi Anna Farmhouse vessel sinks, also available at Lowe's. They are pretty wide but narrow, and aren't too tall. Nice price and look great! I love them!
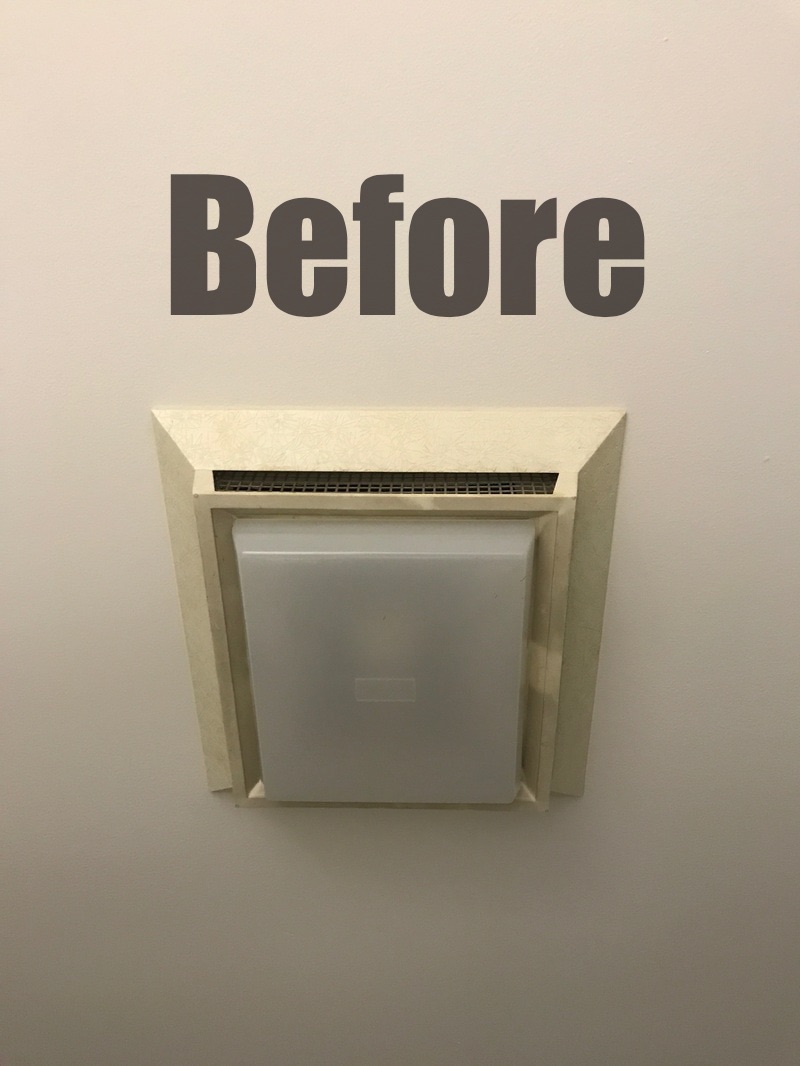
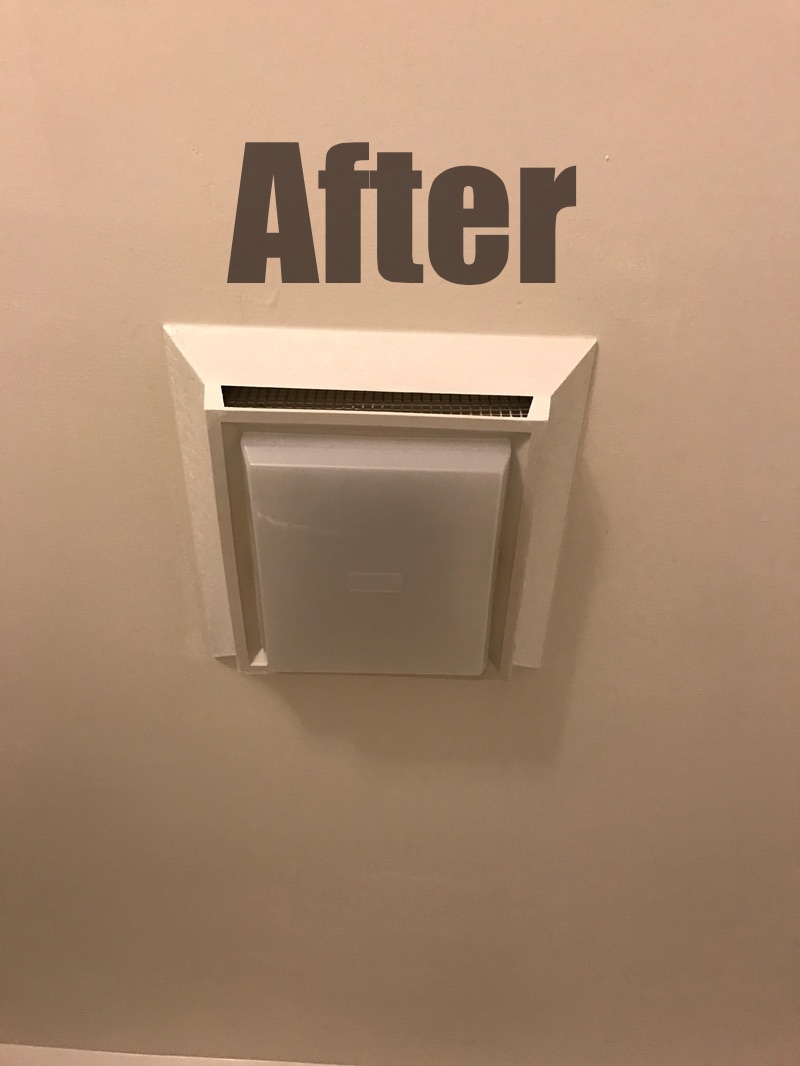
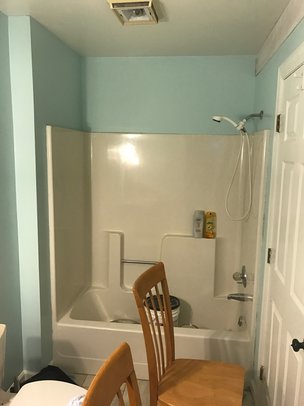
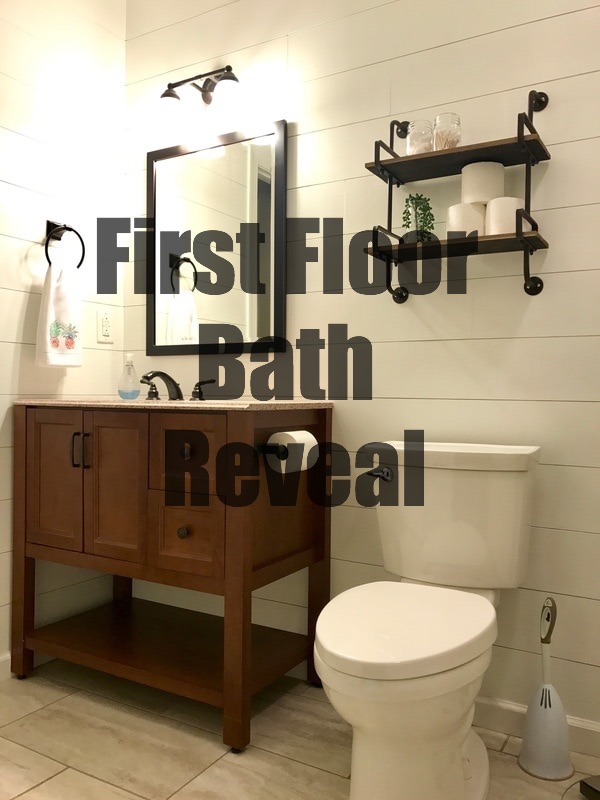 After 4 weekends, the first floor bath is *officially* (but not really) finished. I know, I know, you're probably wondering at this point "What do you have left to do?" Honestly, I swear I am almost done; just one more coat of paint on the baseboards and moulding! Just as a reminder of where we started two years ago.... 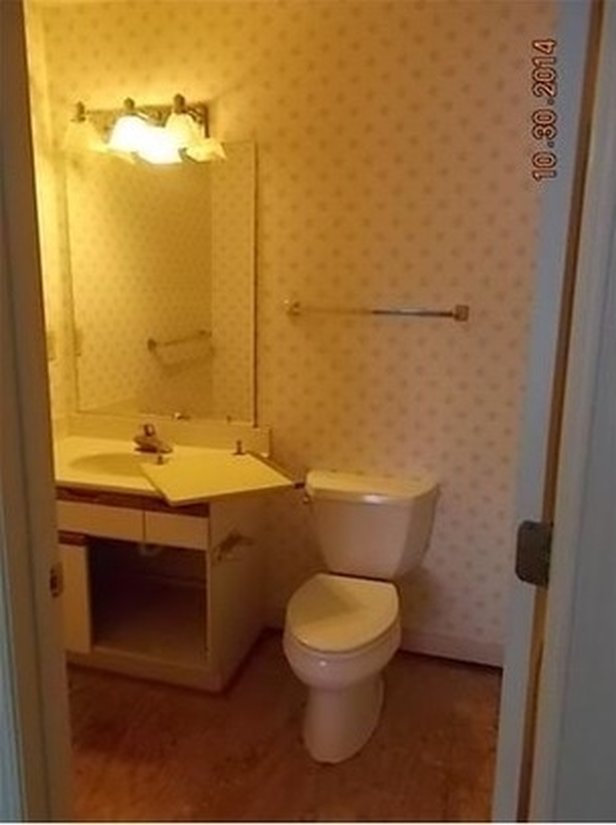 To now.... 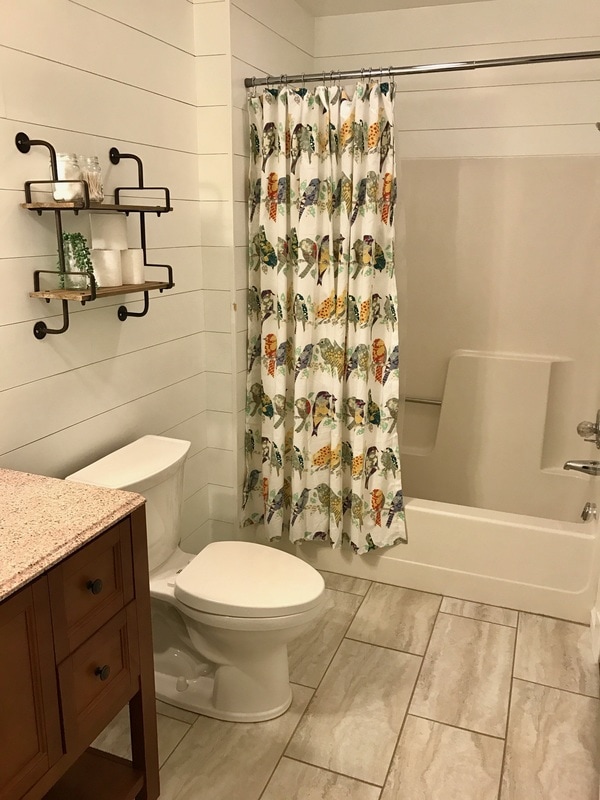 I love, love, LOVE the shiplap walls, but I felt like the white walls needed some color somehow. I went on a search to find a colorful shower curtain and World Market had the winner! The bird shower curtain was about $25 with a coupon, and I replaced the old tension rod with this $8 one from World Market as well. 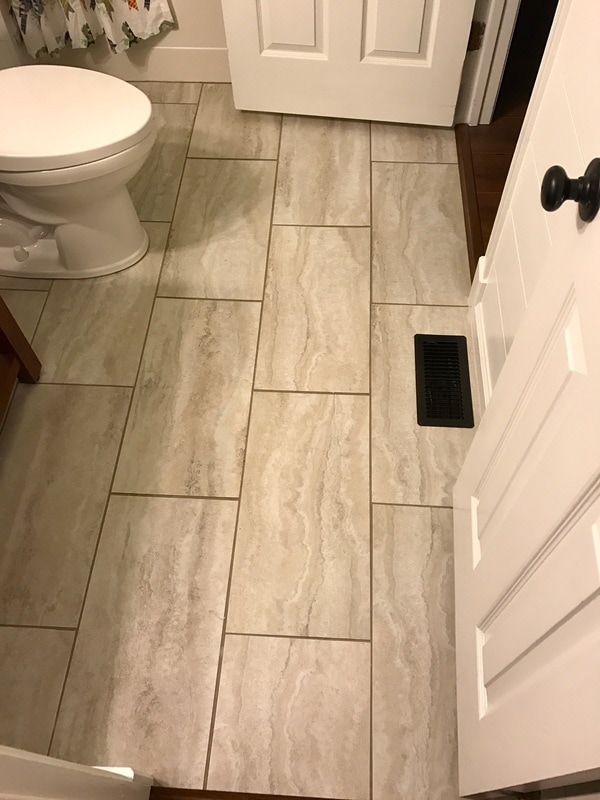 I put down the floor almost two years ago, but I tried my best to really clean it up. I scrubbed away the grout haze and swept, vacuumed, and scrubbed the floor some more. I also spray painted the rusty old floor vent cover oil rubbed bronze. One of the smallest (but biggest) changes in the room was the shower fan. New fans are pretty expensive, and mine was working perfectly fine but it was pretty gross. A couple coats of spray paint and it was as good as new!
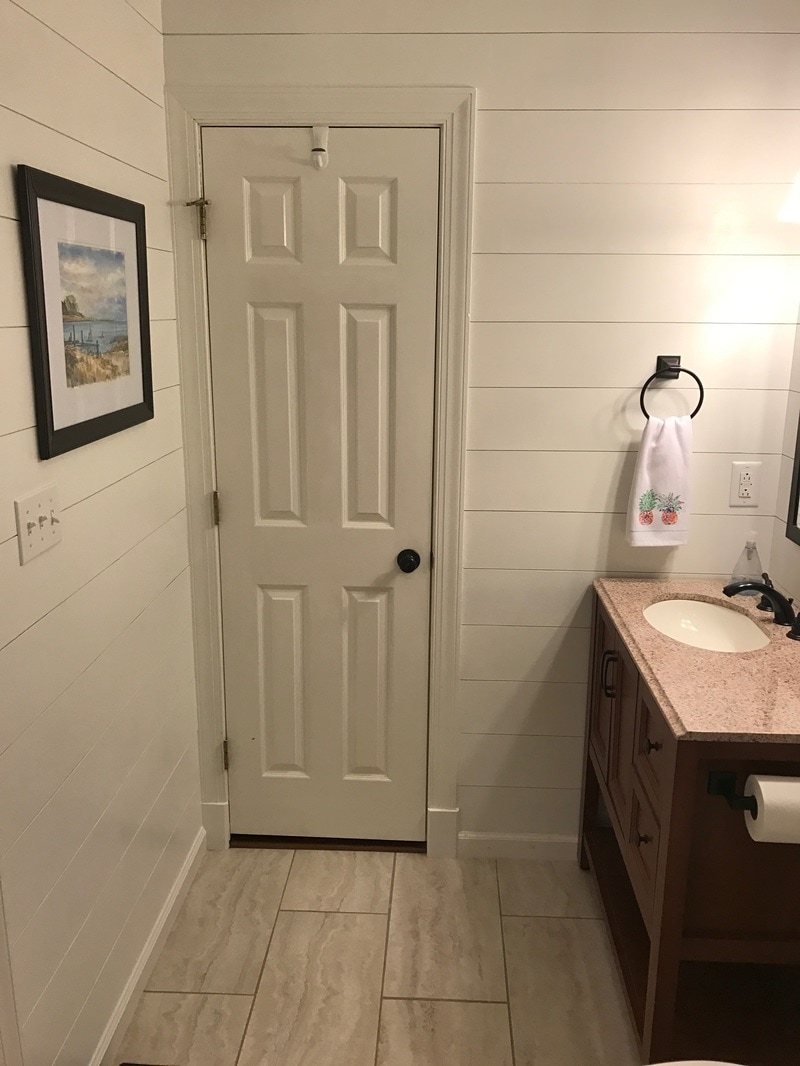 Brian's grandmother painted the watercolor on the wall. Its so beautiful and fits right in with the beach theme! I love it! We picked up the frame from Marshall's for $10, and spray painted it oil rubbed bronze. The original color wasn't great, but for ten bucks, I decided it was something we could easily change. 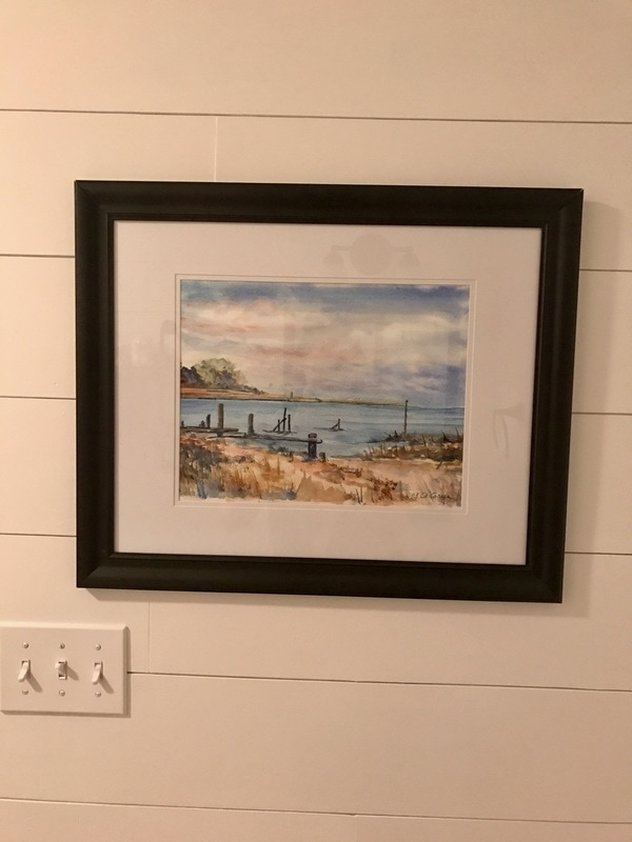 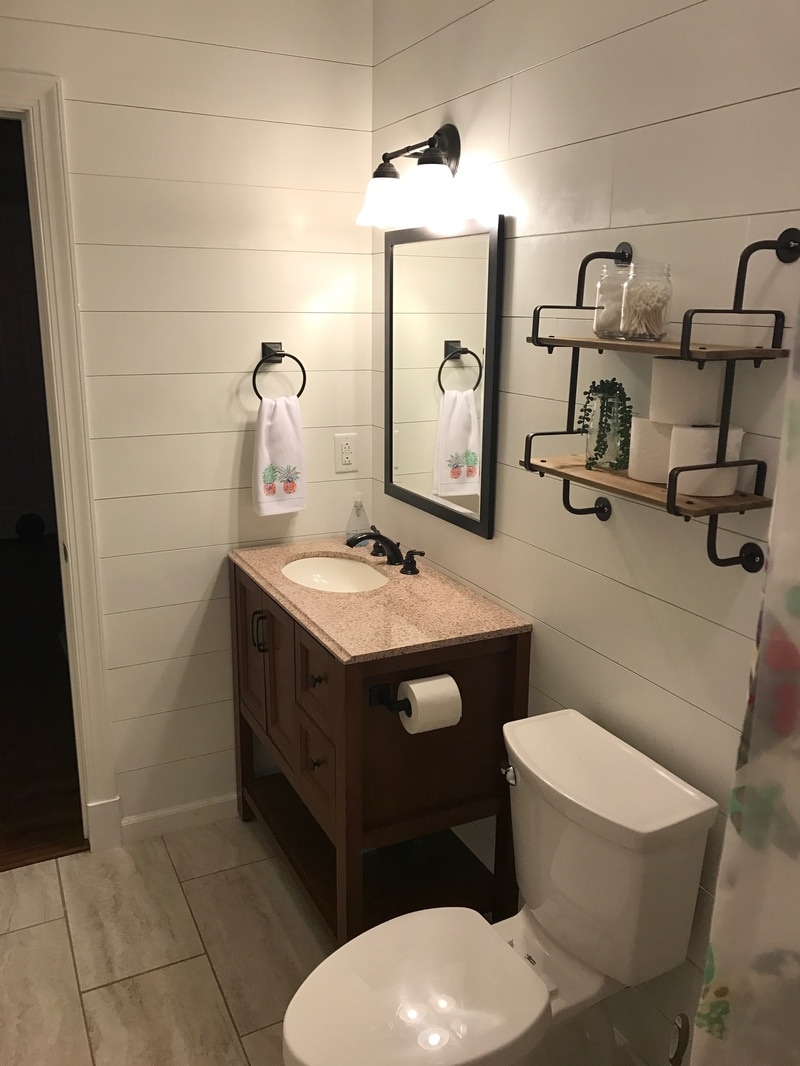 I ordered both the hand towel ring and the toilet roll holder from Amazon. The mirror is from Lowe's, and the vanity and light are from the Home Depot (although I'm not sure I would recommend the vanity anymore). The vanity is beautiful and sturdy, however the laminated wood is peeling off in some areas on the doors and drawers. This vanity literally never gets used so I don't understand why it is peeling off.  The adorable shelf above the toilet is from Hobby Lobby. I snagged it on sale for $25. I love it! 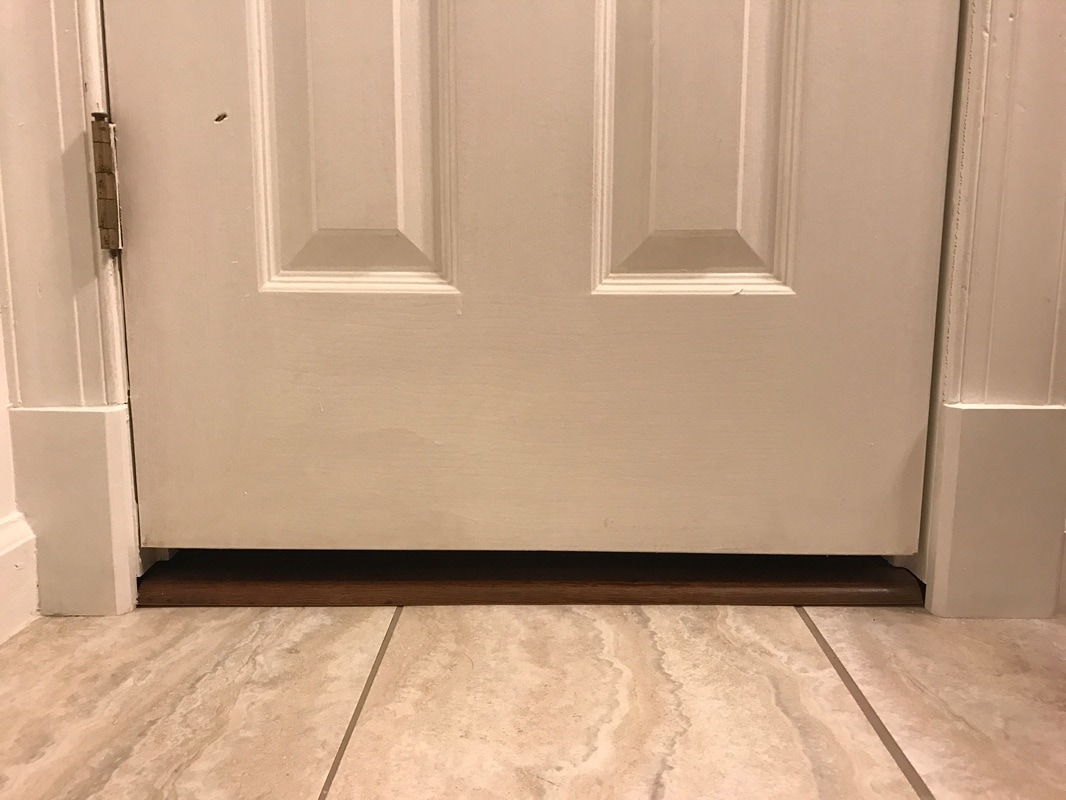 And look at those plinth blocks! No more giant gaps!!! Woot woot!! 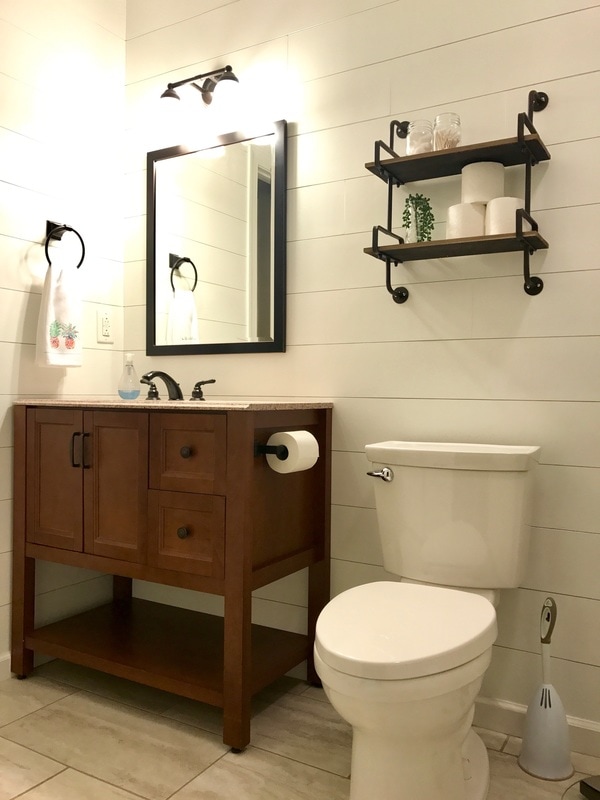 I have to admit, I LOVE this bathroom! I am so happy it turned out so well, and I am so happy that it is finally done. So, what do you guys think?
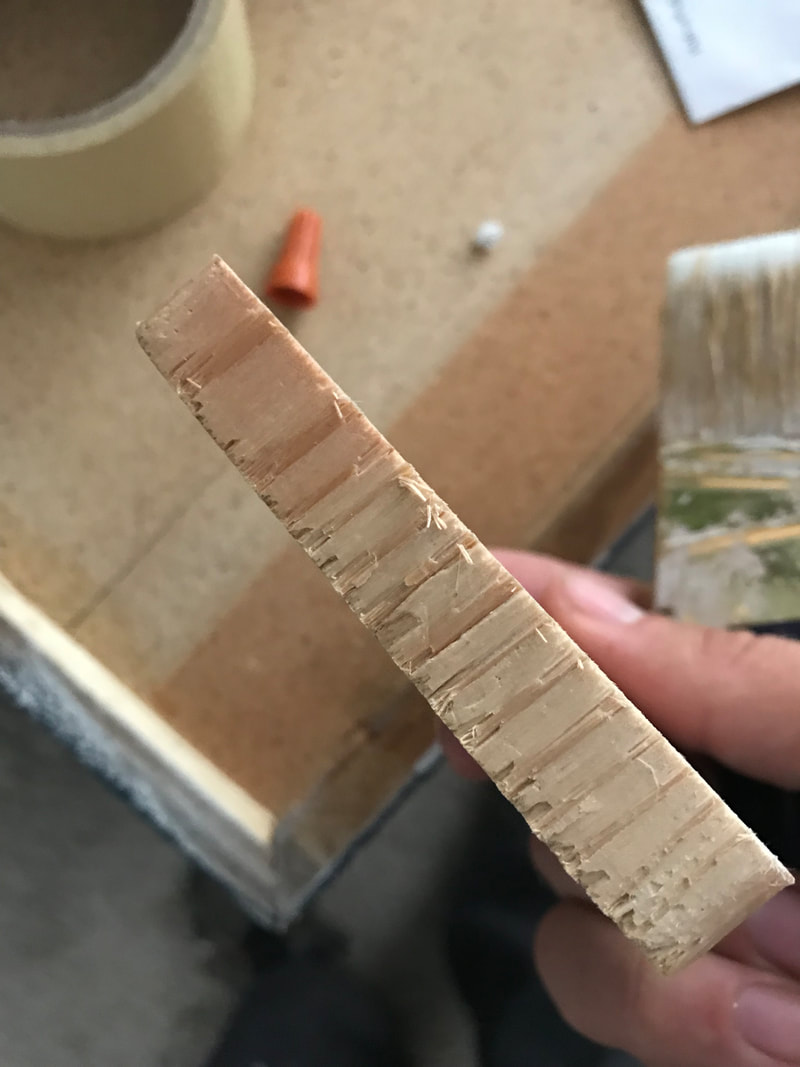
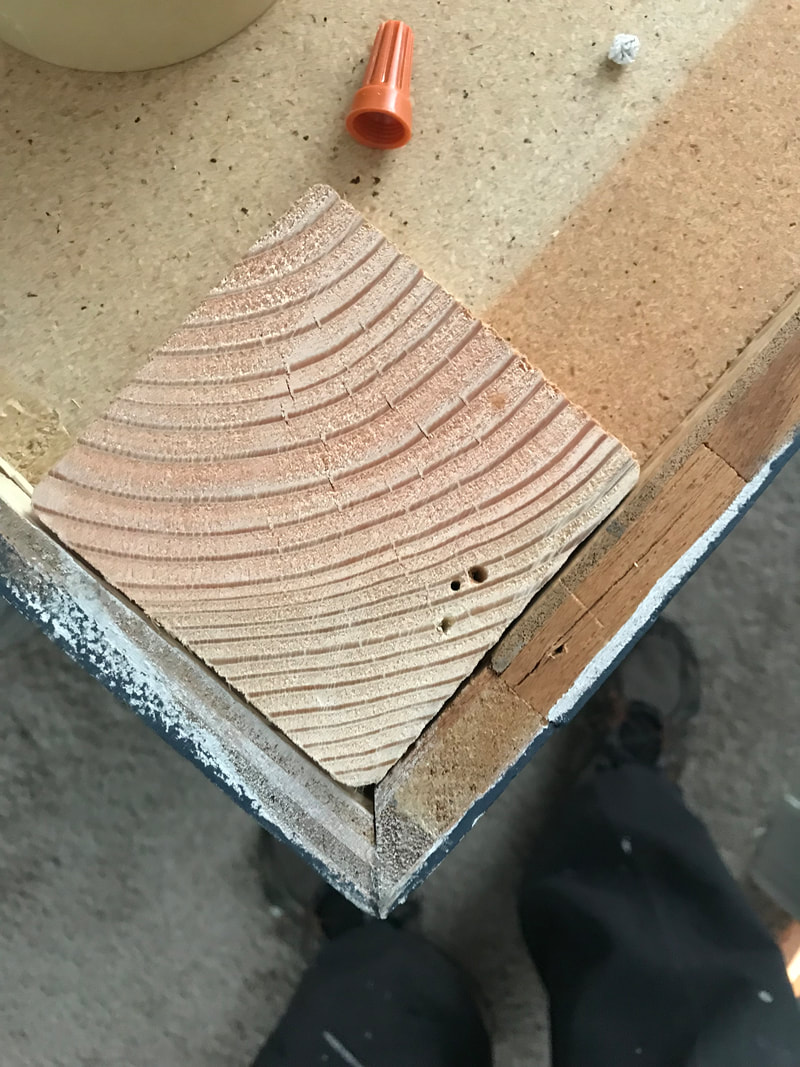
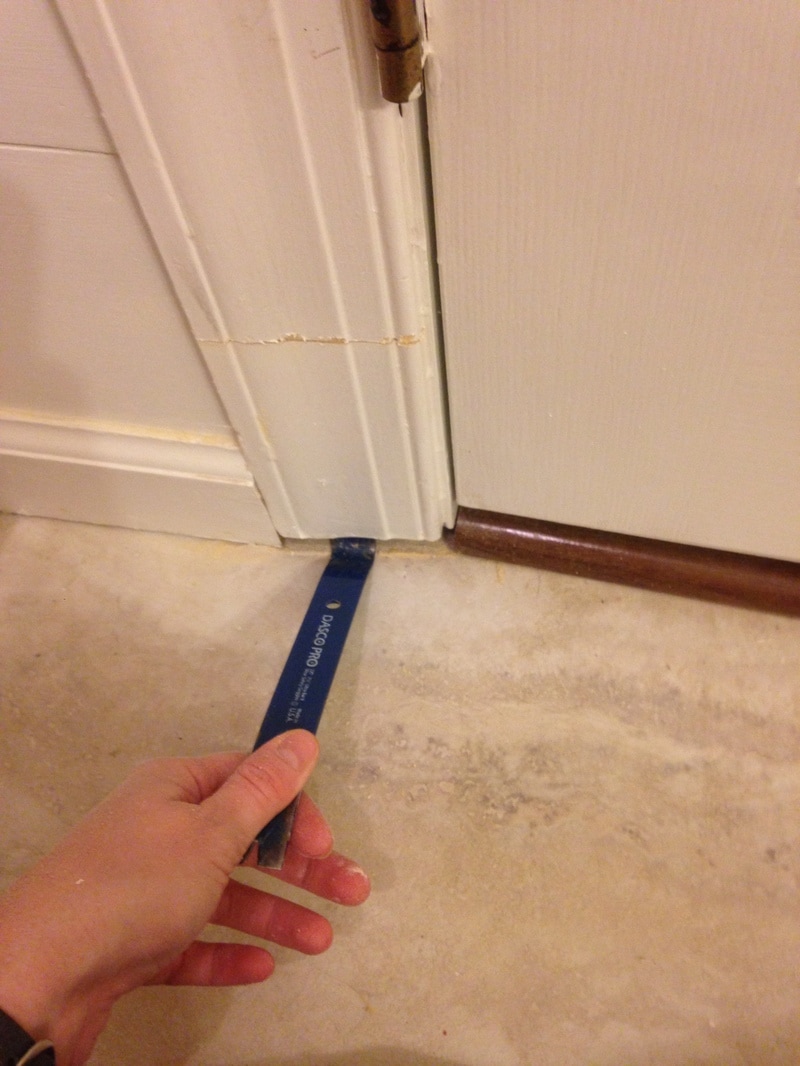
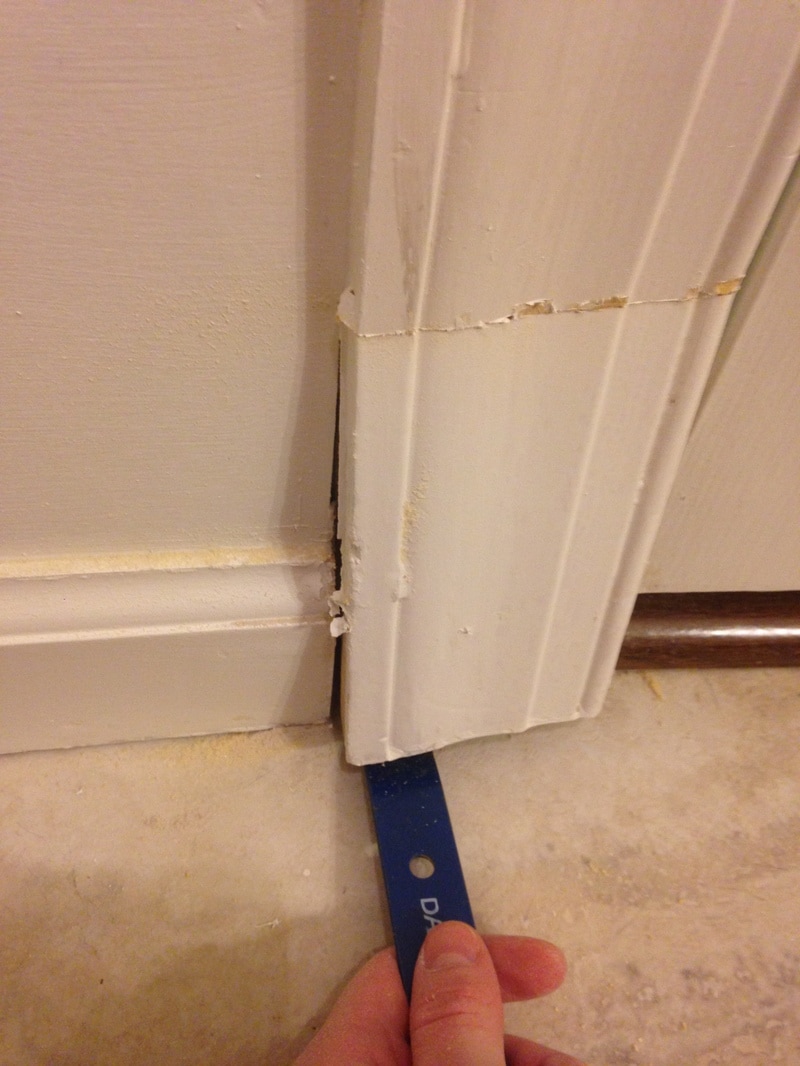
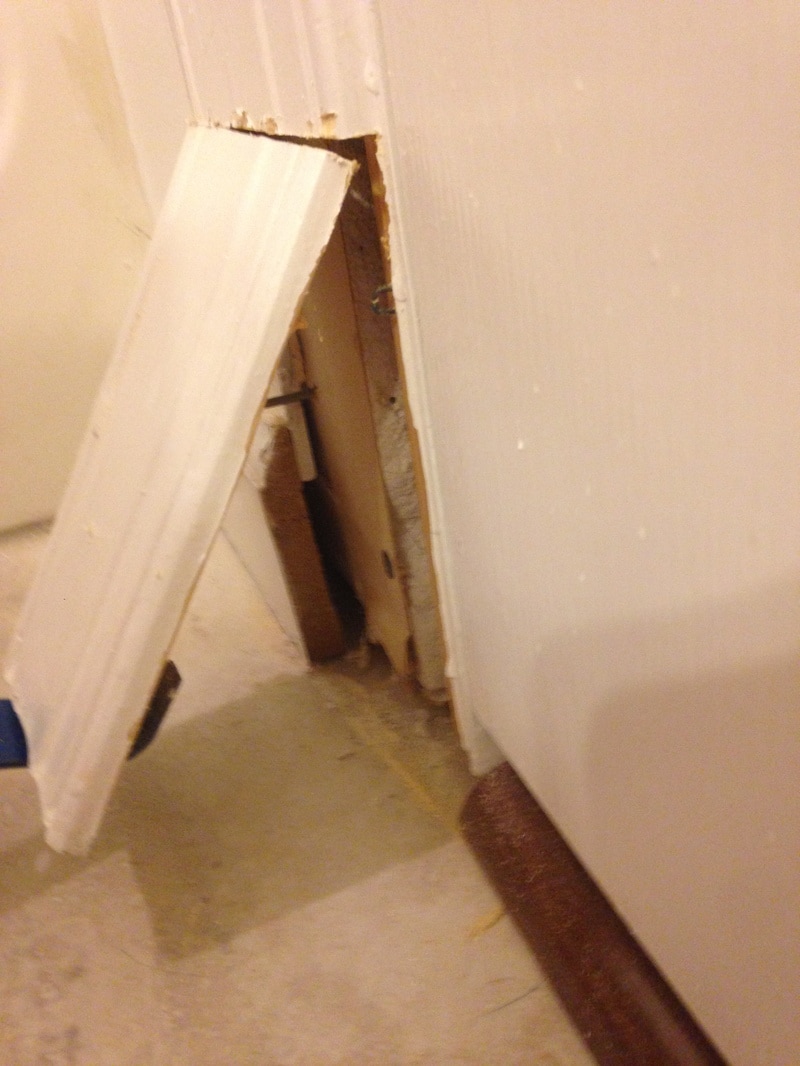
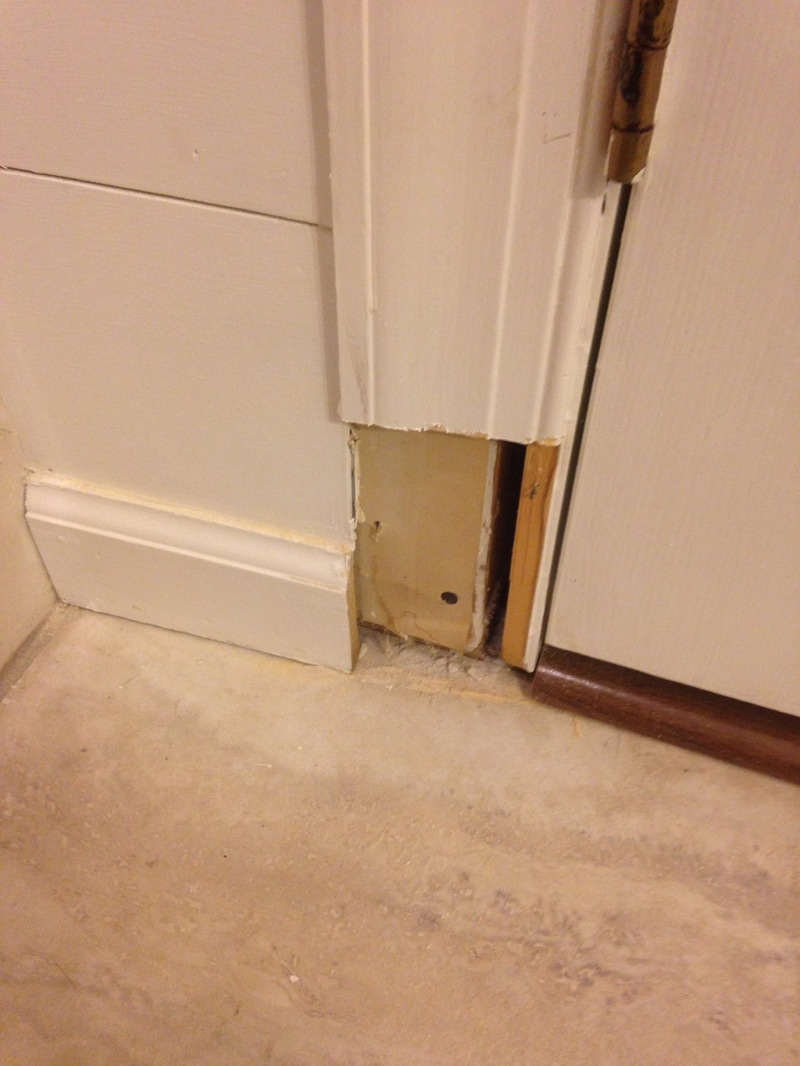
 One of the issues that bothered me for a while in the first floor bath was a giant gap between the floor and the door moulding. When I first bought the house, every inch of flooring had been covered in carpet. Yes, carpet. Even in the bathrooms (cue the throw-up noise now). Fortunately for me, the bank had removed the carpeting before I closed on the house (yay!). When I finally installed flooring throughout the house, most of the gaps created from the carpet went away, except in the bathroom. Hence, my dilemma. 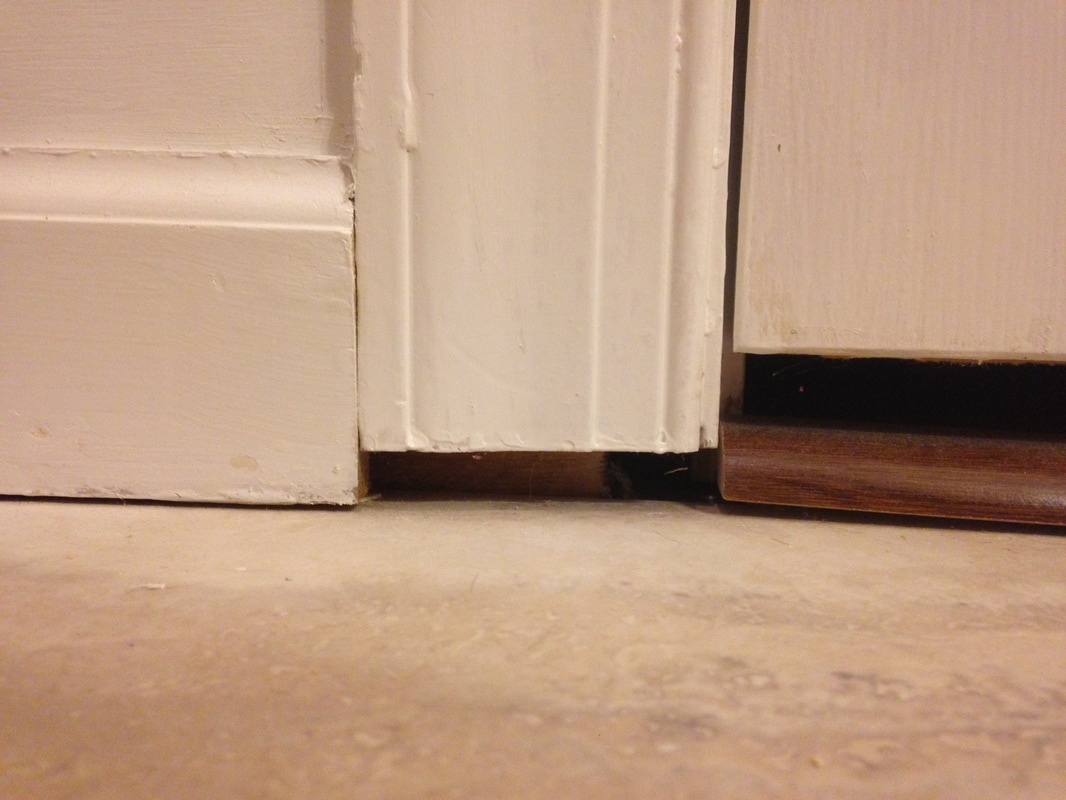 I went through many options to cover the gap, from replacing the trim to installing quarter round, however quarter round is not meant to go in front of door trim, and replacing the trim is too much work. After doing some research, I discovered the "plinth block." A plinth block is simply decorative moulding that is placed at the bottom of door trim to make the moulding look more substantial. Perfect. 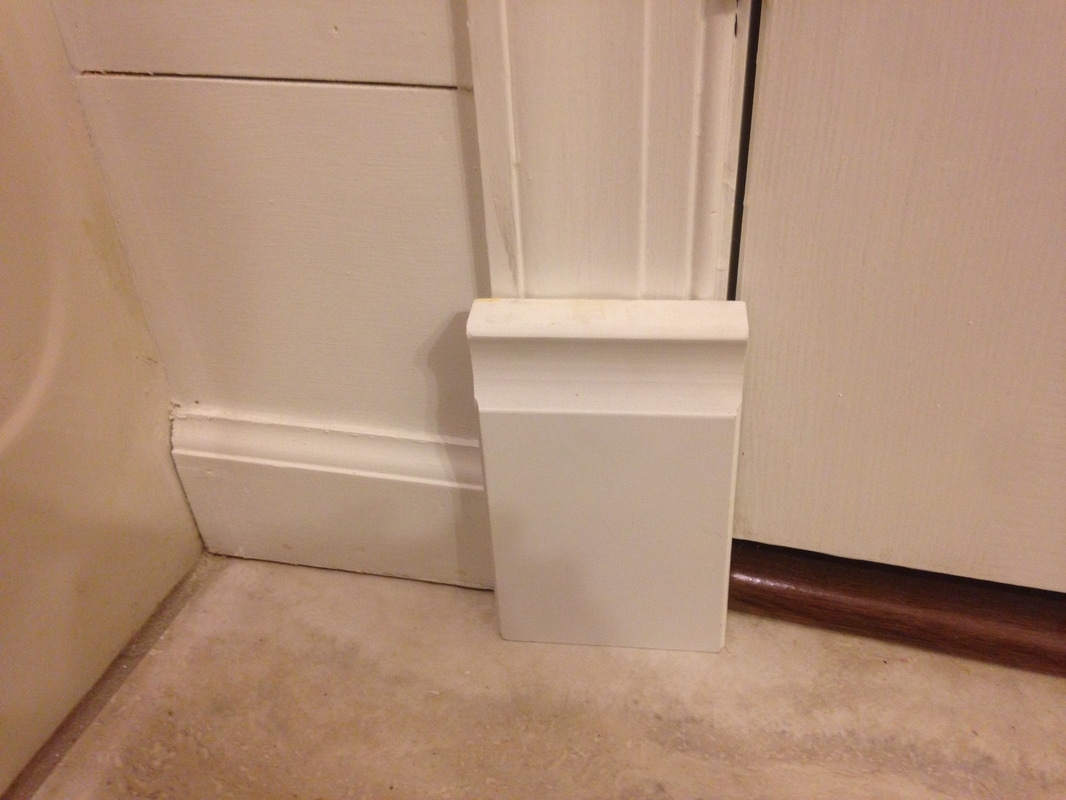 Although I wasn't sold on the plinth block available at The Depot (see above), it was the only option they had so I bought it. At around $4 each, it wasn't a huge investment but made a big impact. 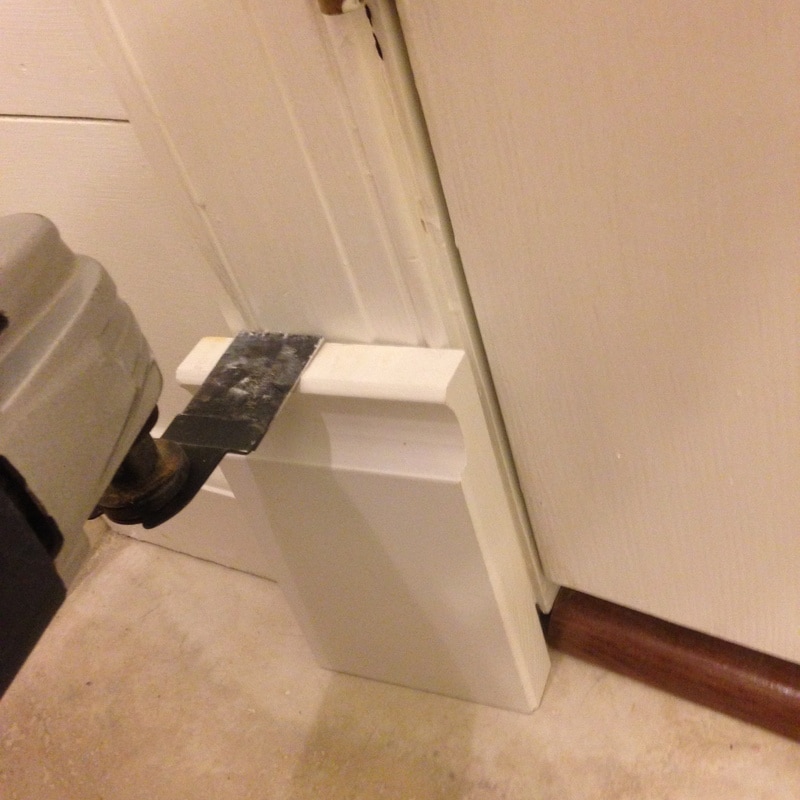 To install the block, I started by using a door jam saw to cut the current trim at the correct height. I then pried it out, being carful not to split any wood.
After I removed the trim, I cut the plinth block down to size on my table saw and installed it. 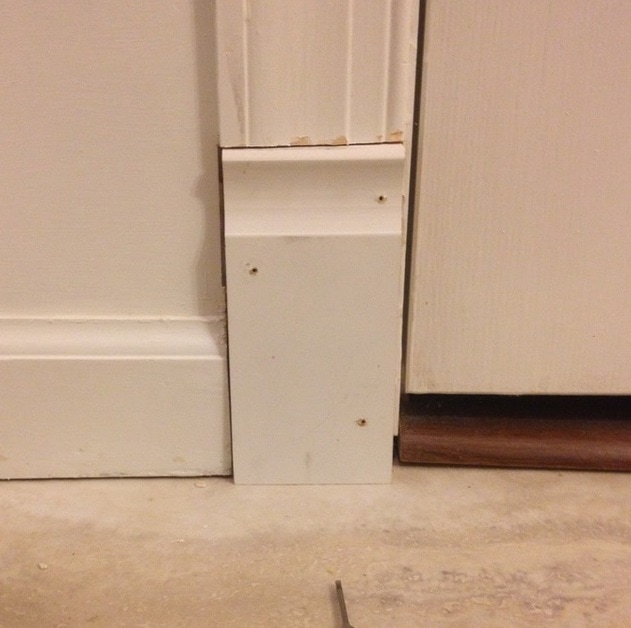 I hated it. It looked too dinky and the victorian style of the block just didn't match the rest of the bathroom. I did more research online and decided that I could just make my own simple plinth block on the table saw with 3/4" MDF. Luckily, I had enough leftover from a pervious project to create 4 blocks, so I cut them to size (a bit wider than the door trim), and ripped two bevels into the sides to make it a bit more decorative. Simple, easy, and they solve my gap problem. 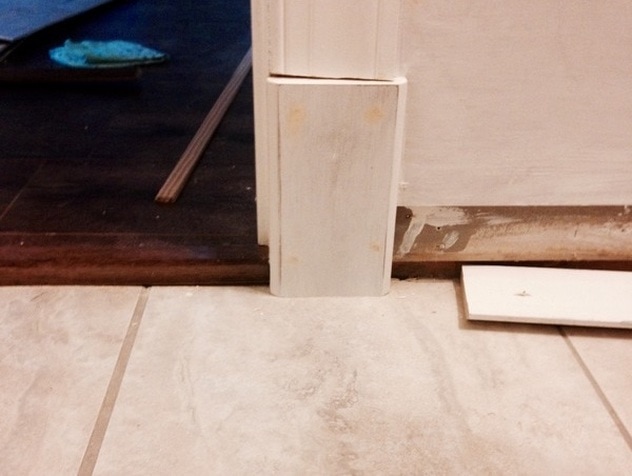 I even tried my best to scribe one plinth around the base moulding. It isn't perfect, but for doing it on the table saw I'd say its great! 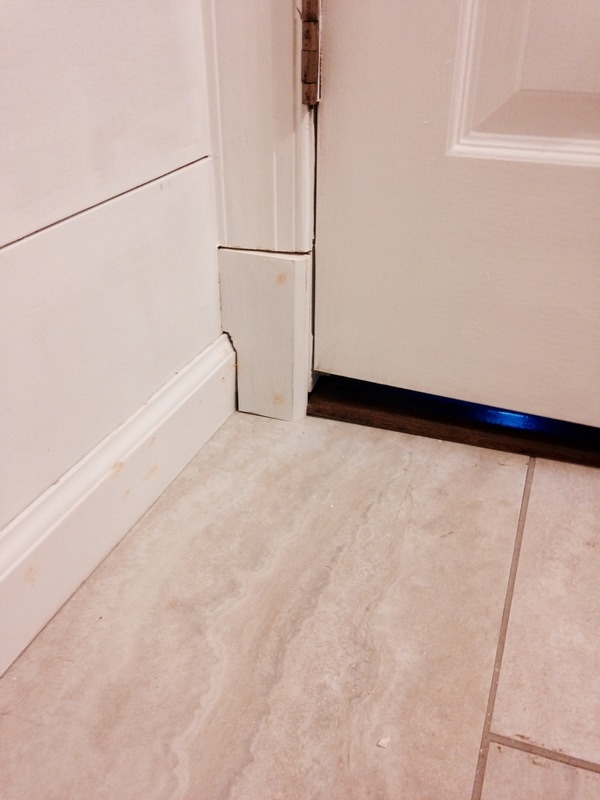 Now I just need to caulk and throw on another few coats of paint! The bathroom is almost done! 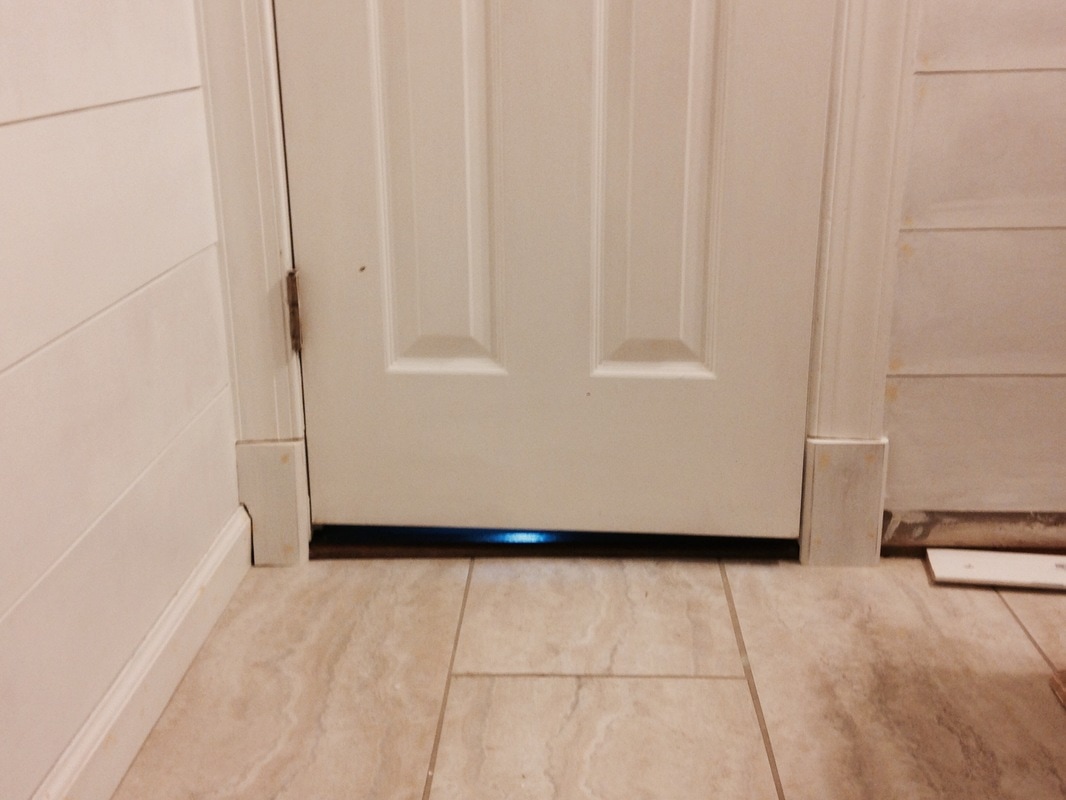 I'm just going to put this out there - Joanna Gaines makes me want to cover everything with shiplap. And DIY network makes you think you can do anything on your own. And as I've learned over the past two years, all in moderation. With that being said, I'm renovating my first floor bath (again), this time with shiplap.  The above bathroom isn't actually the first floor bath, however both guest bathrooms were essentially the same. Awesome 80's wallpaper, wonderfully disintegrating melamine cabinets, some pretty great lights, and no flooring.  Above is the first remodel, which really was a huge change from the 1980's melamine. I never really fully finished this remodel though - the vanity isn't attached to the wall and I still don't have a mirror for above the sink. After living with the brown walls for about a year, I decided I hated the color and painted it a bright blue.
When I was almost finished painting it blue, I decided I hated that color as well and stopped. The bathroom has been like this for the past six months or so. It's been a sad six months for this poor bathroom. Well - time for an update! Again! 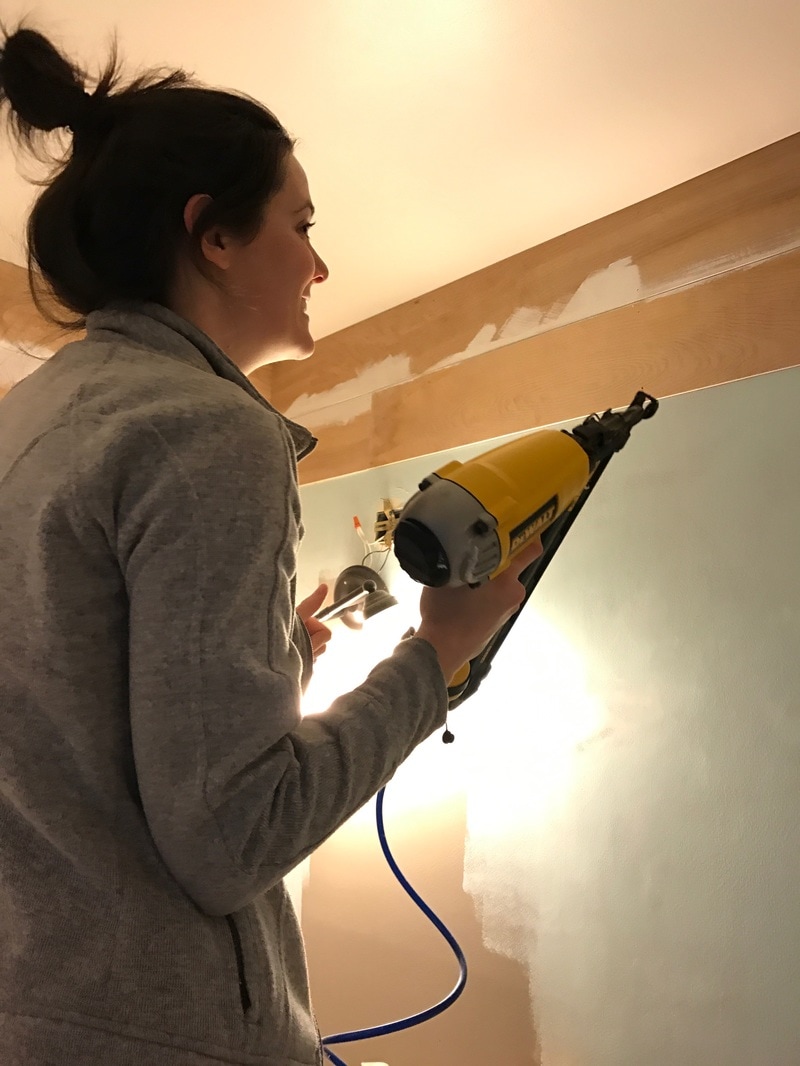 More pictures and updates soon!
Great news! The master bathroom is getting a floor! Right now there is a big rush to get the entire upstairs as ready as possible for carpet to be installed, which includes any flooring that will be adjacent to the carpet. Although the master bath is nowhere near being ready, we had to push forward with the floor anyways. This summer, I bought a lot of extra LVT (luxury vinyl tile) from Lowe's, which is what I installed in both guest baths. I loved the stuff so much, I figured I could also install it in the master bath as well. However, after long nights of scouring Pinterest, I wasn't so sure the LVT was the way to go. Master baths should be elegant and luxurious, and if I was going to invest some money, the master bath is probably a good place to put it. Yet, with the current rush on the carpet, we had very little time to think about the master bath's floor, pick out tile, put down concrete board, and grout - on top of everything else we have to get done before the carpet installation. So, Brian and I made the executive decision on Friday night to cut each LVT (originally 12" x 24") into 4" x 12" and run a herringbone pattern in the bathroom (to give it that elegance I was looking for). Without further ado, here is the initial dry-fit of the tile: 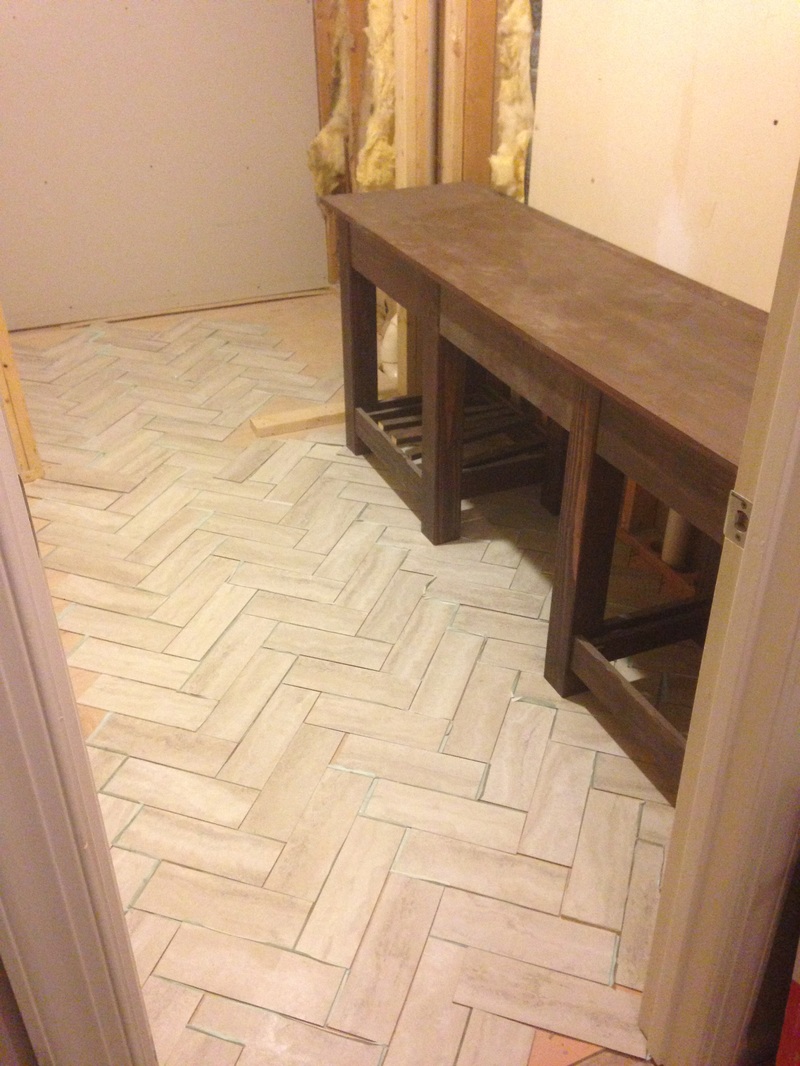 What was supposed to be a relatively short weekend project turned into the longest project I've tackled on my own so far. Cutting the tile alone took nearly 4 hours. I dry-fit them, did some more research, and then decided to run the herringbone longways (to make it look more like a pathway to the closet area). Below are two pictures of this week's progress (which also took hours and hours). 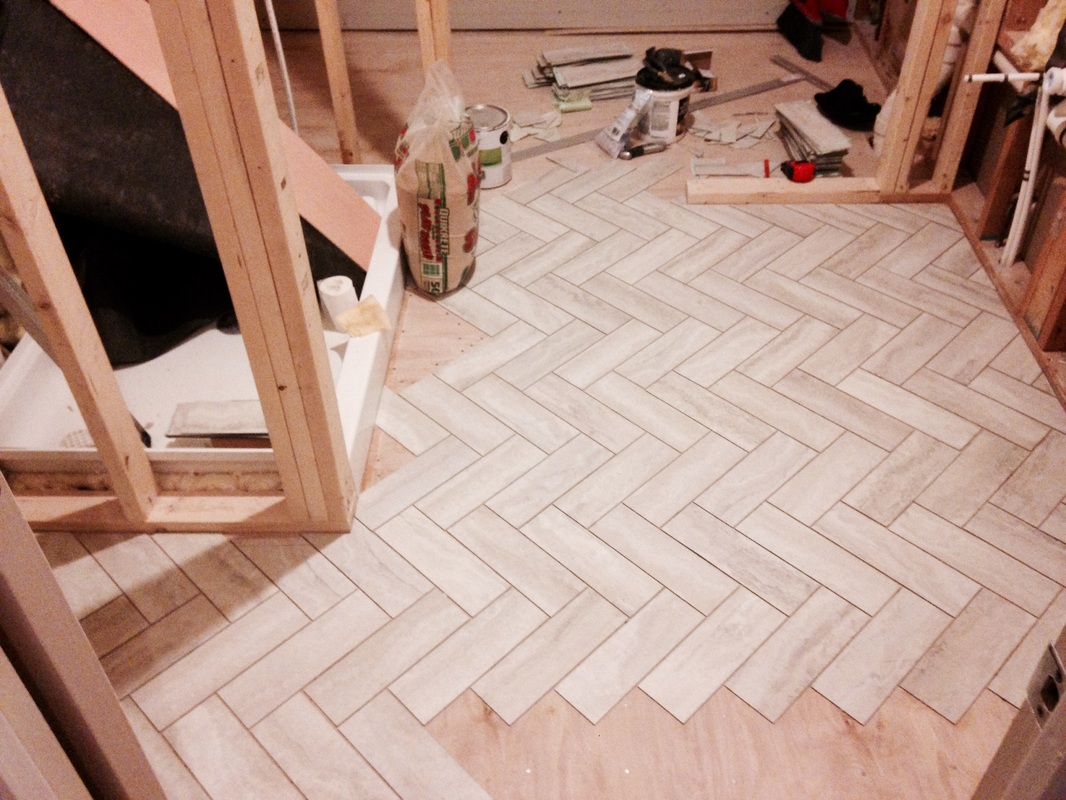 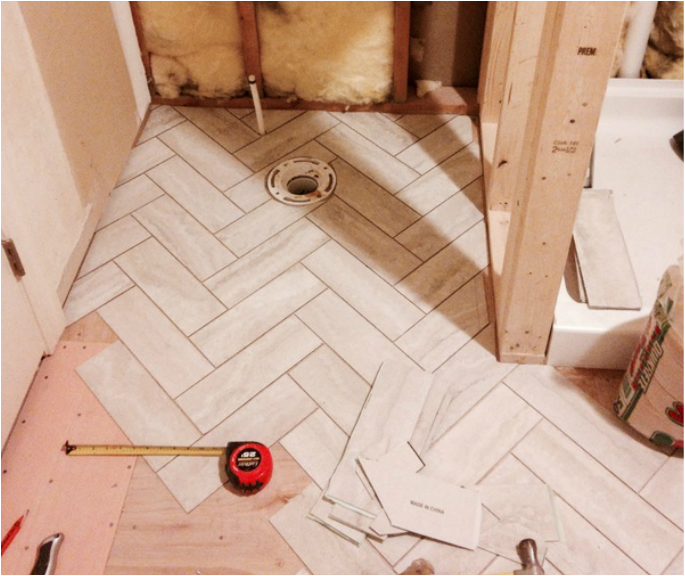 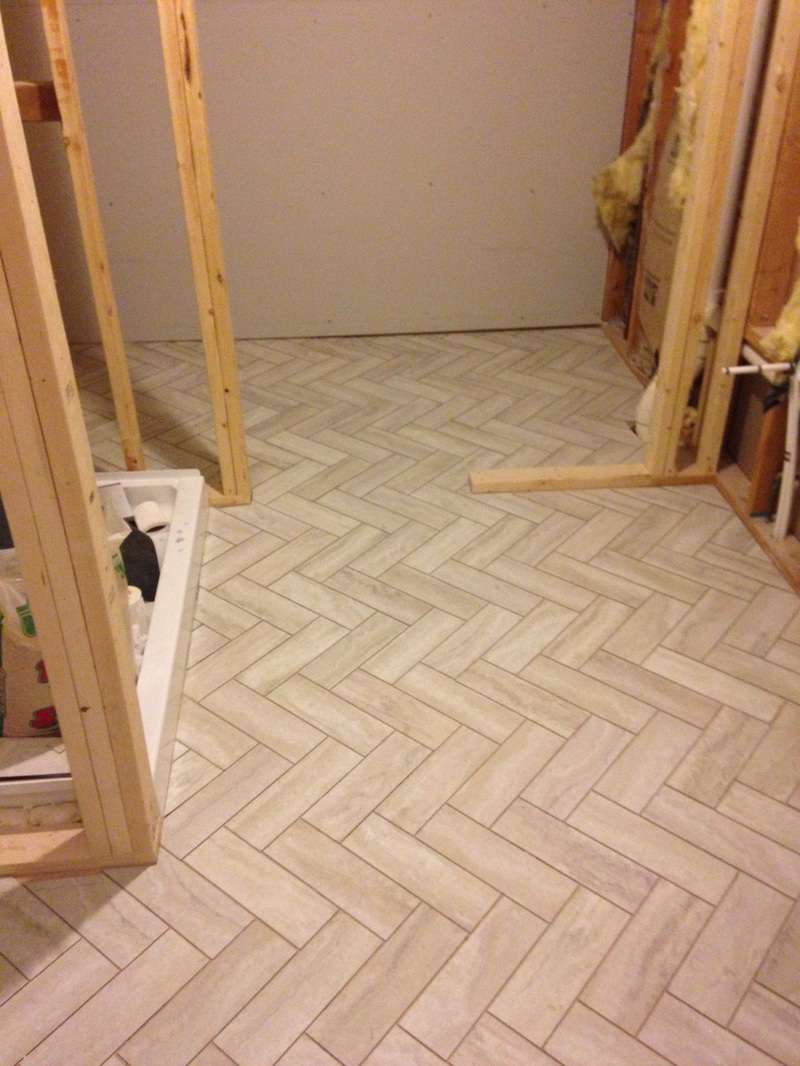 Last tile laid! Now I just need to grout!
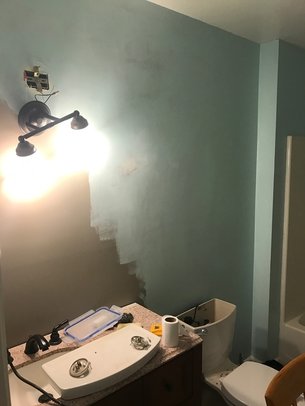
Brian and I are working really hard to finish the upstairs (painting, bathrooms, etc) so that the carpet can be installed by March 1. This may be a long shot, but here's hoping. So some weekend updates - while I now know why it is so important to wear a mask when spray painting (I suddenly feel like an 80 year old man with emphysema), I am happy to report that we have almost completed two major projects (that could and should have been completed a long, long time ago). First, we finished oil priming the master bedroom and tested out our handy new Homeright Finishing Spray Painter with our first coat of latex paint. Brian says he has found a new love (and that we should have been spraying the walls since the beginning). While I agree with him, I also think I'm going to take my mom's advice and buy some heavy duty masks for the next round. Pictures to come. Next, we are in the process of finishing up the second guest bathroom. I wanted to add some pizazz to this bathroom that the one of the first floor lacks, so I used this inspiration picture from Pinterest to help: 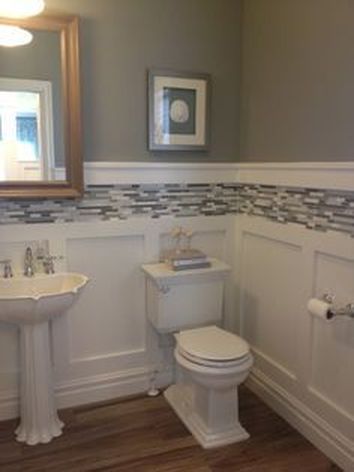 Although my floors aren't wood, I don't have a pedestal sink, and my walls sure as hell won't be this dark, I enjoyed the wainscoting and the tile backsplash. I thought they added elegance and some spice to an otherwise boring bathroom. We started with the wainscoting, and used the same technique that we did in the entry. The difference - we went with pine this time instead of MDF. 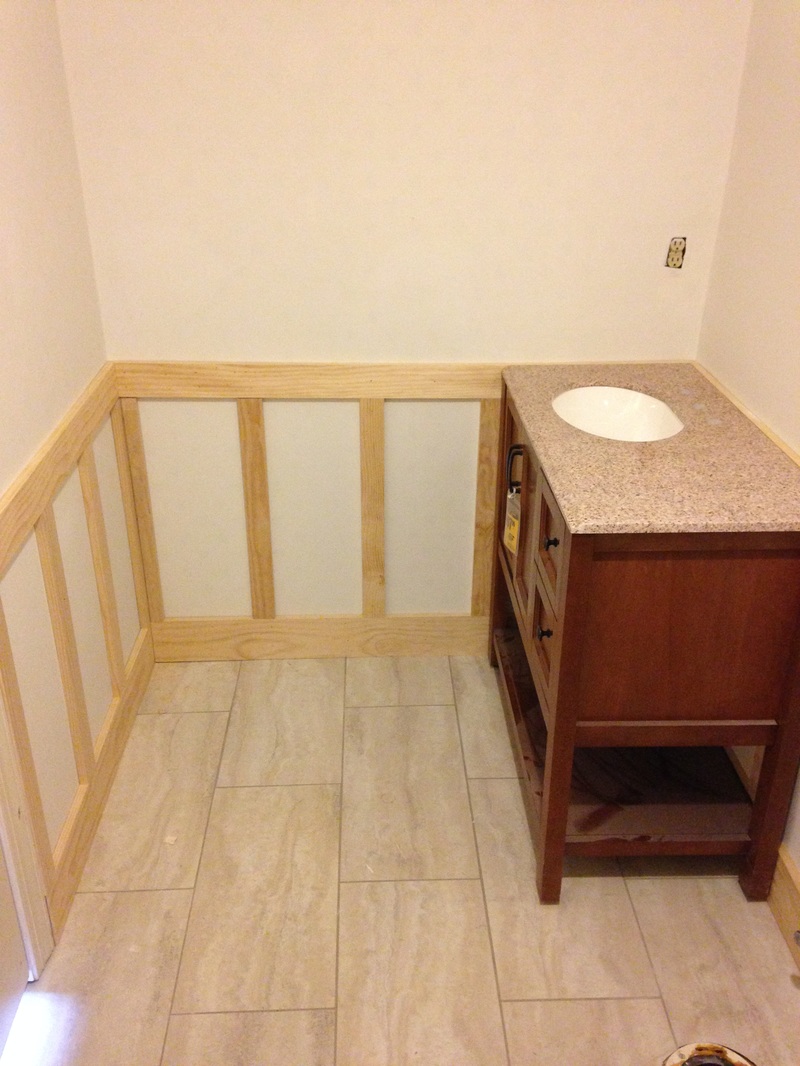 Then it was time to pick out a paint color. I suppose I didn't really care about the color, as long as it was light and bright (the bathroom has no windows, and it's attached to the dark blue room). Brian had a gallon of light blue semi-gloss laying around, so we went ahead and tried it out. 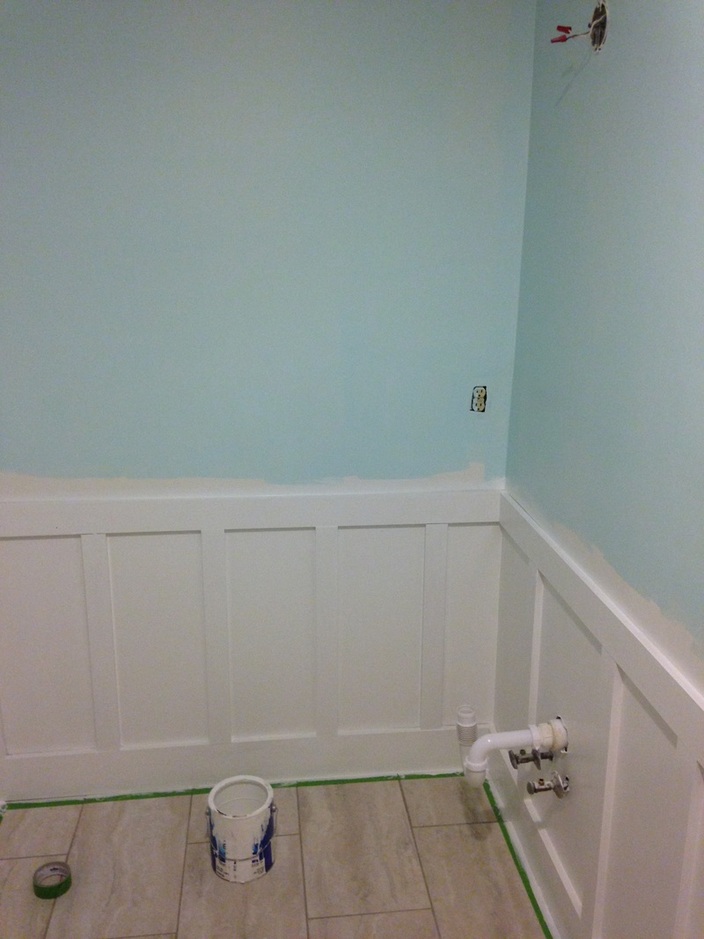 Needless to say, it got painted over the next day with some Sherwin Williams Sea Salt. 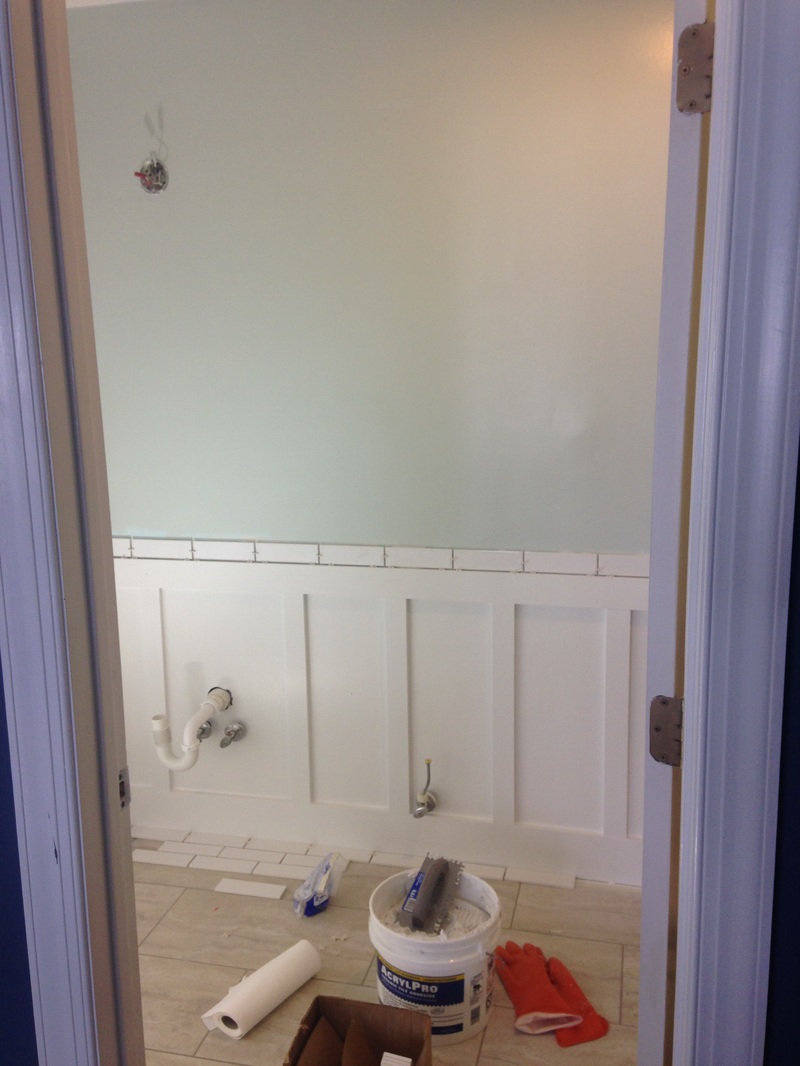 You can see in the above photograph that we are also testing out that tile backsplash I enjoyed so much from the inspiration photo. While my budget doesn't allow me to spend $10 a square foot on mosaic tile, it did allow me to buy 14 square feet of elongated subway tile (a whopping $15 total). Apparently I bought about twice as much as I needed because after installing we still had almost a full case left over! 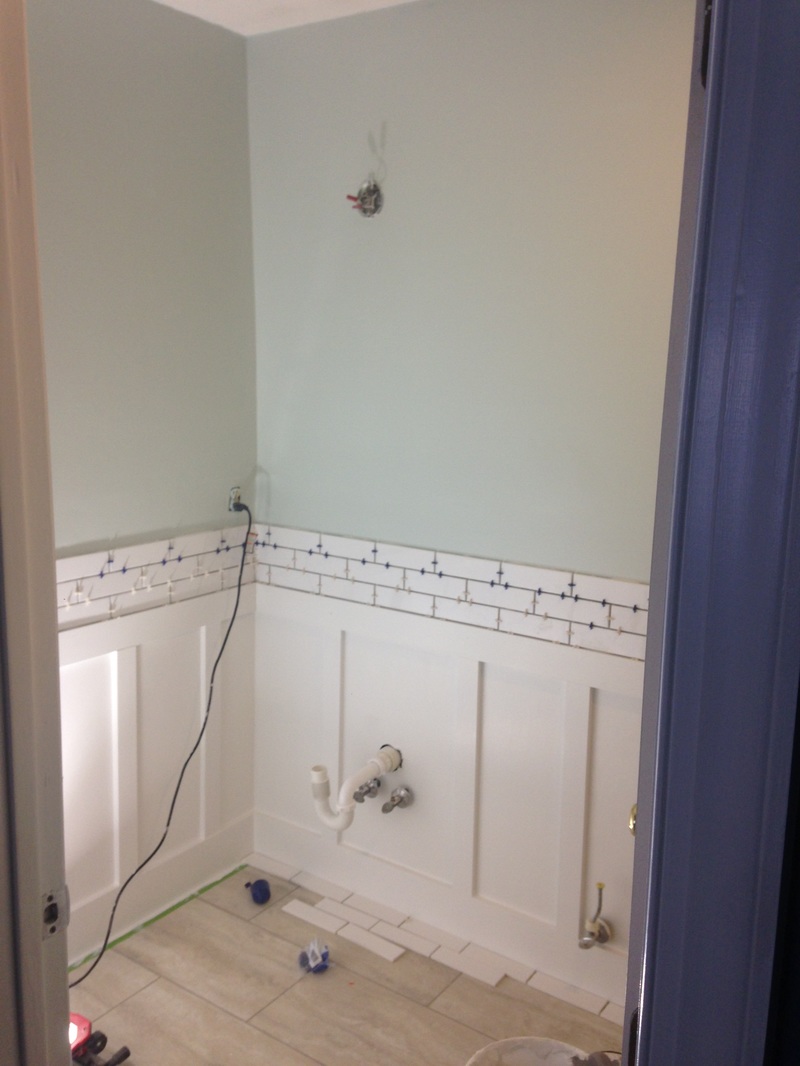 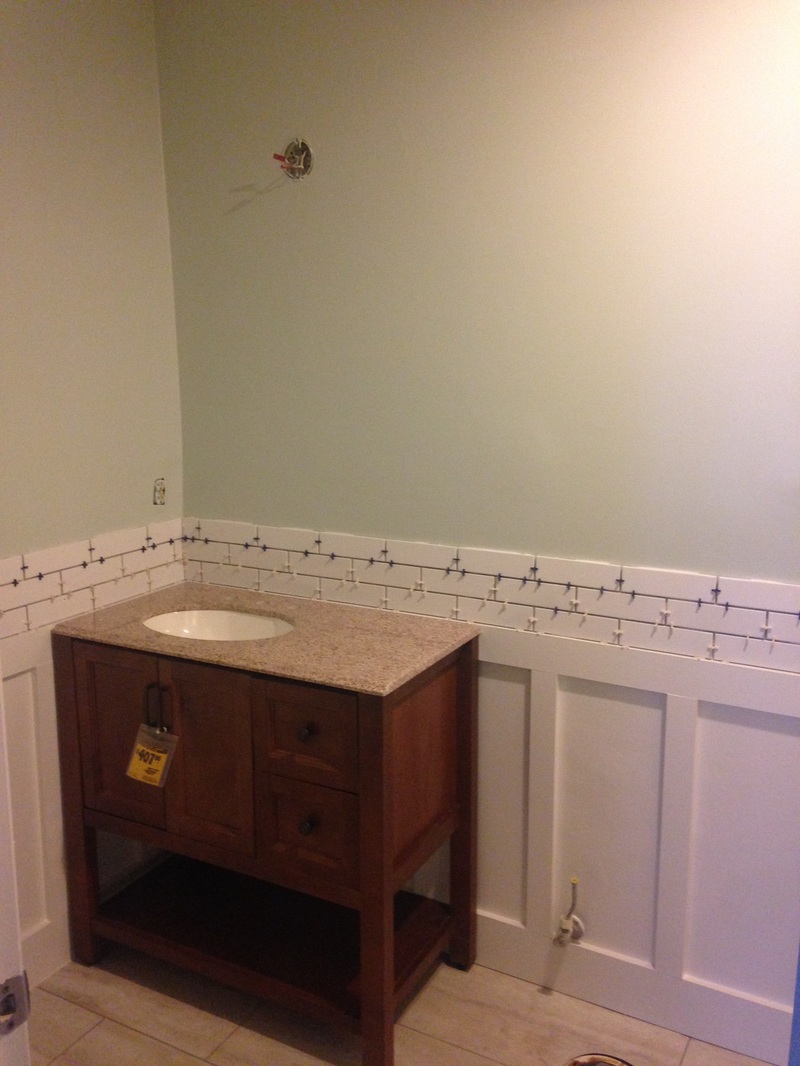 Don't worry, my frugal friends! I didn't spend $407 on that vanity! Between the one I bought in-store and the exact same one I found on Craig's List (both now in the guest bathrooms), I spent a whopping $400 on the two of them. Nice. 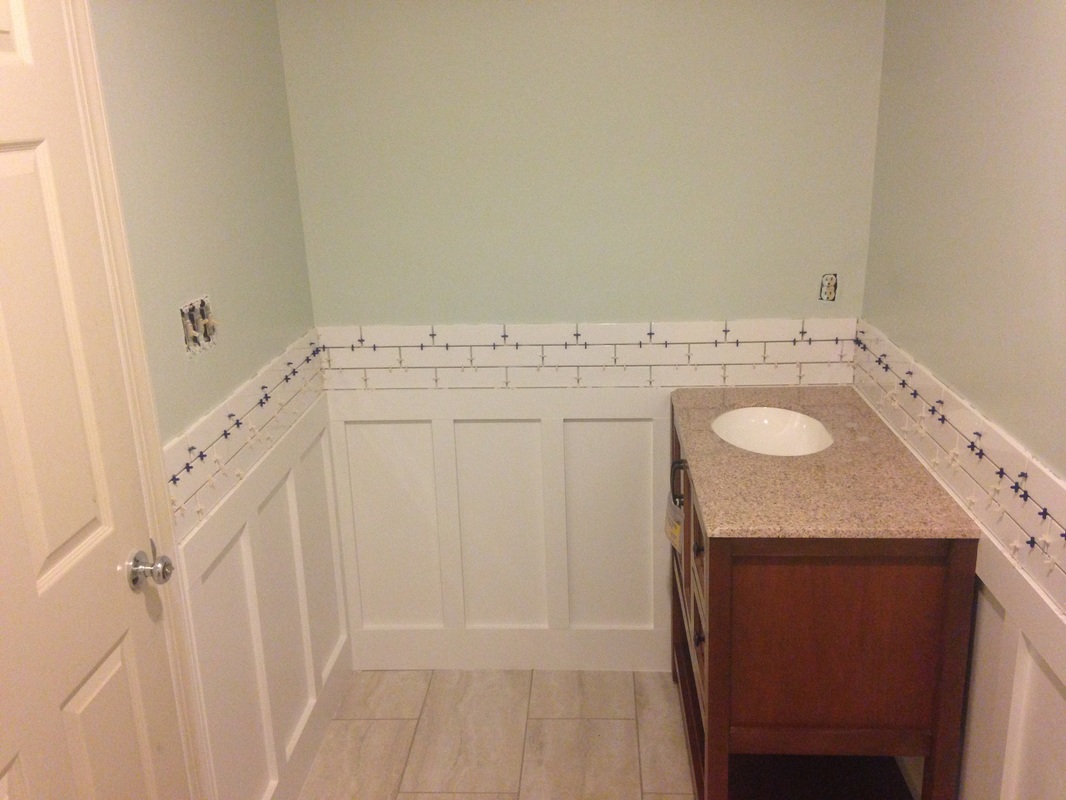 Now all that is left is to:
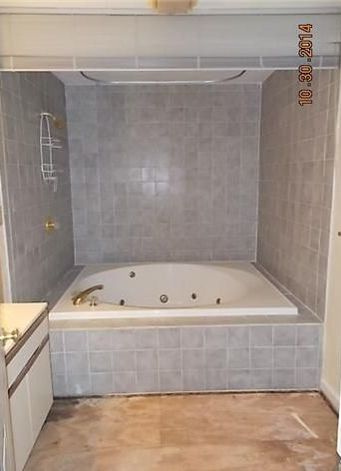
So apparently I never wrote a post about how we framed up the master bathroom. Well, to recap, this summer we ripped down the ceiling in the kitchen when we tore down the kitchen wall. When we removed the ceiling, it exposed the plumbing to the master bathroom. Not like this mattered one way or the other, except that I wanted to gut the bathroom - so this was the time to do it. Pressure was on because we really, really wanted to finish the kitchen, but that could not be complete until the master bath was replumbed. 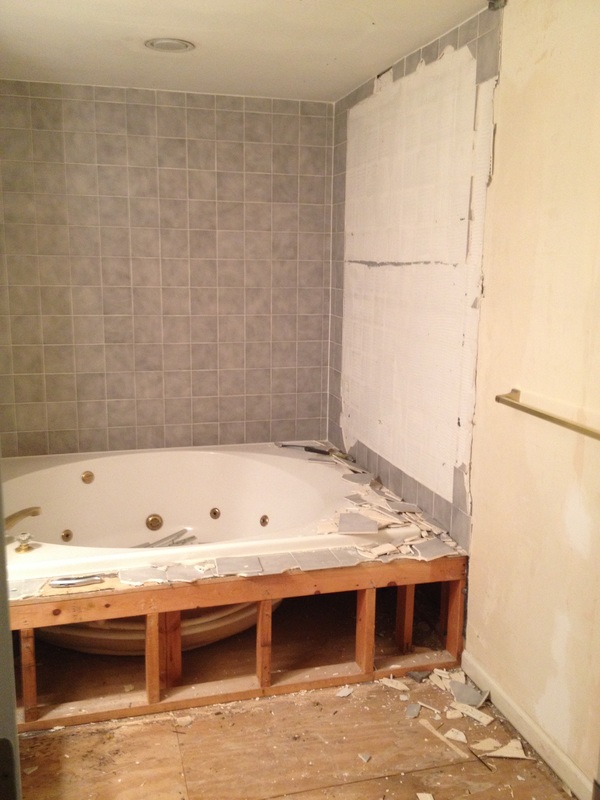 First on the list was to remove the old garden tub. Thanks to my awesome students, that was easily accomplished. Check! Next, we had to figure out some sort of layout. I went back and forth on this for a while, but finally decided to move the toilet across from where it was originally (and now behind the door), install a double vanity, have a smaller stand-up shower, and a relatively large closet (where the tub used to be). 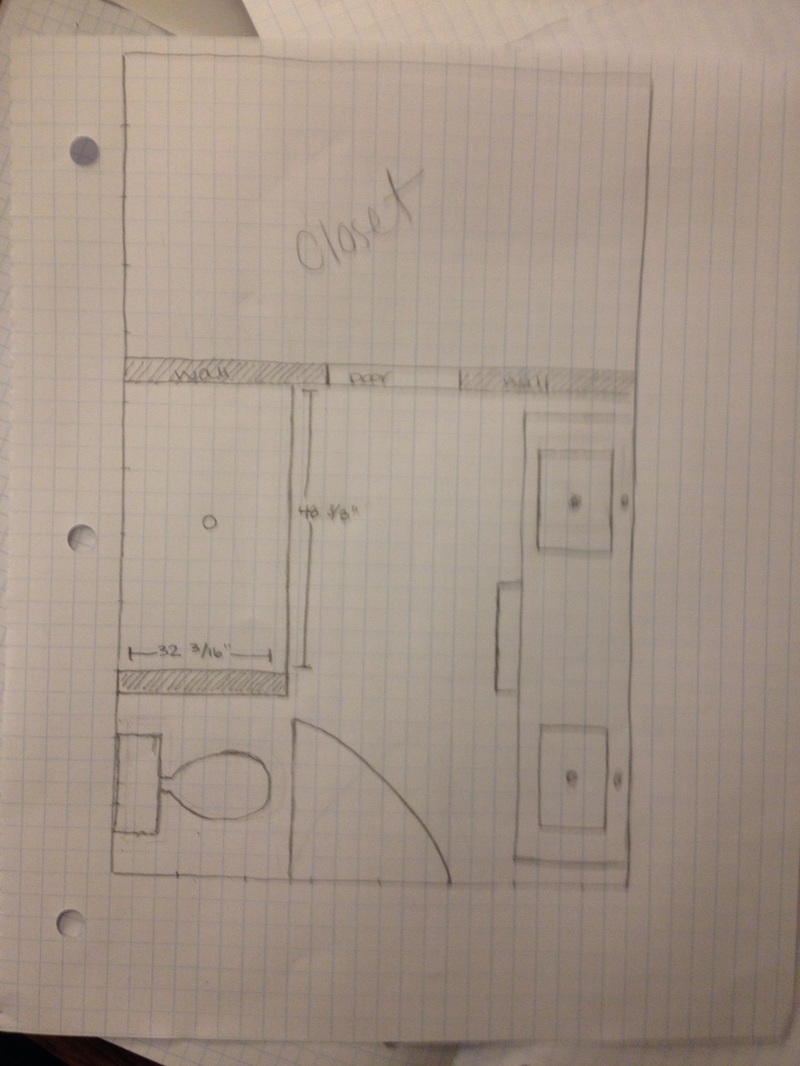 My dad was really the one who convinced me to go with a double vanity. He said, poignantly, it was better for resale. On a plus side, it could actually work in this space. The downside - the toilet is behind the door when it opens. Hopefully, however, no one is opening the door on you when you are using the golden throne! Since we gutted the bath, it was time to put it all back together. We now had my makeshift frame, so Brian and I put Terry to work to help us get the framing done. I was skeptical about putting the closet in the bathroom, however I'm really happy we decided to because it helped support the ceiling in the space. For real - framing up that wall alone raised the ceiling by about 2 inches! Yikes! 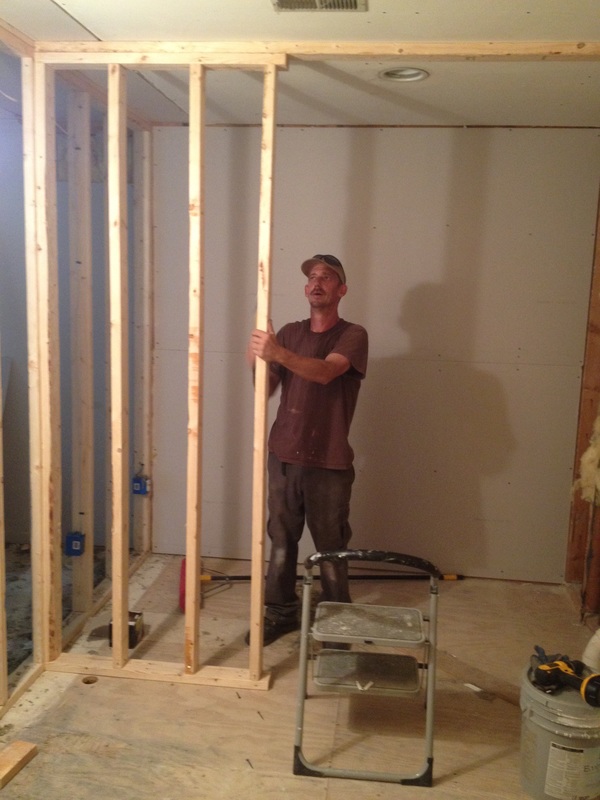 We were originally going to go with a pocket door (I bought the kit and framed the walls accordingly), however after some chats with my pops and his insistence on the walls being perfectly level (or else it is the worst experience in the world), I've decided that a barn door might work better. 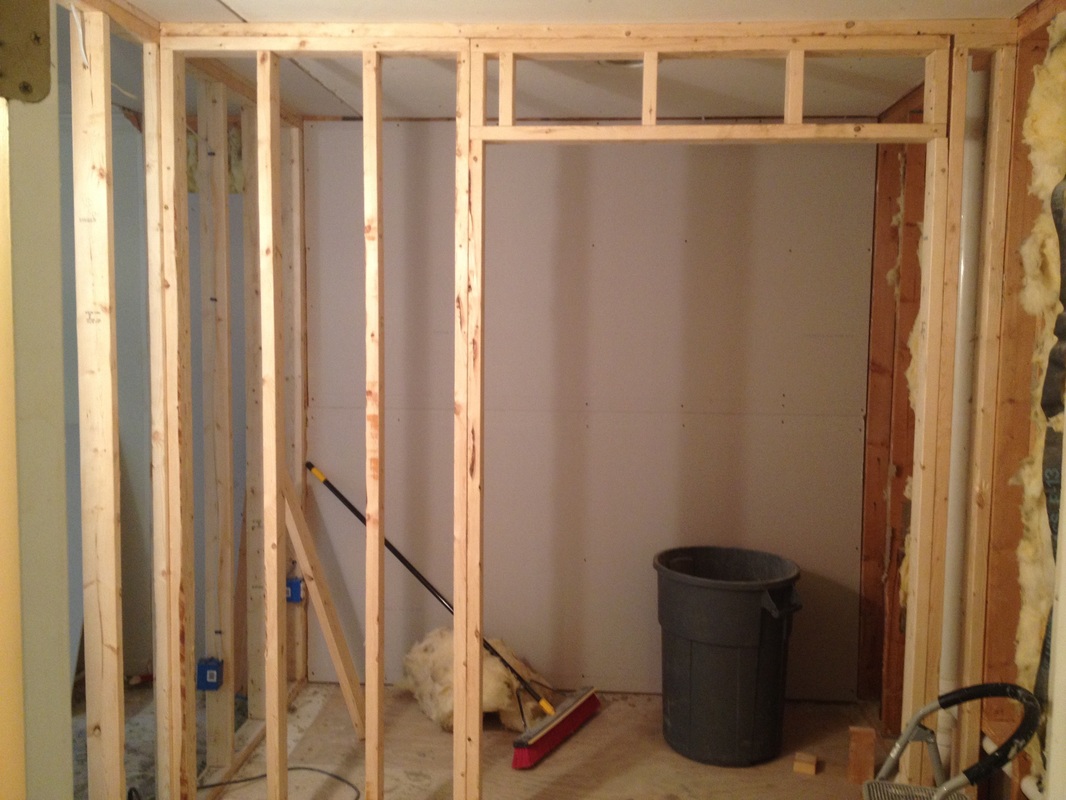 The bathroom stayed like this for about 2 months until the shower pan came in the mail. Tim-the-plumber then came in and replumbed the entire space. He moved the toilet from one side of the room to the other, and plumbed the right wall for my double sinks. (Tim also "forced" me to make my DIY double vanity so that he could get the measurements right.) Once he was satisfied that nothing would leak, Brian and I continued framing in the shower. 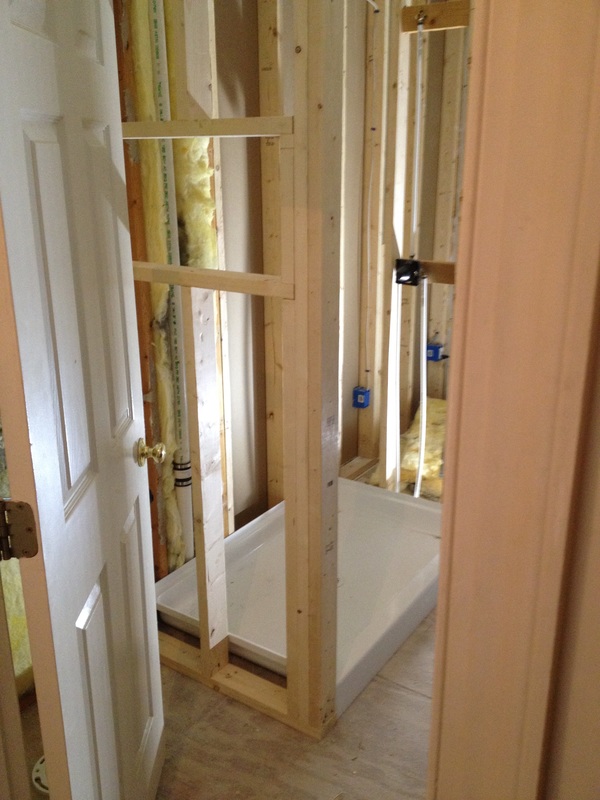 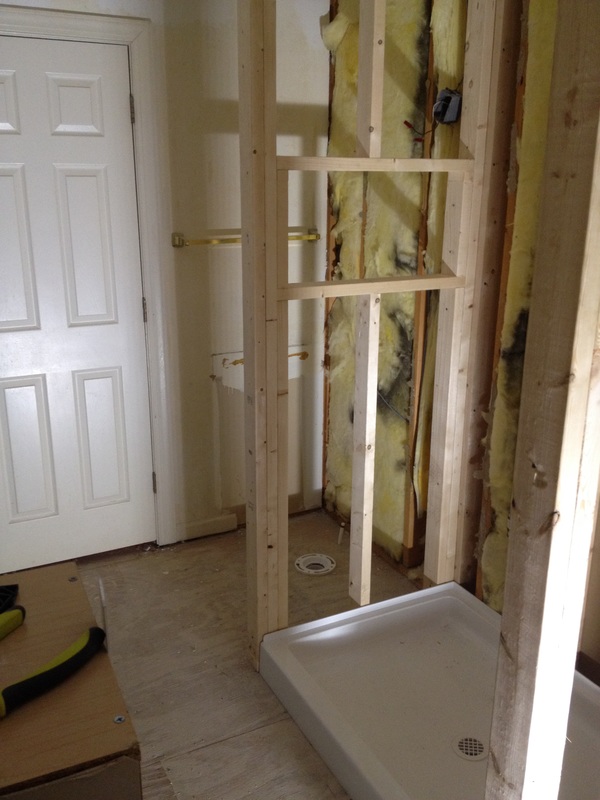 Below is a view from the toilet area, looking at my almost finished DIY double-vanities. 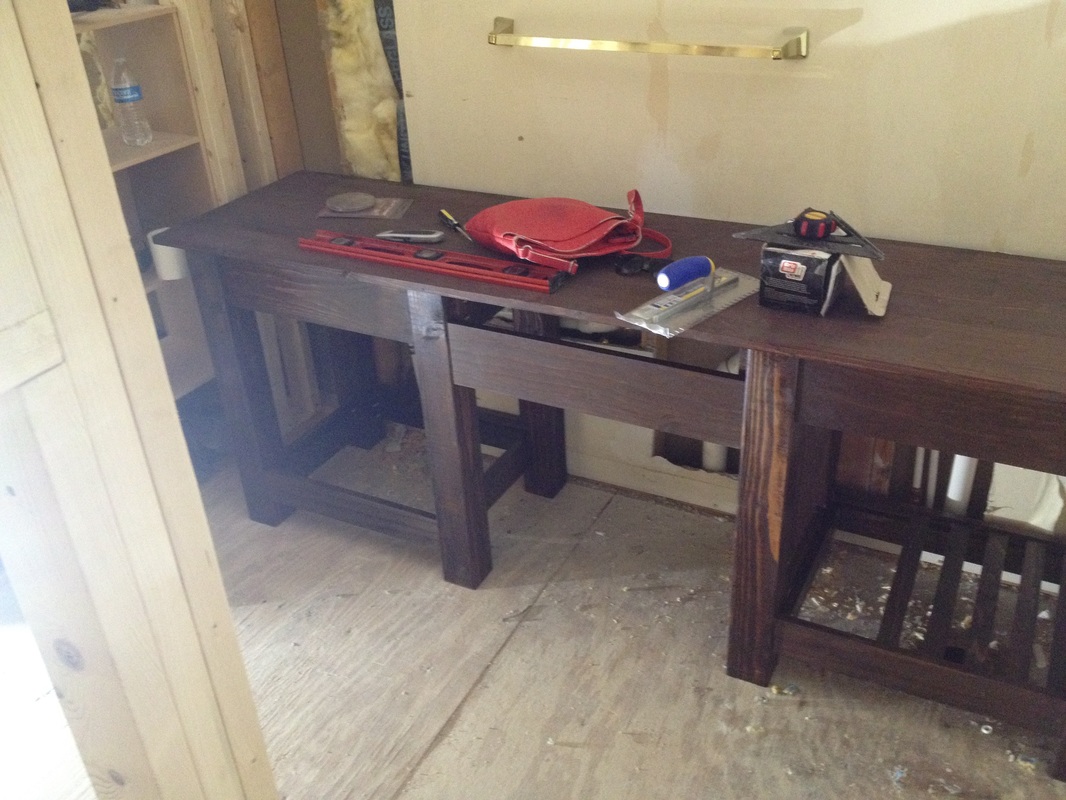 My only regret in the entire bathroom experience is that we stupidly didn't lay luan down before framing up the walls. Oh well. You live and you learn!
Just like everything else in this house, the design for the Master Bathroom has gone through some changes - basically everyday. I have ordered and reordered shower pans. I have laid out and then redesigned the layout about six times. Through it all, I have finally decided to stick with my final plan, which includes a double vanity with makeup station, a relocation of the toilet (next to the shower), and a 32" X 48" shower. See blurry picture below: 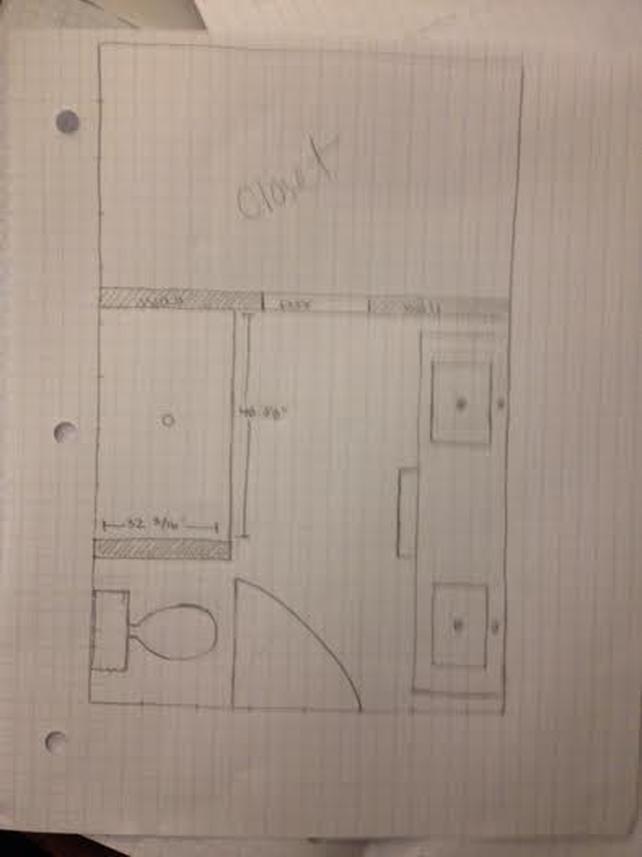 To his credit, my dad really helped me design the bathroom (thanks dad!). The biggest hiccup, though, with this design is the amazing neverthoughtidbesolucky double vanity. One word: Expensive. Now, most people know I am a pretty frugal person, so when I started researching double vanities, I was blown away at home much they cost! Anywhere from $1500 to upwards of $3000 - for basically cabinets and a countertop! Yikes! It took me all of about five minutes to realize that I was going to have to build this one on my own. I actually feel like this is the better way of doing this particular vanity anyways, given the odd size of the space (87.5"). After Pinteresting and Googling and searching odd blogs, I found a vanity look that I really like. I even found some plans on Ana White's amazing building blog, as well as many inspirational pieces that helped me design my particular vanity. The picture below really set me on my journey that I could, in fact, do this. Remember - I am not a carpenter, nor have I really even built anything before (unless Ikea counts). 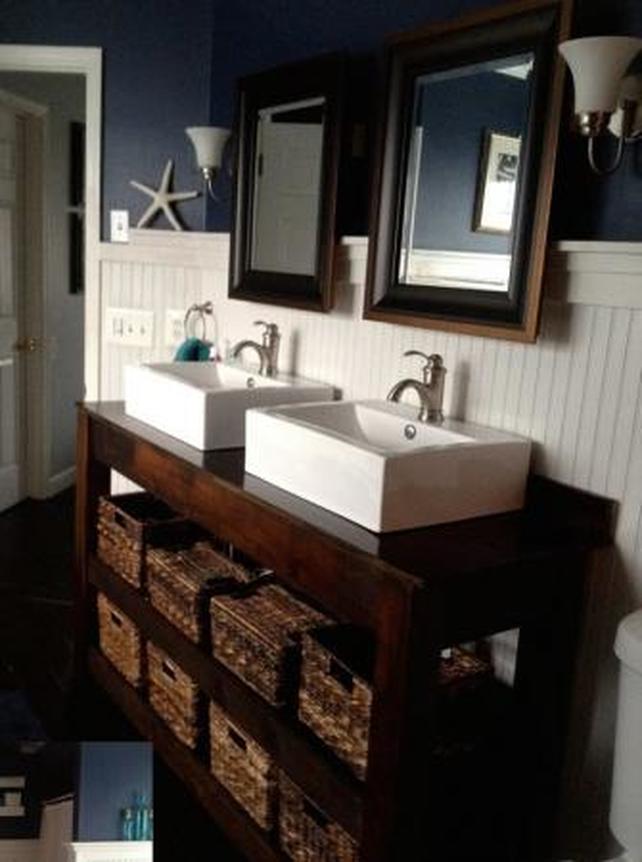 I've honestly never been a huge fan of vessel sinks, mostly because I think they just get in the way and can collect dirt and dust around the edges of the sink, however I do love their look here, Bonus - the only holes I would have to drill for the sink are for the plumbing. So, after finding my inspiration, I started drawing. 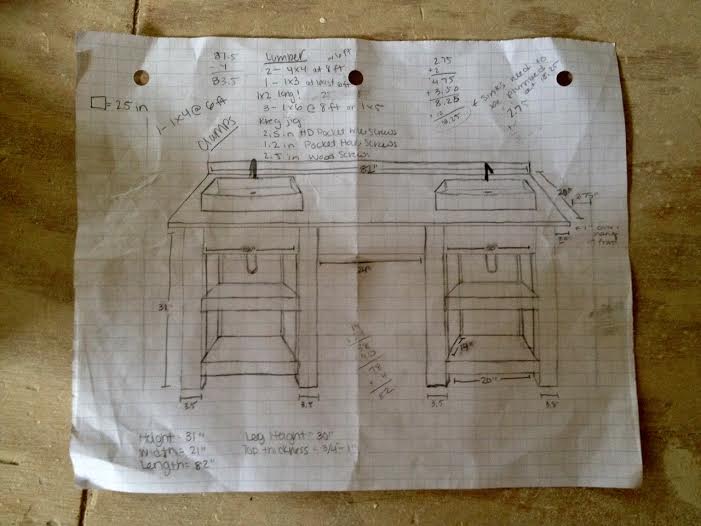 I do like the simplicity of one table, as with my inspiration picture, however after sending multiple plans to my family (and talking to my dad about resale), they all said to go with this one. Double vanities in general get potential homebuyers excited, but throw in a makeup station and they'll get even more giddy. I designed my vanity to be roughly 31" tall, however in reality it will be about 30.75". I know my mom is having a heart attack right now about the height (we are a very tall family), however to create a makeup station (i.e. a table that you sit at), the vanity had to be slightly shorter that the average tall person would prefer. To make up for the lacking inches (see what I did there...????), the vessel sinks I have researched range anywhere from 5-6" tall. This should make the total height roughly 36". So, after searching the "brag posts" on Ana White's website for the DIY Farmhouse Vanity, I stumbled upon Anthony's version of the plans, posted on Wholesteading's blog. I can honestly say that without these detailed plans, I'm not sure if the build would have gone as well as it did! Anthony's vanity is below: 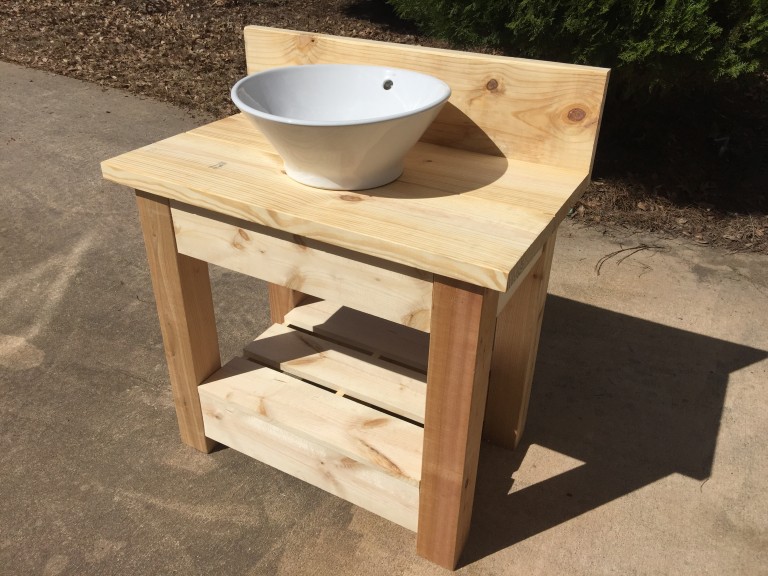 I took Anthony's idea of a single vanity, resized it to fit my needs, and then created two. I started by going to Lowe's and searching for my lumber. Unfortunately, I had the same issue arise as Anthony, in that Lowe's did not carry 4X4 pine posts, only cedar. (Needless to say, my house was smelling great.) I had also intended to go to Lowe's and buy everything except for the countertop, something I assumed I would deal with later, however, on clearance for $33, I found a 20" X 8' piece of spruce, almost exactly the size countertop I would need! Yippie! 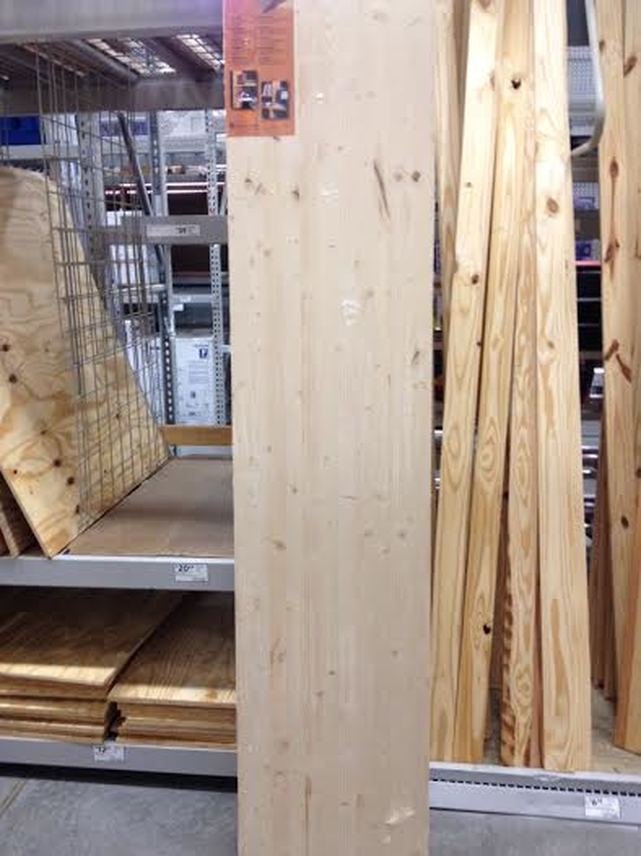 In total, with my Lowe's 10% off moving coupon, purchase of my new Kreg Jig (complete with a free box of 500 count 1.25" pocket hole screws), and all the lumber I could possibly need, my grand total came out to just about $300. Much nicer than that original $1500 vanity! I started building around 4:00 pm and didn't finish for the night until around 10. Brian ventured over after work and helped a bit, too! I started back up again the next day and finished the project. The project, not including staining or polyurethane, took about 2 days, but if I had started earlier in the day on Saturday, I definitely could have completed both vanities in one day.  Cut the eight cedar posts to 30" Make sure to look at each post and determine which side you want facing the front. There are definitely good sides and bad sides to each piece of lumber, so be very careful to choose the best side! I even labeled each post on the bottom as "Right Front V1" (for Vanity 1) or "Left Back V2" (for vanity two). 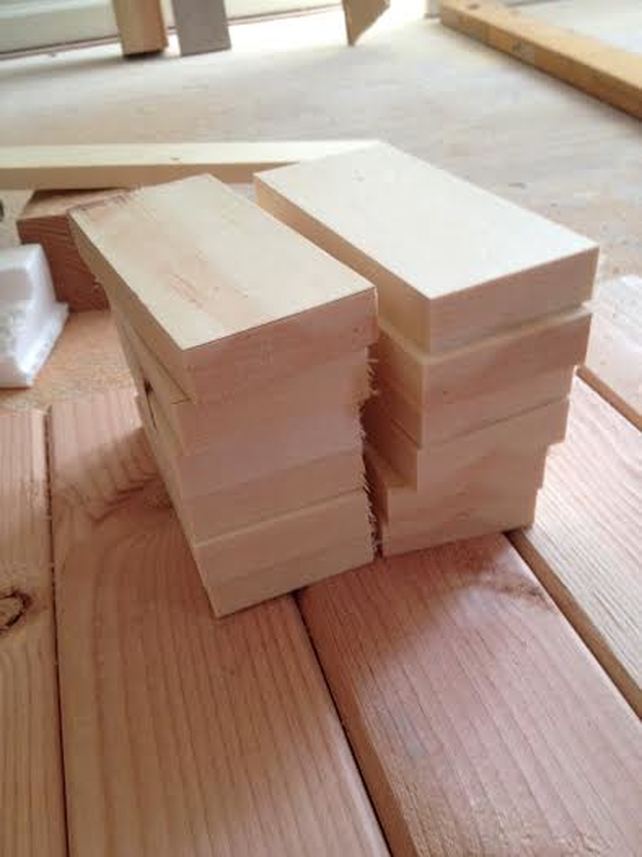 1X3s cut to 5.5" 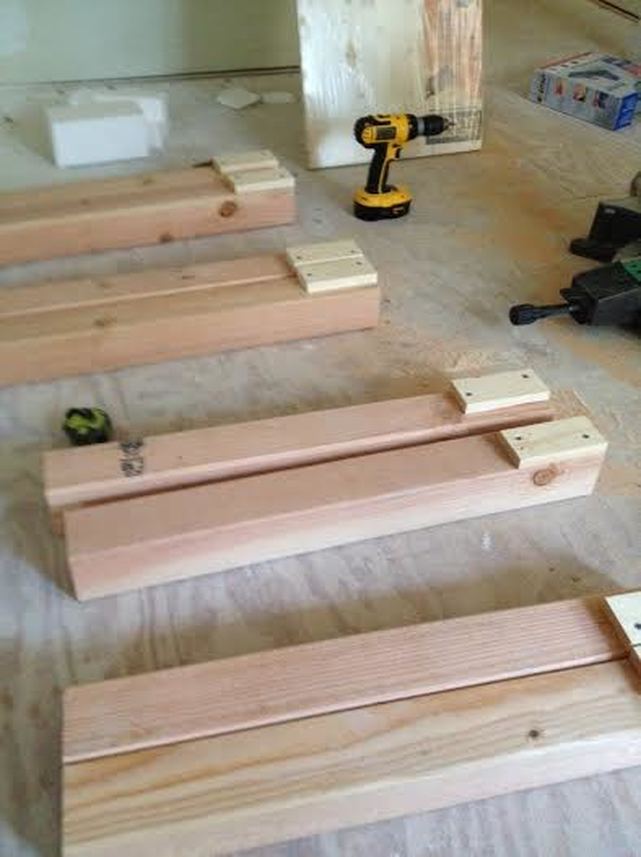 1X3s attached to cedar posts I made sure to pair my Right V1s, Left V1s, Right V2s, and Left V2s together so I attached the blocking at the correct spot! 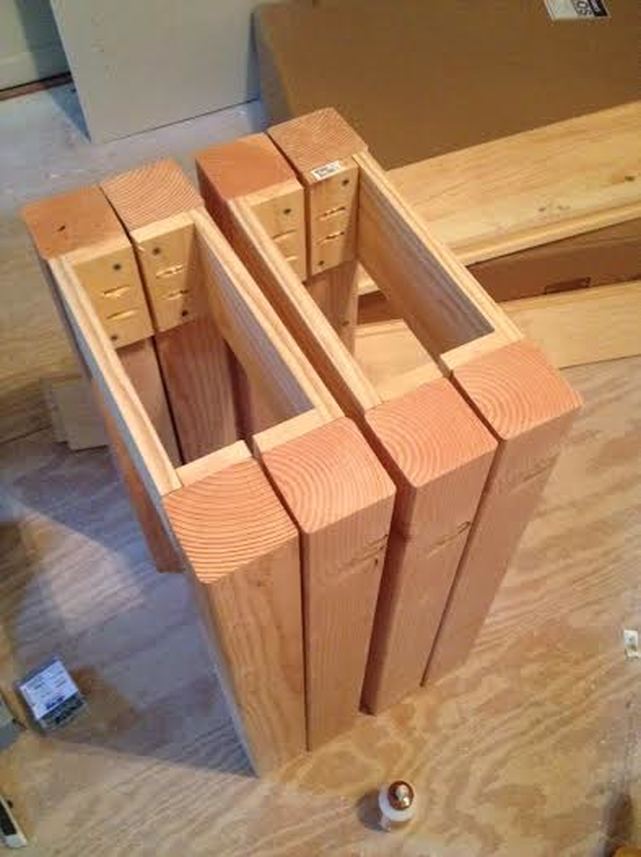 Attached the 12" 1X6 boards 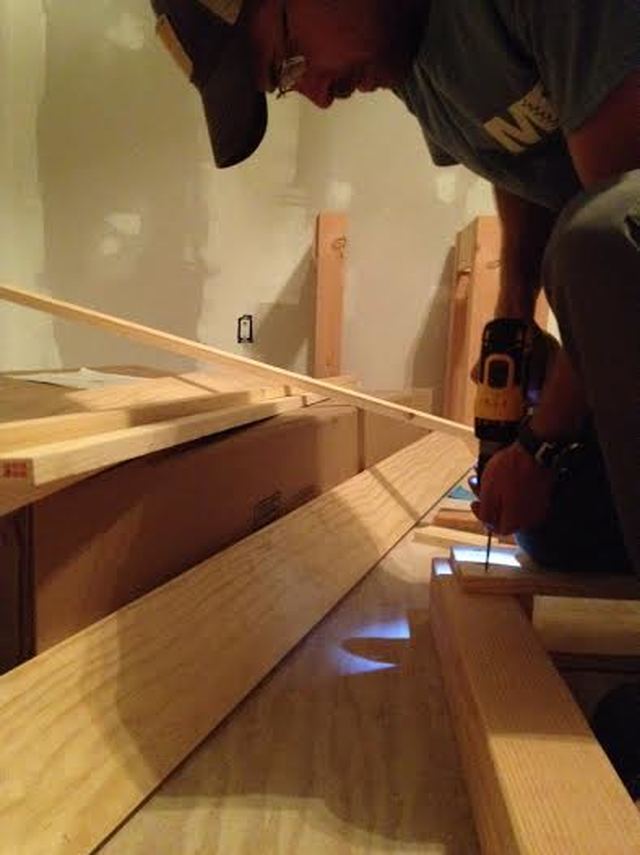 Brian helping me attach the inside supports 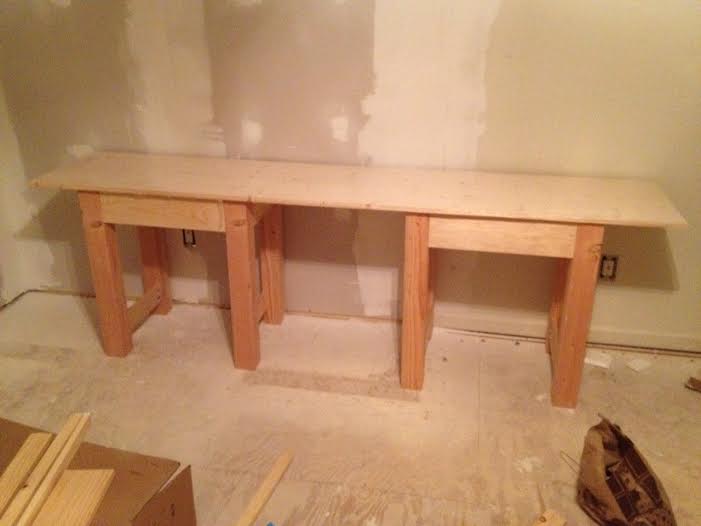 Day 1 complete! The vanity looks more like a workbench at this point, but it's getting there! (Remember, the top will not be attached until the vanities are installed - probably sometime in 2018). The start of Day 2 began with me adding braces to the outside of each vanity, were I will attach another 1X6 across the top of the makeup station (for unity of the piece and to attach the two vanities to each other). 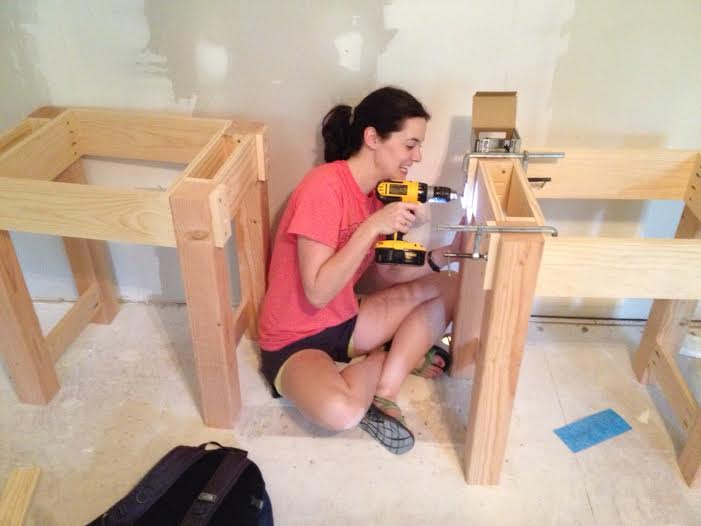 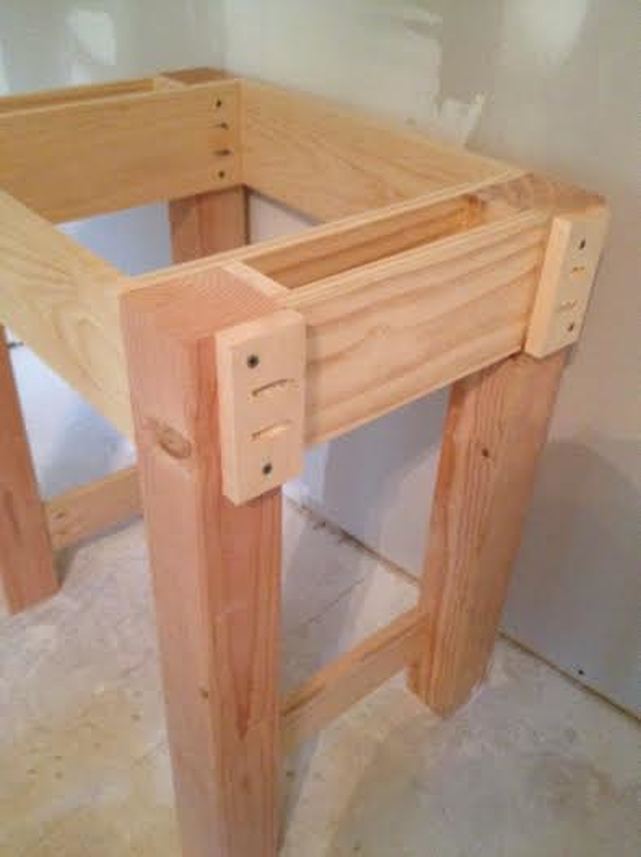 I then attached 1X4s to frame the lower shelf, and then attached 1X3s to the inside of those with a nail gun. The 1X3s will act as mini shelves for the 1X2 slats to sit on. 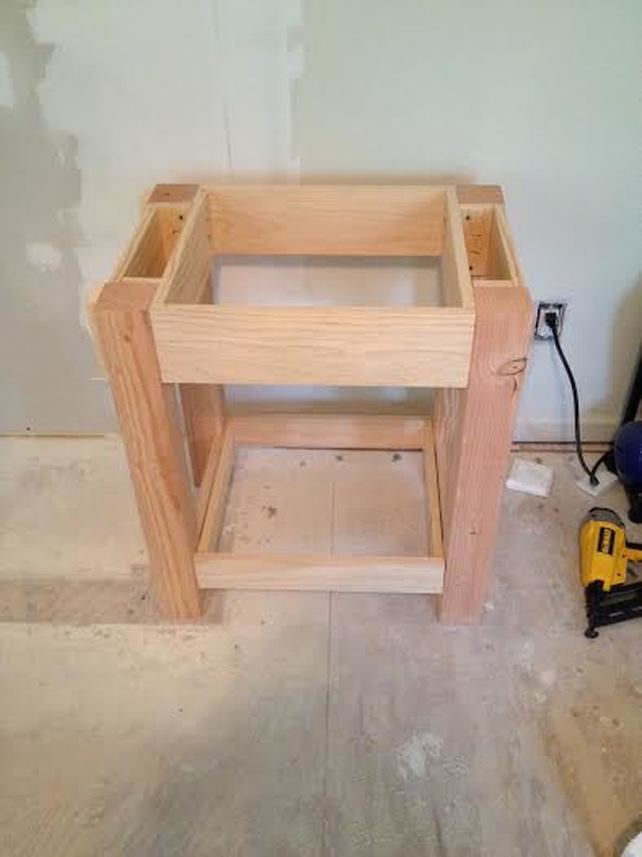 Finally, I added lots of pocket holes to the top 1X6 so I have something to attach the countertop to. That was really the last piece of "building" I had to do (at least for now). Next, it was on to staining! Brian picked out the stain - Minwax English Chestnut. So beautiful! 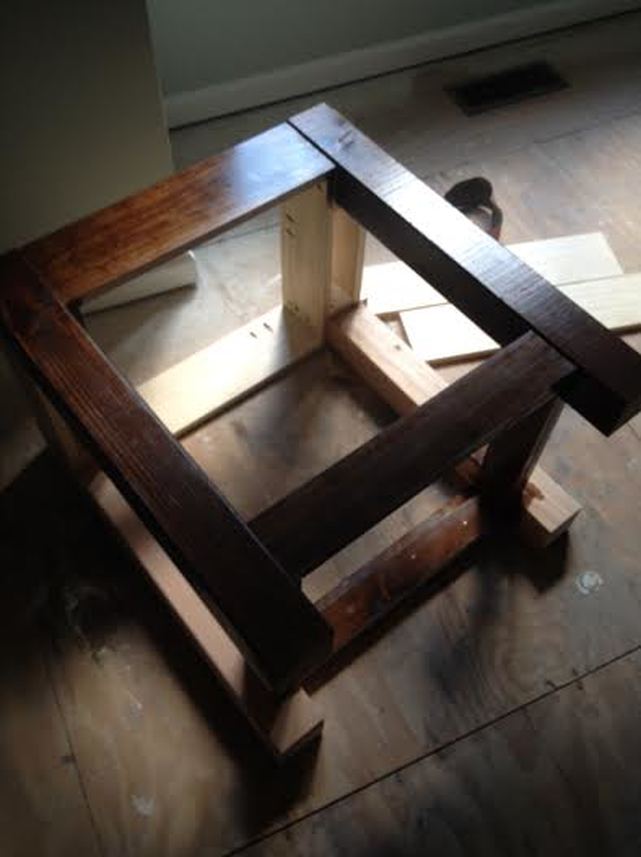 I stained the 1X2 slats while they were still one long 6' piece. I read in the comments section on Ana White's blog that it would go much faster this way - and I agree. I did not, however, apply the top coat while it was still one piece.... I was just too excited to see what the bottom shelf looked like and I had to cut it into little pieces! At this point, I still needed to buy one more 6' piece of 1X2s. Each vanity uses 2 - 6' pieces, but I originally only bought 3 instead of 4. Whoops! 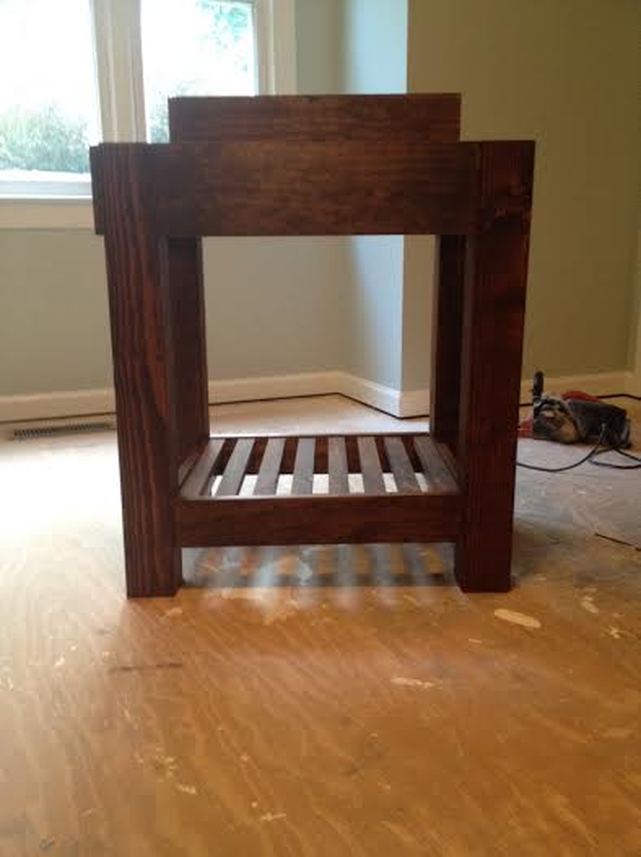 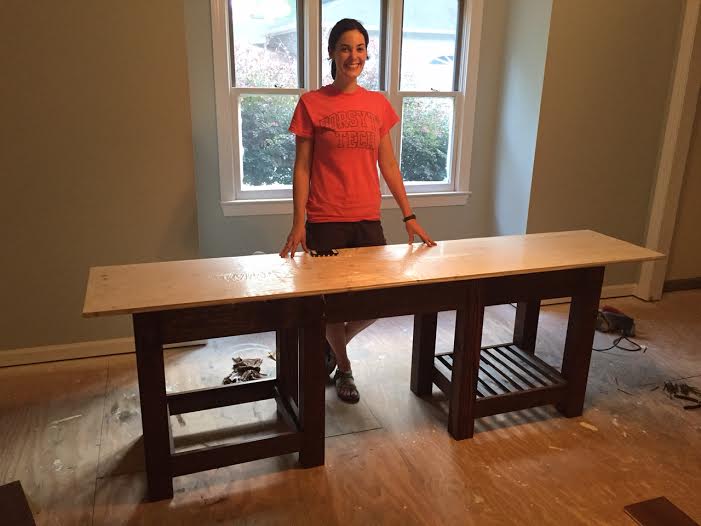 The vanities aren't actually attached (the middle 1X6 is just lodged in between them), and obviously the top isn't stained yet.... and the second vanity is still missing its bottom shelf, but I'm almost there! 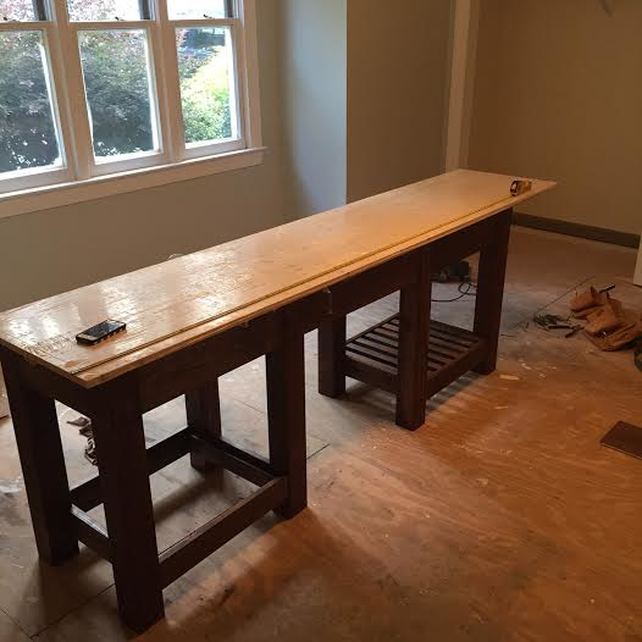 Where the measuring tape stops is exactly 82", or the actual length of my countertop! I've now taken the top back to Lowe's and had them cut it to size. From there, I stained the top..... but it did NOT come out how I expected it to. It. Was. Terrible. The top originally turned out very red. This is not how I imagined my "rustic-y" vanity. The picture below really doesn't do it justice. 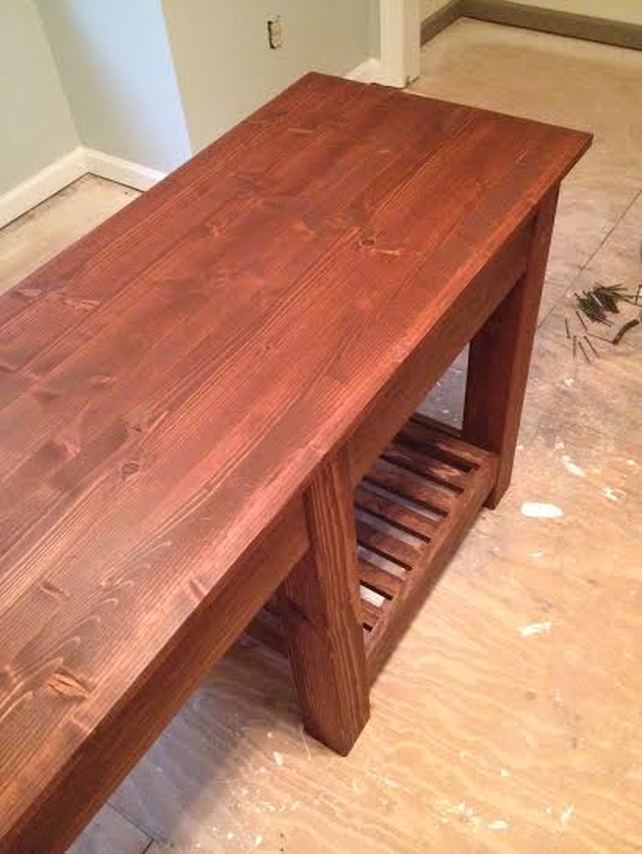 Since you can layer stain, I went ahead and added a second coat, which turned out dark red-brown. YUCK. 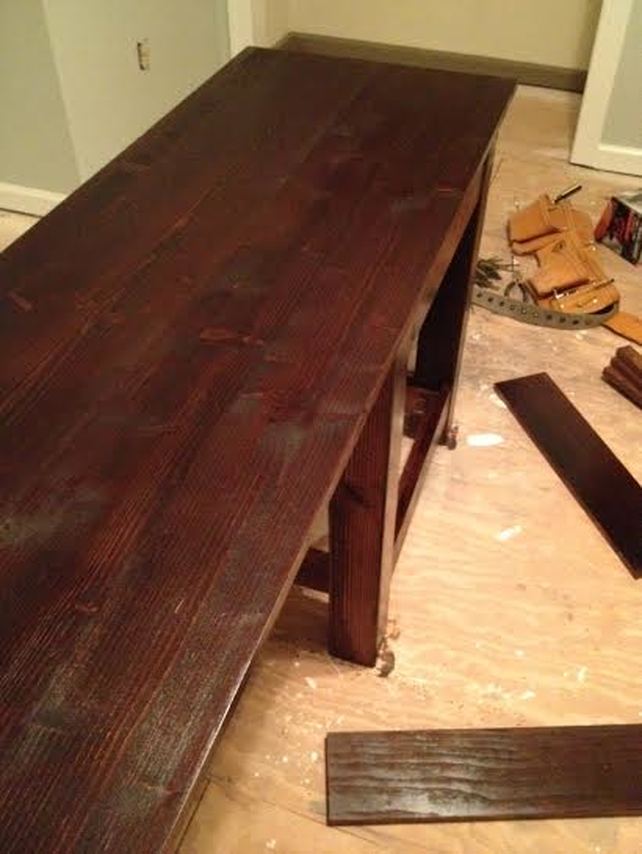 Thank the lord I did not stain the underside, because my tabletop was looking like a disaster. I decided to flip it over and try again, and I am so happy I did. The end result is below. 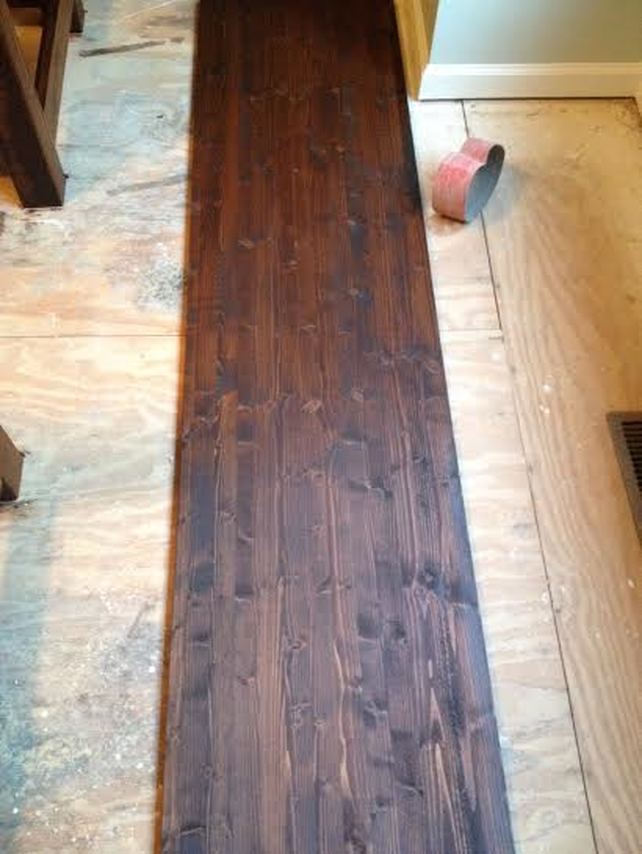 Much better! Now, I need to polyurethane the entire vanity, buy some vessel sinks, and maybe install a floor in the master and I'll be ready to actually use these things! Whew! 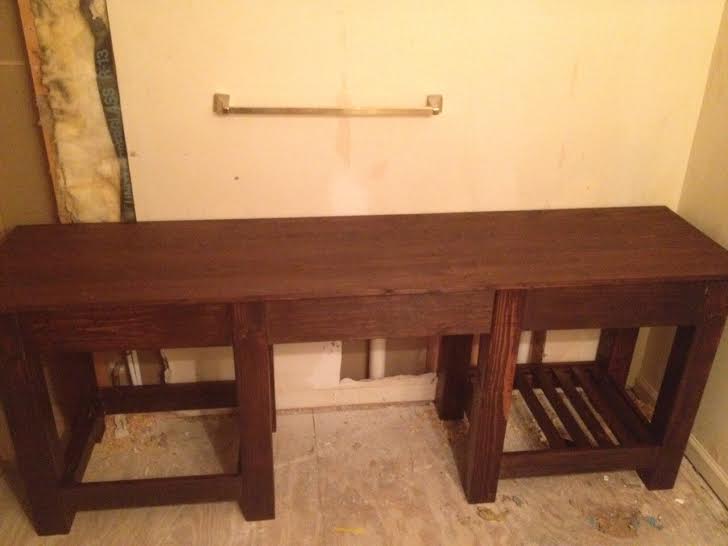 Almost there! Just need some drywall, sinks, and floor! Well friends, my first project is officially (kind of) complete! Although this probably shouldn't have taken this long, it's okay because I think the result is great! First, let's recap what the first floor bathroom used to look like: 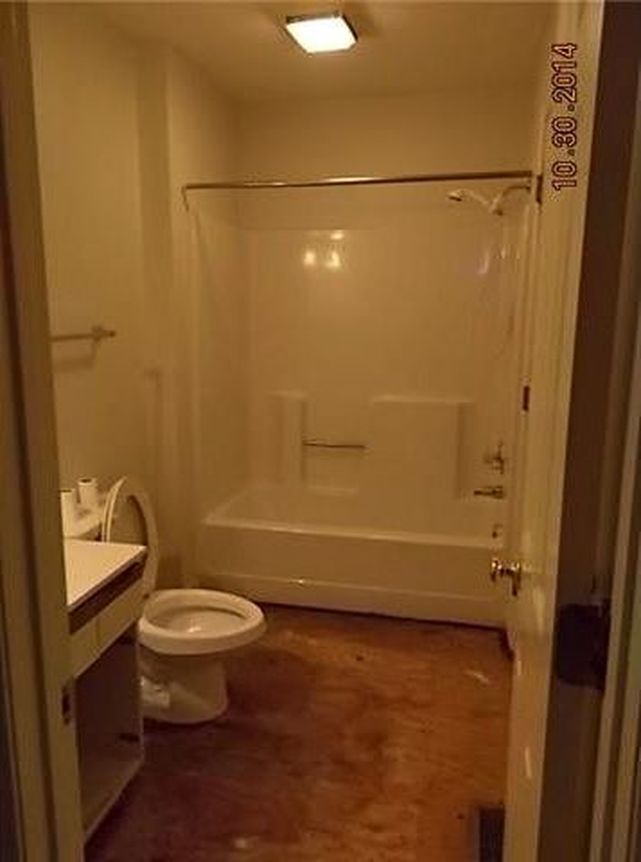 Brian and I then went to Lowe's (I know, Home Depot - I miss you too), and found something a little different - groutable vinyl tile. It didn't match the vanity top either (big surprise), but it was my favorite looking tile by far and Brian's favorite as well. Terry-the-painter-turned-decorator also told us that if the tile didn't match the top, just match the paint to the tile, and that the vanity top should be neutral enough to go with anything. True dat Terry. True dat. After a long debate about if we should use vinyl or not, we went with it, and I think the results are amazing! Bonus - I was able to install and grout the tile all by myself! BOOM! You can't really notice the terriblegrossrottingfloorunderthetoilet in this picture, however you can admire my 30-in tall melamine cabinets! After we repaired the subfloor, I attempted to remove the wallpaper - but failed. It. Would. NOT. Come. Off. So, my philosophy was if it wanted to stay - it will stay. Terry-the-painter told me not to worry - a little oil primer over the entire surface and spackle on the joints should seal the wallpaper to the walls, so let's hope he is right! After we primed and spackled the joints, it was decision time on the floor tile. This is really what held up the bathroom for so long. I probably took home about 20 floor tiles trying to match something to the vanity top. The tiles were either too dark or too light, too busy or too boring, too brown or too pink... you get the idea. 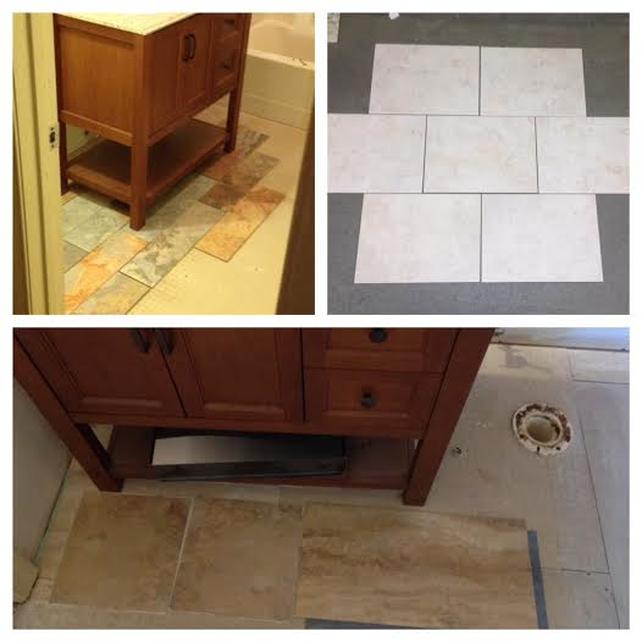 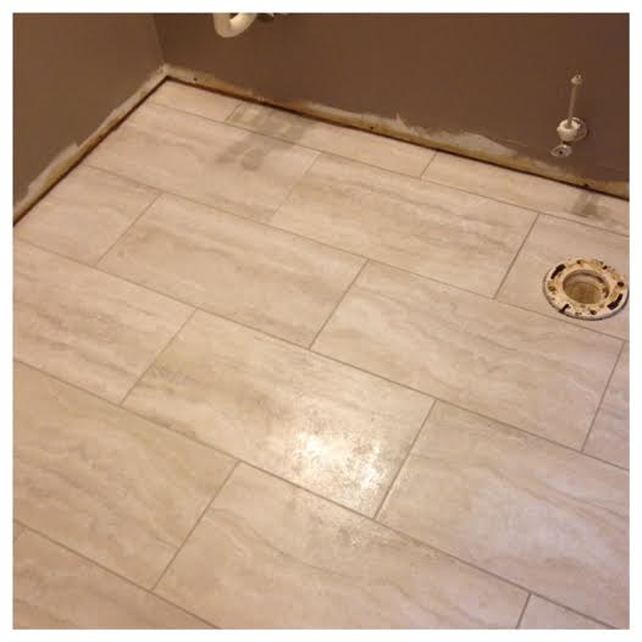 Look at those perfectly cut tiles and straight grout lines! #Mathintherealworld Finally, we reinstalled the floor molding (and did some molding repair), officially installed my vanity (found on clearance from the Depot), hooked up my new faucet, hung my new curved shower rod ($12 at Marshalls), and installed a new soft-close toilet. I still need a mirror, shower curtain, towel racks, etc., but as for the big stuff, I'd say this bathroom is complete! Hurray!  |

about meHi! I'm Lauren! I'm a twenty-something teacher and homeowner in North Carolina. I love math, decorating, and getting down and dirty learning new things about home renovation and repair. Categories
All
Archives
December 2018
|
 RSS Feed
